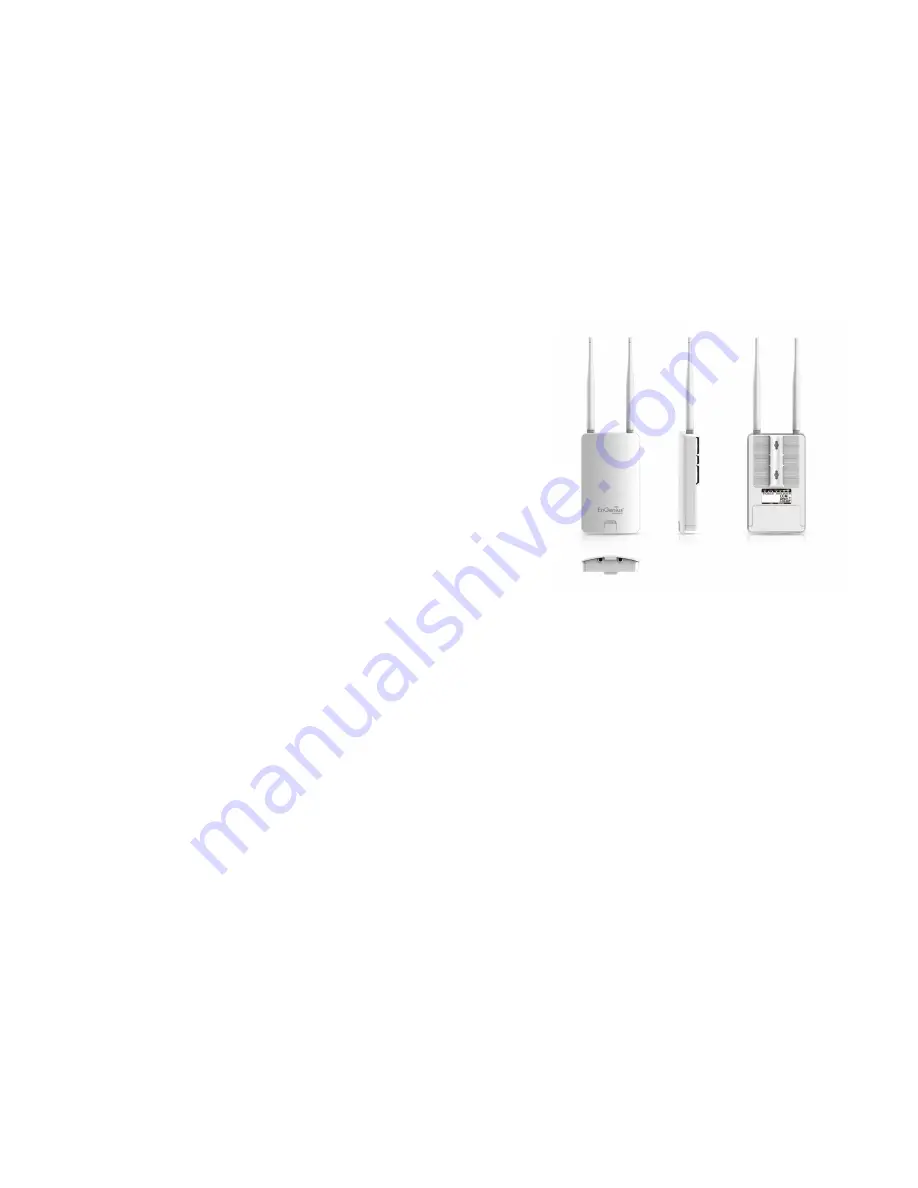
background image

8

Physical Interface

Dimensions and Weights
With Antenna:

100mm(4”)*37.5mm(1.375”)*205mm(8”)(W*D*H)

                            Weight: 242g

Without Antenna:

100mm(4”)*37.5mm(1.375”)*189mm(7.375”)               

                                  (W*D*H)
                            Weight: 275g

  1 

2.4 GHz Antennas: 

Detachable 5 dBi 2.4 GHz Omni-ENS202EXT 

only

  2 

LAN Port (Proprietary 24V PoE Input)

: Ethernet port for RJ-45 

cable.

  3 

LED Indicators: 

LED lights for Power, LAN Port, 2.4 GHz 

Connection 

  4 

Mounting Holes:

 Using the provided hardware, the ENS202EXT 

can be attached to a wall or pole.

Physical/Environment Conditions

Operating:
 

Temperature: -4 °F to 158 °F (-20 °C to 70 °C)


Humidity (non-condensing): 0%~90% typical

Storage: 
 

Temperature: -40 °F to 176 °F (-40 °C to 80 °C)


Humidity (non-condensing): 0%~90% typical

Summary of Contents for ENS202EXTv2

Page 1: ...User Manual Business Solutions N300 2 4GHz Outdoor AP ENS202v2 ENS202EXTv2 version 1 0 ...

Page 2: ...2 IMPORTANT To install this Access Point please refer to the Quick Installation Guide included in the product packaging ...

Page 3: ...rview 26 Connection 29 Chapter 6 Network 31 Basic IP Settings 32 Spanning Tree Protocol Setting 33 Chapter 7 2 4 GHz Wireless 34 Wireless Settings 35 2 4 GHz Wireless Network 36 Wireless Security 39 Fast Roaming 42 Wireless Traffic Shaping 44 Wireless MAC Filteing 43 Guest Network Settings 45 RSSI Threshold 46 Manegement VLAN Settings 47 Chapter 8 Management 48 Advanced Settings 49 CLI SSH HTTPS S...

Page 4: ...4 Chapter 1 Product Overview ...

Page 5: ...le Introduction ENS202 ENS202EXT supports Power over Ethernet and Power by Adapter capabilities which allow the device to be installed easily in nearly any indoor or outdoor location Also ENS202EXT provides not only detachable antenna connectors for antenna upgrade but also high output power and high sensitivity can extend the transmisson range to deliver a stable wireless connection ENS202EXT int...

Page 6: ...g systems Web Browsing Application i e Internet Explorer Firefox Safari or another similar browser application Package Contents The ENS202 ENS202EXT package contains the following items ENS202 ENS202EXT Access Point 2 detachable 5 dBi 2 4 GHz Omni Antenna ENS202EXT only PoE Adapter 24V 0 6A Wall Mount Kit Screw set Adhensive Label Pole Mount kit Cable Tie 2 Quick Installation Guide all items must ...

Page 7: ...2 11b g n on 2 4 GHz IEEE802 3u 100BASE TX IEEE802 3 10BASE T Operation Modes Access Point Client Bridge WDS WDS Detail WDS AP WDS Bridge WDS Station Management Auto Channel Selection Multiple SSID 8 SSIDs per Radio BSSID SNMP V1 V2c V3 MIB I II Private MIB VLAN Tag VLAN Pass through Clients Statistics Save Configuration as User Default Fast Roaming E Mail Alert RADIUS Accounting Guest Network Con...

Page 8: ...only 2 LAN Port Proprietary 24V PoE Input Ethernet port for RJ 45 cable 3 LED Indicators LED lights for Power LAN Port 2 4 GHz Connection 4 Mounting Holes Using the provided hardware the ENS202EXT can be attached to a wall or pole Physical Environment Conditions Operating Temperature 4 F to 158 F 20 C to 70 C Humidity non condensing 0 90 typical Storage Temperature 40 F to 176 F 40 C to 80 C Humid...

Page 9: ...9 Chapter 2 Before You Begin ...

Page 10: ...r system 1a Click the Start button and open the Control Panel 1b Move your mouse to the lower right hot corner to display the Charms Bar and select the Control Panel in Windows 8 OS 1c In Windows 10 click Start to select All APPs to enter the folder of Windows system for selecting Control Panel Computer Settings Windows XP Windows 7 Windows 8 Windows 10 ...

Page 11: ...he Network and Internet section then select Change adapter settings 3 RightclickonLocalAreaConnectionandselectProperties 4 Select Internet Protocol Version 4 TCP IPv4 and then select Properties 5 Select Use the following IP address and enter an IP address that is different from the Access Point and Subnet mask then click OK ...

Page 12: ...12 Note Ensure that the IP address and Subnet mask are on the same subnet as the device For example ENH220EXT IP address 192 168 1 1 PCIPaddress 192 168 1 2 192 168 1 255 PC Subnet mask 255 255 255 0 ...

Page 13: ...ion 3 Highlight Ethernet 4 In Configure IPv4 select Manually 5 Enter an IP address that is different from the Access Point and Subnet mask then press OK Note Ensure that the IP address and Subnet mask are on the same subnet as the device For example ENH900EXT IP address 192 168 1 1 PCIPaddress 192 168 1 2 192 168 1 255 PC Subnet mask 255 255 255 0 6 Click Apply when done ...

Page 14: ...rnet cable into the LAN port of the PoE adapter and the other end to the Ethernet port on the computer 4 Screwontheprovidedantennastothetopofthisdevice Note The AP Bridge should ONLY be powered via Ethernet cable connected to the included PoE Adapter This diagram depicts the hardware configuration Note The AP Bridge should ONLY be powered via Ethernet cable connected to the included PoE Adapter Ha...

Page 15: ...ENS202EXT Using the provided hardware the ENS202EXT can be attached to a wall or a pole The height should not exceed 2 meter 1 Wall Mounting Kit Anchors Φ5 5 18mm Bolts Φ8 25mm 2 Pole Mounting Strap Φ66 12 6 mm Anchors Bolts ...

Page 16: ...the markings of the label C Remove the label and screw the anchors unto the holes until they are flush with the wall D Screw the included screws into the anchors Place the AccessPointagainstwallwiththemountingscrewheads To attach the ENS202EXT to a pole using the provided pole mounting kit A Thread the open end of the Pole Strap through the two tabs on the Pole Mount Bracket B Lock and tighten Pol...

Page 17: ...17 Chapter 3 Configuring Your Access Point ...

Page 18: ...i Chrome and enter the IP Address http 192 168 1 1 Note If you have changed the default LAN IP Address of theAccessPoint ensureyouenterthecorrectIPAddress 2 The default username and password are admin Once you have entered the correct username and password click the Login button to open the web base configuration page The model name will be varied by different models 3 If successful you will be lo...

Page 19: ...19 Chapter 4 Building a Wireless Network ...

Page 20: ...operating modes for outdoor Access Points Access Point Mode InAccessPointMode APbehaveslikesacentralconnectionforstationsorclientsthatsupportIEEE802 11ac a b g nnetworks The stations and clients must be configured to use the same SSID Service Set Identifier and security password to associate with the AP The AP supports up to eight SSIDs at the same time for secure access AP Access Point Client Cli...

Page 21: ...e capability of their internal high gain directional antennas resulting in a very cost effective solution to expand a company network over a multiple building campus AP Access Point AP Client Bridge ENH202 Client Bridge ENH202 Client Bridge ENH500 Client Bridge Client Client Client Client Client Client Client Client Client Client Client 2 4 GHz 5 GHz 5 GHz 2 4 GHz Switch Switch Internet ...

Page 22: ...g WDS technology In this mode configure the MAC addresses or SSIDs in both Access Points to enlarge the wireless area by enabling WDS Link settings WDS supports up to four 4 AP MAC addresses and four 4 SSIDs at the same time AP WDS AP AP WDS AP 2 4 GHz 2 4 GHz 5 GHz 5 GHz Client Client Client Client Client Computer Client Computer ...

Page 23: ...er The best solution is to use the Access Point to wirelessly connect two wired LANs as shown in the following diagram WDS Bridge Mode can establish up to four 4 to eight 8 WDS links creating a star like network Note WDS Bridge Mode does not act as an Access Point Access Points linked by WDS are using the same frequency channel More Access Points connected together may lower throughput AP WDS Brid...

Page 24: ...A mode expands the WDS by receiving a wireless signal service and sharing it through the Ethernet port With WDS STA mode Access Point WDS AP on both 5 GHz or 2 4 GHz Access Point WDS Station Access Point WDS Station Access Point WDS Station ...

Page 25: ...25 Chapter 5 Status ...

Page 26: ... be varied by different models Device Status Clicking the Device Status link under the Overview menu shows the status information about the current operating mode The Device Information section shows general system information such as Device Name MAC Address Current Time Firmware Version and Management VLAN ID Note VLAN ID is only applicable in Access Point WDS AP or WDS BR mode The model name wil...

Page 27: ...mary DNS Address Secondary DNS Address status of DHCP client and status of Spanning Tree protocol STP The Wireless LAN Information 2 4 GHz section shows wirelessinformationsuchasOperatingMode Frequency and Channel Since this Access Point supports multiple SSIDs information about each SSID the ESSID and security settings are displayed Note Profile Settings are only applicable in Access Point and WD...

Page 28: ...28 The Statistics section shows Mac information such as SSID MAC address RX and TX ...

Page 29: ...Hz GHz WDS Link List Click the connection link under the Overview menu This page displays the current status of the WDS link including WDS Link ID MAC Address Link Status and RSSI Note Only applicable in WDS AP and WDS Bridge modes Realtime The Realtime section contains the following options CPU Loading 3 minutes CPU loading percentage information it displays current loading average loading and pe...

Page 30: ...peak time Realtime Connection Pkts Overview on current active network connections It displays UDP and TCP packets information and other connection status UDP connections curve is in blue TCP connection curve is in green others curve is in red Below of chart shows connections source and destination ...

Page 31: ...31 Chapter 6 Network ...

Page 32: ...ress field or be obtained automatically when the device connects to a DHCP server IP Address The IP address of this device Subnet Mask The IP Subnet mask of this device Gateway The Default Gateway of this device Leave it blank if you are unsure of this setting Primary Secondary DNS The primary secondary DNS address for this device Save Click Save to confirm the changes Basic IP Settings ...

Page 33: ...re Bridged Local Area Network Max Age Specifies Bridge Max Age in seconds If another bridge in the spanning tree does not send a hello packet for a long period of time it is assumed to be inactive Forward Delay Specifies Bridge Forward Delay in seconds Forwarding delay time is the time spent in each of the Listening and Learning states before the Forwarding state is entered This delay is provided ...

Page 34: ...34 Chapter 7 2 4 GHz Wireless ...

Page 35: ...ettings The model name will be varied by different models Device Name Enter a name for the device The name you type appears in SNMP management This name is not the SSID and is not broadcast to other devices Wireless ...

Page 36: ...broadcasting standard on 2 4GHz frequency bands ChannelHTMode Scrowdownthislisttoselectbandwidth for operating under a frequency band The default channel bandwidth is 20 MHz on 2 4GHz frequency radio Considering the different applications users can decide to implement a channel bandwidth to fulfill real applications The larger the channel the greater the transmission quality and speed Channel Clic...

Page 37: ...ault enable and multicast AP Detection AP Detection can select the best channel to use by scanning nearby areas for Access Points Distance Specifies the distance between Access Points and client devices The proper setting for this parameter may assist Access Points to avoid the improper operation when transmitting data under a filed application Save Click Save to confirm the changes or Cancel to c...

Page 38: ...first 2 4GHz SSID SSID Specifies the SSID for the current profile Hidden SSID Check this option to hide the SSID from clients If checked the SSID will not appear in the site survey ClientIsolation Clicktheappropriateradiobuttontoenable this function for allowing or preventing communication between client devices VLAN Isolation Restrict clients communicating with different VIDs by selecting the rad...

Page 39: ...39 Wireless Security The Wireless Security section lets you configure the AP s security modes Secuirty Mode Including WPA2 PSK WPA2 Enterprise We strongly recommend you to use WPA2 PSK mode ...

Page 40: ...ate Interval Specifies how often in seconds the Group Key changes The default value is 3600 Setting of WPA2 Enterprise Pre Shared Key Encryption Default is AES Please ensure that your wireless clients use the same settings Group Key Update Interval Specifies how often in seconds the Group Key changes The default value is 3600 Radius Server Enter the IP address of the Radius server Radius Port Ente...

Page 41: ...nter the IP address of the Radius accounting server Radius Accounting Port Enter the port number used for connections to the Radius accounting server Radius Accounting Secret Enter the secret required to connect to the Radius accounting server Interim Accounting Interval Specifies how often in seconds the accounting data sends Note 802 11n does not allow WPA2 PSK TKIP security mode The connection ...

Page 42: ...rise as well as to set the Radius Server firstly Users can enable the Fast Roaming and implement the advanced search Please also set the same enterprise Encryption under the same SSID on other Access Points and enable the Fast Roaming When the configuration is realized on different Access Point the mobile client devices can run the voice service and require seamless roaming to prevent delay in con...

Page 43: ...le in Access Point and WDS AP mode ACL Access Control List Mode Determines whether network access is granted or denied to clients whose MAC addresses appear in the MAC address table on this page Choices given are Disabled Deny MAC in the list or Allow MAC in the list MAC Address Enter the MAC address of the wireless client you wish to configure for Add Click Add to add the MAC address to the MAC A...

Page 44: ...affic Shaping per SSID Download Limit Specifies the wireless transmission speed used for downloading Upload Limit Specifies the wireless transmission speed used for uploading Per User Check this option to enable wireless traffic shaping per user function This function allow users to limit the maximum download upload bandwidth for each client devices on this SSID Save Click Save to confirm the chan...

Page 45: ...ch wireless network in the 2 4 GHzb g n frequencies IP address The IP Address of this device Subnet Mask The IP Subnet mask of this device Starting IP Address The first IP Address in the range of the addresses by the DHCP server Ending IP Address The last IP Address in the range of addresses assigned by the DHCP server WINS Server IP Windows internet name service server IP Address ...

Page 46: ...y share this information with other Access Points in the vincinity of that client to coordinate which of them should serve the client best RSSI Enter the RSSI Received Signal Strength Index in order to determine the handover procedure which the current wireless link will terminate RSSI is an indication of the power level being received by the antenna Therefore the higher the RSSI number the strong...

Page 47: ...o be physically located next to one another on the LAN Note Only applicable in Access Point and WDS AP modes Management VLAN If your network includes VLANs you can enable Management VLAN ID for packets passing through the Access Point with a tag Note If you reconfigure the Management VLAN ID you may lose your connection to this AP Verify that the DHCP server supports the reconfigured VLAN ID and t...

Page 48: ...48 Chapter 8 Management ...

Page 49: ...ils of the device Location Specifies the location of the device Port Specifies the port of the device Community Name Read Only Specifies the Name for the SNMP community for read only access Community Name Read Write Specifies the password for the SNMP community with read write access Trap Destination Port Specifies the port that will receive the SNMP traps IP Address Specifies the IP address of th...

Page 50: ...content securely The Hypertext Transfer Protocol over SSL Secure Socket Layer is a TCP IP protocol used by web servers to transfer and display web content securely Email Alert Status You can Enable to use the Email Alert feature to send messages to the configured email address when particular system events occur From To The email address of sender and recipent Note Do NOT use your personal email a...

Page 51: ... Password Enter the password for the email account that will be used to send emails SMTP Server Enter the IP address or hostname of the outgoing SMTP server Port Specifies the port of SMTP server Security Mode Selects the security mode SSL TLS or STARTTLS or None Apply To save setting and take effect ...

Page 52: ...and Time and check whether you wish to enter the IP address of an NTP server or use the default NTP server to have the internal clock set automatically Time Zone Time Zone Choose a time zone to implement the service for this AP Enable Daylight Saving Check whether daylight savings applies to your area Start Select the day month and time when daylight savings time starts Enable Daylight Saving Sele...

Page 53: ...can specify how often you wish to reboot the AP Status Enables or disables the Auto Reboot function Timer Select the day and enter the time you would like to reboot automatically Save Click Save to apply the changes WiFi Scheduler ...

Page 54: ...ss to these times Status Enables or disables the Wi Fi scheduler function SSID Selection Select a SSID from the drop down list Schedule Templates Select a schedule template from the drop down list Availabe Select available unavailable from the drop down list for the desired days Duration The Start Time is entered in two fields The first box is for hours and the second box is for minutes The End Ti...

Page 55: ...g Packet Size Enter the packet size of each ping Number of Pings Enter the number of times you wish to ping Start Click Start to begin pinging the target device via IP Traceroute Target Target IP Domain Name Enter the IP address or domain name you wish to trace Start Click Start to begin the trace route operation Nslookup Test Parameter Target IP Domain Name Enter the IP address or domain name you...

Page 56: ... in how many intervals IPv4 IPv6 Port This Access Points uses IPv4 5001 and IPv6 60001 port for the speed test Start Click start to implement speed test LED Control Control LED on off for Power LAN interface or 2 4 GHz WLAN interface The LED Control will be varied by different models Power Enables or disables the Power LED indicator Others Enables or disables the LAN and WLAN LED indicator Apply T...

Page 57: ...y box Verify Password Re enter the new password in the Confirm Password entry box for confirmation Apply Click Apply to apply the changes Firmware Upgrade This page allows you to upgrade the firmware of the AP To Perform the Firmware Upgrade 1 Click the Choose File button and navigate the OS file system to the location of the upgrade file 2 Select the upgrade file The name of the file will appear ...

Page 58: ... if you have set the AP incorrectly you can use the Reset button in the Revert to Factory Default Settings section to restore all the configurations of the AP to the original default settings Backup Setting Click Export to save the current configured settings Restore New Setting To restore settings that have been previously backed up click Browse select the file and click Import Restore to Default...

Page 59: ...p Setting as Default Click Backup to backup the user settings you would like to the device s memory for the default settings Note1 After setting the current settings as the default you should click the Restore to Default on the web interface for reverting the settings into the factory default instead of pushing the reset button Note2 Please write down your account and password before saving The us...

Page 60: ...ed from the log When powered down or rebooted the log will be cleared Status Enable Disable this function Trafic Log Enable Disable this function Log type You may choose one of log types to display logs in the following window The default log types is All Remote Log This page allows you to setup the Remote Log functions for the AP Remote Log Enable disable this function Log Server Port Enter the p...

Page 61: ...ck on Reset to reboot the AP The model name will be varied by different models Once you click reset button you will see the options for reboot or restore this AP Reboot the device Click it to reboot this device Restore to Factory Default Click it to reset this device to factory default setting Restore to User Default Click it to reset this device to user default settings For realizing the setting ...

Page 62: ...62 Appendix ...

Page 63: ...allation If this equipment does cause harmful interference to radio or television reception which can be determined by turning the equipment off and on the user is encouraged to try to correct the interference by one of the following measures Reorient or relocate the receiving antenna Increase the separation between the equipment and receiver Connect the equipment into an outlet on a circuit diffe...

Page 64: ...lage préjudiciable et 2 ce dispositif doit accepter tout brouillage reçu y compris un brouillage susceptible de provoquer un fonctionnement indésirable IMPORTANT NOTE Radiation Exposure Statement This equipment complies with ISED radiation exposure limits set forth for an uncontrolled environment This equipment should be installed and operated with greater than 20cm between the radiator your body ...

Page 65: ...han the maximum gain indicated for that type are strictly prohibited for use with this device Le présent émetteur radio IC 10103A ENS202EXTV2 Model ENS202EXTv2 a été approuvé par ISED pour fonctionner avec les types d antenne énumérés ci dessous et ayant un gain admissible maximal Les types d antenne non inclus dans cette liste et dont le gain est supérieur au gain maximal indiqué sont strictement...

Page 66: ...lease take below as reference Hereby EnGenius Networks declares that the EWS550AP EWS510AP EWS511AP are in compliance with Directive 2014 53 EU The full text of the EU declaration of conformity is available at the following internet address Importer EnGenius Networks Europe B V Importer Address ESP 240 5633 AC Eindhoven The Netherlands Manufacturer EnGenius Networks Inc Manufacturer Address No 500...

Reviews: