background image

33

    • 

Type:

 Set up the camera type.  


−  Device Output

: Select if the 

Main Out

 of the DVR is connected  

        to the

 Video In

 port of the MMX, and select the DVR.  

        You can control the DVR by using a network keyboard. 
     

−  Fixed:

 Select if the camera is not a PTZ camera. 


–  PTZ Camera: 

Select if the camera is a PTZ camera, and select  

        the device that controls the PTZ camera. You can control the  
        PTZ camera by using a network keyboard.

5.  Monitor Layout and Control

You can create various monitor layouts with user-defined channels during the MMX setup. You can also monitor video 
from any camera channels and control the DVRs or PTZ cameras on the monitor by using a network keyboard.  
The MMX should be registered on the network keyboard properly to control the MMX.  
Refer to the User’s Manual of the network keyboard for details on the MMX control by a network keyboard.

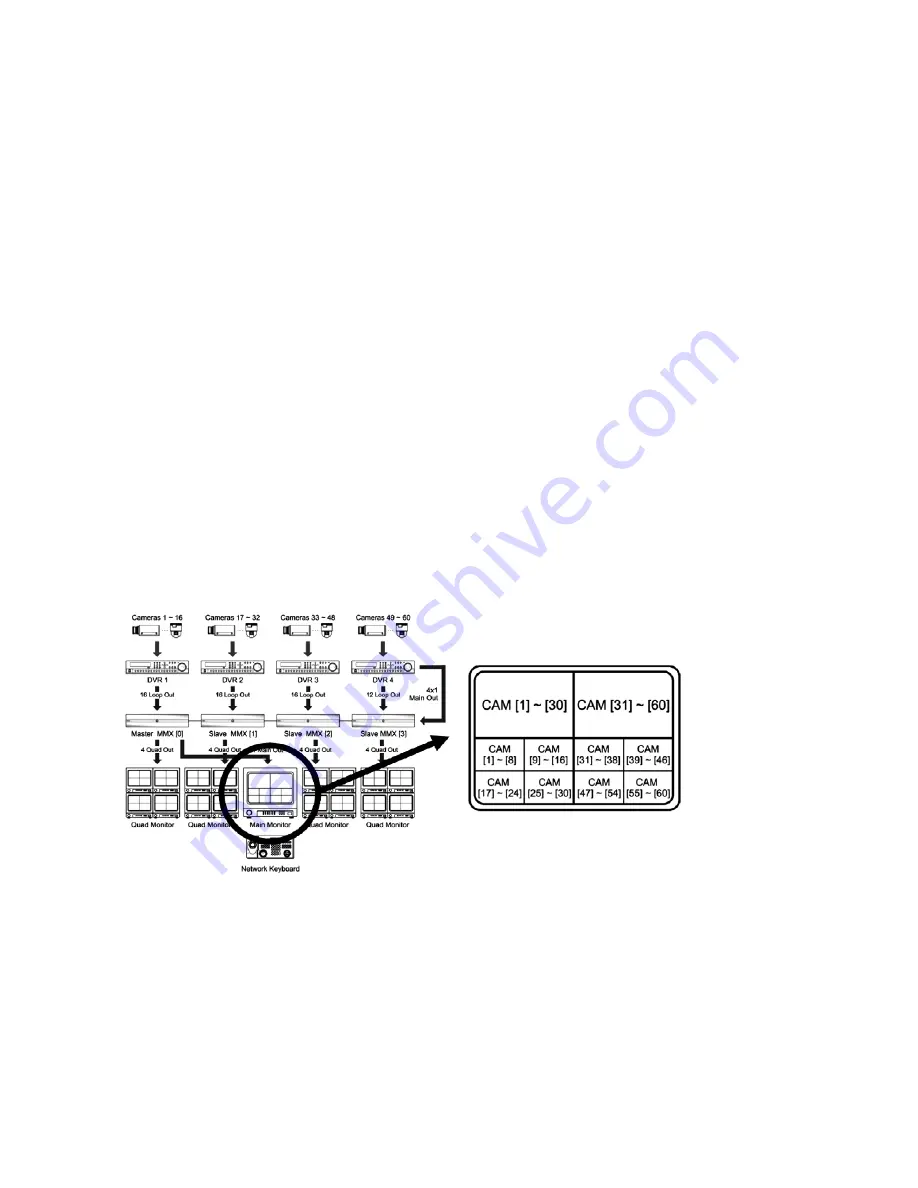
5.1  Main Monitor

Event Monitoring

Sequence Monitoring

A main monitor is connected to a master MMX and controlled by a network keyboard. You can monitor video from 
any cameras in the preset layout in the main monitor or change the layout by using a network keyboard. Sequence 
monitoring and event monitoring are supported according to the preset settings. You can also control DVRs by using a 
network keyboard.

Summary of Contents for MMX

Page 1: ...Instruction Manual MMX Network Controlled Video Matrix System...

Page 2: ...em with DVRs 25 5 Monitor Layout and Control 33 5 1 Main Monitor 33 5 2 Quad Monitor 39 5 3 Spot Monitor 42 5 4 Spot MMX Monitor 44 6 Configuration 47 6 1 System 48 6 2 Network 51 6 3 Video 55 6 4 Eve...

Page 3: ...excessive heat dust damp and vibration Do not place any heavy objects on the unit To disconnect the power cord of the unit pull it out by the plug Never pull the cord itself Pay attention when laying...

Page 4: ...figure one Master since it keeps all information and controls the Slaves Customized layout The combination of multiple MMX devices will create a matrix system of 16 to 256 cameras Each of these camera...

Page 5: ...pical Applications Medium Sized System without DVRs NOTE The MMX is controlled by a network keyboard via Ethernet Refer to the user s manual of network keyboard on instructions for using the network k...

Page 6: ...e medium sized system without DVRs Medium Sized System with DVRs You can monitor video from cameras connected to the MMX through Loop Out ports of DVRs You can control DVRs if Main Outs of the DVRs ar...

Page 7: ...splayed on the spot MMX monitors connected to the spot MMXs in the single screen layout and you can change the monitoring channel by using a network keyboard at any time Video from cameras of a DVR co...

Page 8: ...tors The voltage range of the alarm input is from 0V to 5V The threshold voltage of electrical switches for NC Normally Close is above 2 4V and for NO Normally Open is below 0 3V and should be stable...

Page 9: ...s booting when power is applied NOTES Do NOT connect a cable to the Loop BNC unless it is connected to another device because it will cause poor quality video To make connections on the Alarm Connecto...

Page 10: ...chain all slave MMXs to a master MMX by using the STP Cat5E cable with an RJ 45 jack when using more than one MMX Connect a cable from the DAISY CHAIN OUT port of a MMX with a higher ID number to the...

Page 11: ...format is PAL 2 END OF SLAVES The MMX is a slave MMX with the highest ID number among all slave MMXs The MMX is a spot MMX The MMX is the only one MMX Other cases except when the switch is set to the...

Page 12: ...t the IP address setting and the settings of a master MMX are applied to slave MMXs automatically A spot MMX is connected to a master MMX and slave MMXs and displays video from spot outputs of a maste...

Page 13: ...a buzzer sounds The MMX resets to factory defaults and restarts after completing the factory reset You can perform a factory reset remotely while the MMX is turned on by running the INIT program and s...

Page 14: ...System without DVRs When connecting cameras directly to the MMXs you can monitor video of user defined channels on monitors con nected to the MMXs 1 Connect cameras to the Video In ports of a master...

Page 15: ...n Switch Slave MMX Set up the unique MMX ID for each slave MMX from 1 to 63 in order and set the END OF SLAVES switch to the On or Off position depending on the slave MMXs ID setting Set the END OF SL...

Page 16: ...toring are supported in each monitor 5 Connect MMXs to network via Ethernet connections through the NETWORK port on the rear panel All MMXs should be networked via Ethernet 6 Run the INIT program and...

Page 17: ...or layout 7 Run the INIT program and connect to a network keyboard Refer to the User s Manual of the network keyboard for details on setting up the network keyboard 7 1 Go to the following menus Remot...

Page 18: ...ould have its own unique ID Type Set up the camera type Fixed Select if the camera is not a PTZ camera PTZ Camera Select if the camera is a PTZ camera You can control the PTZ camera by using a network...

Page 19: ...s to control to the Video In ports of a master MMX or a slave MMX The number of cameras that can be connected to the DVRs decreases as the number of DVRs connected to the master MMX and slave MMXs You...

Page 20: ...n Switch Slave MMX Set up the unique MMX ID for each slave MMX from 1 to 63 in order and set the END OF SLAVES switch to the On or Off position depending on the slave MMXs ID setting Set the END OF SL...

Page 21: ...e master MMX or slave MMXs 7 Connect MMXs to network via Ethernet connections through the NETWORK port on the rear panel All MMXs should be networked via Ethernet 6 Connect quad monitors or spot monit...

Page 22: ...n the list Master MMX ID 0 slave MMX ID 1 to 63 8 2 Go to the following menus Remote Setup Video Main Monitor Quad Monitor Spot Monitor Select a monitor and click the Edit button to set up layouts Ref...

Page 23: ...9 4 Click the Digital Video Recorder pull down menu in the device list then the registered DVR s pull down menu A list of monitors and cameras supported in the DVR is displayed ID Main Monitor Display...

Page 24: ...ix pull down menu in the device list then the registered MMX s pull down menu A list of monitors and cameras supported in the MMXs is displayed ID Main Monitor Displays the monitor ID and type ID Spot...

Page 25: ...e PTZ camera by using a network keyboard 4 3 Enterprise Sized System with DVRs When connecting DVRs to the MMXs you can monitor video of user defined channels on monitors connected to the MMXs You can...

Page 26: ...spot MMXs The number of spot outs of each master MMX and slave MMX connected to the spot MMXs should be the same The cable connection between the master MMX or slave MMXs and spot MMXs is different d...

Page 27: ...for each spot MMX from 0 to 3 and set the END OF SLAVES switch of each spot MMX to the On position and the SPOT MODE switch to the On position ID MMX ID Switch 0 Option Switch Slave MMX Set up the uni...

Page 28: ...u can monitor video from any cameras in various layouts and sequence and event monitoring are supported You can also control DVRs connected to the master MMX or slave MMXs 7 Connect quad monitors to t...

Page 29: ...ork via Ethernet connections through the NETWORK port on the rear panel All MMXs should be networked via Ethernet 10 Run the INIT program and connect to the master MMX Refer to the INIT User s Manual...

Page 30: ...he spot MMX if the spot MMX is not displayed in the list 12 1 Go to the following menus Remote Setup Device General Select Advanced from the Device type drop down menu 11 1 Go to the following menus R...

Page 31: ...4 Click the Digital Video Recorder pull down menu in the device list then the registered DVR s pull down menu A list of monitors and cameras supported in the DVR is displayed ID Main Monitor Displays...

Page 32: ...ress Control Port User ID Password Enter the IP address port number user ID and password for the connection to the MMX 12 8 Click the Matrix pull down menu in the device list then the registered MMX s...

Page 33: ...can also monitor video from any camera channels and control the DVRs or PTZ cameras on the monitor by using a network keyboard The MMX should be registered on the network keyboard properly to control...

Page 34: ...menus Remote Setup Video Main Monitor Saved layouts are displayed in the list Click the Add button to add a new layout max 29 and the Edit button to edit the saved layout Selecting a layout and click...

Page 35: ...ence list in the right Adjust the sequence order by using the and button and set up the sequencing interval Enter the group name and click the OK button Clicking the Sequence Monitoring in the Sequenc...

Page 36: ...deo from selected channels is displayed in the main monitor in the user defined layout Controlling Main Monitor Display You can change the layout of the main monitor by using a network keyboard You ca...

Page 37: ...The layout changes Controlling Cameras on Main Monitor You can monitor video from a channel and control a camera in the desired pane of the main monitor by using a network keyboard 1 Press the main mo...

Page 38: ...etwork keyboard Remote Setup Device Setup Digital Video Recorder ID DVR name 6 Press the button The DVR s main monitor screen is displayed in the selected pane and you can control the DVR by using dev...

Page 39: ...etting up event monitoring Sequence monitoring and event monitoring are not supported in a quad monitor at the same time Quad Monitor Layout 1 Run the INIT program and connect to the master MMX Refer...

Page 40: ...a max 126 for sequence monitoring and click the button The selected camera is added to the sequence list in the right Adjust the sequence order by using the and button and set up the sequence duration...

Page 41: ...nd click the OK button Clicking the Event Monitoring in the Sequence Event Group List in the left displays the registered event monitoring group in the list Select the group and allocate the selected...

Page 42: ...ayout for details of setting up sequence monitoring Event monitoring allows you to monitor event detected video when the user defined events occur at the user defined camera channels Camera channels a...

Page 43: ...ideo from the camera is displayed in the spot monitor and you can control the camera by using PTZ control buttons if the camera is a PTZcamera 1 Press the spot monitor s ID by using the network keyboa...

Page 44: ...ntrol the camera by using PTZ control buttons if the camera is a PTZ camera 5 4 Spot MMX Monitor A spot MMX monitor is connected to a spot MMX You can monitor video from a master MMX or slave MMXs con...

Page 45: ...eck the spot MMX monitor s ID by running the INIT program and connecting the network keyboard Remote Setup Device Setup Matrix ID Spot MMX Monitor 2 Press the button 3 Press the camera ID You can chec...

Page 46: ...board Remote Setup Device Setup Digital Video Recorder ID DVR name 4 Press the button The DVR s main monitor screen is displayed in the spot MMX monitor and you can control the DVR by using device con...

Page 47: ...rs Refer to the following master MMX s settings for details on setting up a spot MMX NOTE The Remote Setup is not supported for slave MMXs A slave MMX does not have its own settings except the IP addr...

Page 48: ...t Click to return all except network related settings to the original factory settings Import Click to apply the settings saved as a mda file format to a master MMX and all slave MMXs daisy chained to...

Page 49: ...zone and turn daylight saving time on or off by checking the box Clicking the Apply button applies the changes immediately Time Sync Automatic Sync Check the box to automatically synchronize the time...

Page 50: ...r Edit Select a group and click the button to change authority levels assigned to the group or select a user and click the button to change the user s password Remove Select a group or user and click...

Page 51: ...ou can change the network settings and set up DVRNS function IP Address Master MMX and Slave MMXs You can set up the network connection information of the master MMX and all slave MMXs daisy chained t...

Page 52: ...Ask your Internet service provider for information about the IP Address of the DNS Server Spot MMXs When a spot MMX is connected to the master MMX and slave MMXs you have to connect to a spot MMX and...

Page 53: ...ad of its IP address For the DVRNS function to work properly the MMX should be registered on the DVRNS server and the DVRNS server settings in the MMX system should match the settings registered on th...

Page 54: ...toring function Control Set up the port number for the remote control by a network keyboard When changing the port settings you must change the port settings on a network keyboard also NOTES The MMX r...

Page 55: ...displays video and OSD information on the screen Selecting Covert 1 displays only OSD on the screen but no video Selecting Covert 2 neither video nor OSD information displays and the camera input appe...

Page 56: ...Refer to Main Monitor Setup Layout below for details Set Default Select a layout to apply in the main monitor and click the button The selected layout is set as a default layout and video is displaye...

Page 57: ...ick the Add button Sequence Monitoring Enter a group name select cameras to register in the group from the camera list in the left and click the button The selected camera will be added to the list in...

Page 58: ...ad monitor in the list and click the button A layout setup screen appears and a camera list of the MMX that the quad monitor is connected is displayed in the left of the setup screen Refer to Main Mon...

Page 59: ...ot monitor in the list and click the button A layout setup screen appears and a camera list of the MMX that the spot monitor is connected is displayed in the left of the setup screen Refer to Main Mon...

Page 60: ...Master Slave MMX Spot MMX Connection Displays the cable connection between a master MMX or slave MMXs spot output and spot MMXs video input Clicking the icon displays the connection information on a...

Page 61: ...Title Check the box to display the camera name Event Check the box to display the event status PTZ Check the box to display the icon when the camera is set to a PTZ camera The icon flickers during th...

Page 62: ...arm Out Select to trigger an alarm output signal Email Callback Select to send an Email Callback Select to send a message to remote sites and select the desired remote sites PTZ Preset Click the desir...

Page 63: ...to remote sites and select the desired remote sites PTZ Preset Click the desired PTZ camera and select the desired preset number to move a PTZ camera to the previously saved preset location You must...

Page 64: ...n Setup screen appears Check the box for each action the MMX will take whenever it detects a video loss event Alarm Out Select to trigger an alarm output signal Send Email Select to send an Email Remo...

Page 65: ...the SMTP server Select Use SSL TLS if the SMTP server requires SSL Secure Sockets Layer authentication Authentication ID Password Enter the ID and password if the SMTP server requires user authenticat...

Page 66: ...ween DVRs and MMXs Check that video is displayed on the monitor connected to a DVR If video is not displayed check the DVR settings and camera connection to the DVR referring to the DVR User s Manual...

Page 67: ...nt Full picture and sequential monitoring Alarm inputs 16 Alarm output 2 Alarm reset input yes Alarm processing Motion detection Alarm in Video loss Alarm Out email callback PTZ preset Cascading Maste...

Page 68: ...k and Jog Shuttle 5VDC Type MMX Art No 90556 Power consumption 30watts Temperature range Operation 0 40 C Housing Steel metal Colour Black Dimensions HxWxD 88 x 430 x 405mm Weight 4 3kg Parts supplied...

Page 69: ...Pin Outs I O Connector AI 1 to 16 Alarm Inputs GND GND Chassis Ground NC Alarm Out Normally Closed C Common NO Alarm Out Normally Open ARI Alarm Reset In RS 485 Connector Master Unit Slave Unit RX TX...

Page 70: ...010 17 100010 18 010010 19 110010 20 001010 21 101010 22 011010 23 111010 24 000110 25 100110 26 010110 27 110110 28 001110 29 101110 30 011110 31 111110 32 000001 33 100001 34 010001 35 110001 36 001...

Page 71: ...es given by the MMX system Otherwise the MMX system might not work properly Check the cable connec tion information by running the INIT program and setting up the spot MMX monitors in Remote Setup Ref...

Page 72: ...nnection One Connection of Two Spot MMX Monitors The number of spot MMXs necessary for the connection One Master MMX and Slave MMXs Spot MMX Master MMX 0 Spot Out 1 to Spot MMX 1 0 Video In 1 Master M...

Page 73: ...Slave MMX 2 Spot Out 2 to Spot MMX 1 0 Video In 11 Slave MMX 3 Spot Out 1 to Spot MMX 1 0 Video In 4 Slave MMX 3 Spot Out 2 to Spot MMX 1 0 Video In 12 Slave MMX 4 Spot Out 1 to Spot MMX 1 0 Video In...

Page 74: ...eo In 12 Slave MMX 3 Spot Out 3 to Spot MMX 2 0 Video In 4 Slave MMX 3 Spot Out 4 to Spot MMX 2 0 Video In 12 Slave MMX 4 Spot Out 1 to Spot MMX 1 0 Video In 5 Slave MMX 4 Spot Out 2 to Spot MMX 1 0 V...

Page 75: ...Out 2 to Spot MMX 2 1 Video In 4 Slave MMX 3 Spot Out 3 to Spot MMX 3 2 Video In 4 Slave MMX 3 Spot Out 4 to Spot MMX 4 3 Video In 4 Slave MMX 4 Spot Out 1 to Spot MMX 1 0 Video In 5 Slave MMX 4 Spot...

Page 76: ...deo In 12 Slave MMX 11 Spot Out 3 to Spot MMX 3 2 Video In 12 Slave MMX 11 Spot Out 4 to Spot MMX 4 3 Video In 12 Slave MMX 12 Spot Out 1 to Spot MMX 1 0 Video In 13 Slave MMX 12 Spot Out 2 to Spot MM...

Page 77: ...77 Appendix 4 Map of Screens Remote Setup...

Page 78: ...78...

Page 79: ...79...

Page 80: ...xclusive distribution through specialised trade channels only VIDEOR E Hartig GmbH Carl Zeiss Stra e 8 63322 R dermark Germany Tel 49 0 6074 888 0 Fax 49 0 6074 888 100 www videor com V 1 0 Technical...

Reviews: