


75
sors at development level V 1.1.
If sensor version V 1.2 is set in the respective selection field, then only Version 1.2
sensors will be received and displayed. This must be taken into account when
using a number of different outdoor sensors.
If a number of different external configurations are used or only Version V 1.1. sen-
sors are used, then the sensor version V 1.1 should be set. This ensures that Ver-
sion V 1.1 as well as Version V 1.2 can be received.
Change base address for sensors with fixed assignment
It is normally not necessary to change the address of the S 2000 ID indoor sensor,
the rain sensor, the brightness sensor and the wind sensor.
Multifunctional operation is a special case, in which as many base devices as re-
quired can be operated within the range of the radio sensors. There can be a base
station in the living room, one in the office, etc., all displaying the same data.
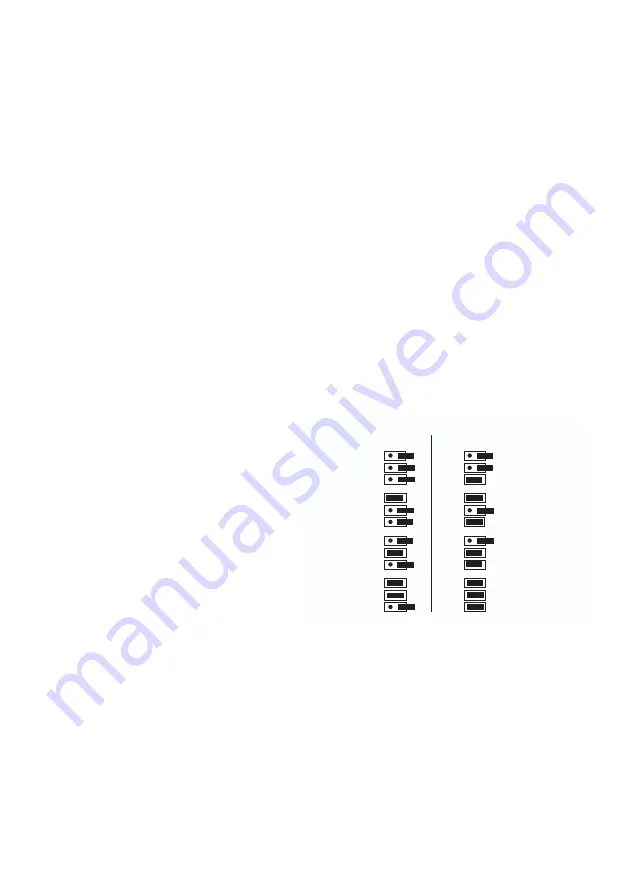
If, in every room where a base station (display unit) has been set up, the internal
temperature of the room also has to be displayed, various base addresses are
assigned to the indoor sensors as shown in the diagram.
So that the base station receives only the assigned sensor, the corresponding ad-
dress must also be set here. To change the base address call up the sensor admin-
istration of system settings, as described in the previous sections, and set the
corresponding address in the “Indoor
sensor” field.
The base address of the wind sensor
and the rain sensor can also be changed
in this operating mode, which only
needs to be done on very rare occa-
sions. A change of address is then only
required, when two neighbouring wind
sensors or rain sensors are mounted
within the range of the base station.
Only the manufacturer can change the
base address of the wind sensor and
the rain sensor, so that the relevant sen-
sor must be returned to him if necessary.
Calibration
Setting of height comparison for the barometric air pressure
In the “air pressure” operating field use the
“-” and “+” keys
in the “height” sensor
field to enter the height of your location above sea level (height above normal zero)
in metres (values between 0 and 1999 m possible). By pressing the larger, external
plus/minus sign the setting is changed in 20 m steps, by pressing the other smaller,
internal plus/minus signs the setting is changed in 1 m steps.
2
1
0
Jumper
Jumper
A0
A1
A2
A0
A1
A2
A0
A1
A2
A0
A1
A2
A0
A1
A2
A0
A1
A2
A0
A1
A2
A0
A1
A2
1 0
1 0
Address
Address
7
5
4
3
6
JP1
JP2
JP3
JP1
JP2
JP3
JP1
JP2
JP3
JP1
JP2
JP3
JP1
JP2
JP3
JP1
JP2
JP3
JP1
JP2
JP3
JP1
JP2
JP3
Summary of Contents for WS 3001
Page 2: ...2...
Page 35: ...35 Detailanzeigenfenster Temperatur Luftfeuchte 1 2 3 5 6 7 1 2 5 6 4 7 8 3 4 8...
Page 36: ...36 1 2 5 6 7 4 8 Detailanzeigenfenster Luftdruck 1 5 2 6 3 4 7 8 3...
Page 37: ...37 1 2 5 6 7 4 8 Detailanzeigenfenster Regenmengensensor 3 1 5 2 6 3 7 4 8 1 2 5 6 7 4 8 3...
Page 38: ...38 1 2 5 6 7 4 8 Detailanzeigenfenster Helligkeitssensor 3 1 5 2 6 3 7 4 8 1 2 5 6 8 4...
Page 46: ...46...
Page 79: ...79 Detail display window for temperature humidity 1 2 3 5 6 7 1 2 5 6 4 7 8 3 4 8...
Page 80: ...80 1 2 5 6 7 4 8 Detail display window for air pressure 1 5 2 6 3 4 7 8 3...
Page 81: ...81 1 2 5 6 7 4 8 Detail display window for rain sensor 3 1 5 2 6 3 7 4 8 1 2 5 6 7 4 8 3...
Page 82: ...82 1 2 5 6 7 4 8 Detail display window for brightness sensor 3 1 5 2 6 3 7 4 8 1 2 5 6 8 4...
Page 90: ...90...
Page 124: ...124 1 2 5 6 7 4 8 Affichage d taill pression atmosph rique 1 5 2 6 3 4 7 8 3...
Page 125: ...125 1 2 5 6 7 4 8 Affichage d taill capteur pluviom trique 3 1 5 2 6 3 7 4 8 1 2 5 6 7 4 8 3...
Page 126: ...126 1 2 5 6 7 4 8 Affichage d taill capteur de luminosit 3 1 5 2 6 3 7 4 8 1 2 5 6 8 4...
Page 134: ...134...


