background image

M1XSLC Installation Manual - 

LUTRON HOMEWORKS QS

Page 9

LUTRON HOMEWORKS QS

4.13

 Select 

ElkRP > Automation > Rules.

4.14 

Click 

New

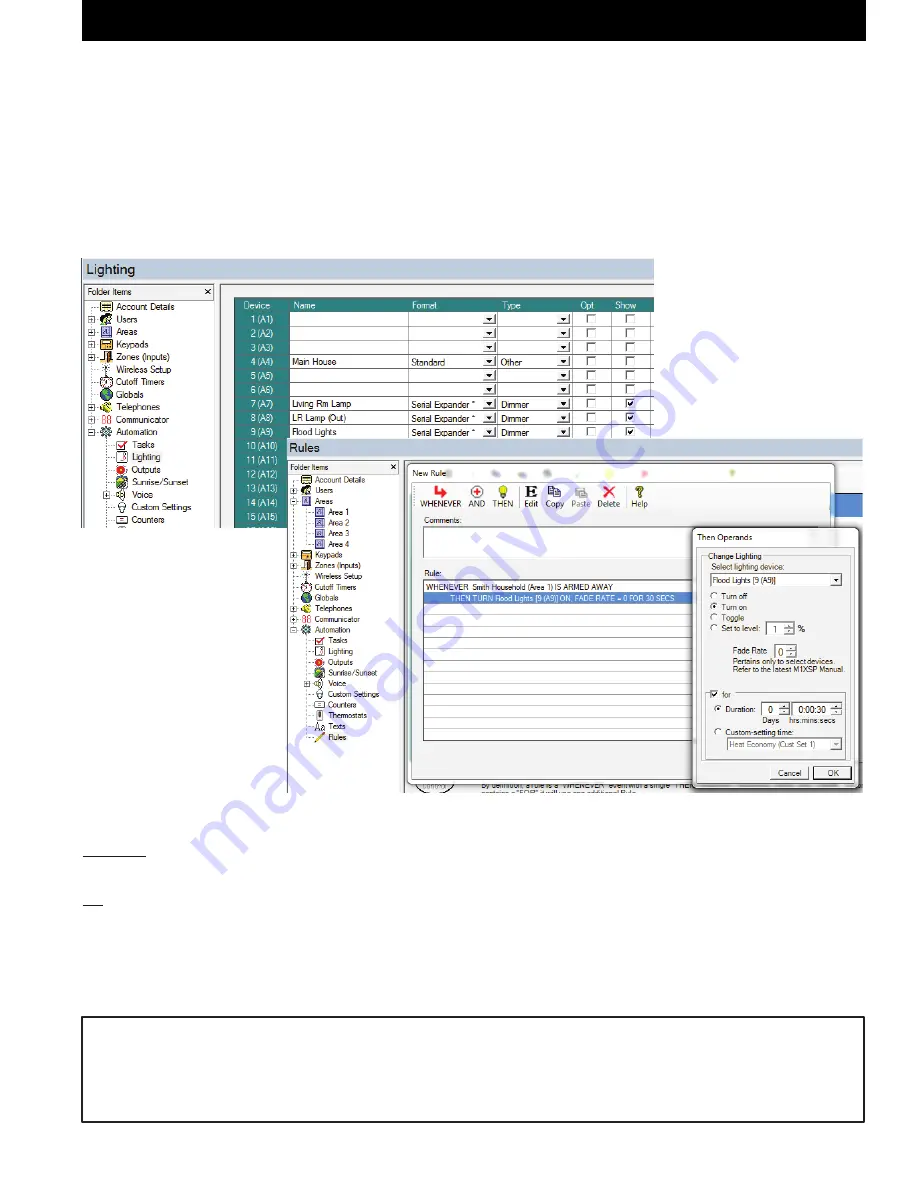
 to start a new Rule.  E.G. Turn ON a Flood Light when the System is Armed Away.  

4.15 

Click 

WHENEVER >


Security/Alarms > Is Armed > Armed Away

.  A pop-up box appears to pick the Area (par-

tition).  Use the drop down to pick the area or Click OK to accept "Area 1".  

4.16 

Click 

THEN > Control Lighting > Individual

.  A new box will appear.

4.17 

In the Select lighting device box scroll and select one of the Lights. E.G. Flood Lights [9 (A9)].

4.18 

Click 

Turn On 

followed by 

OK

.  The screen should resemble the first two lines in the illustration below.

4.19 

Repeat for additional lights and then click 

DONE

 to complete the Rule. 

4.20 

Make sure that ElkRP is connected and on-line with the M1 Control, then click 

Send to Control

.

This rule turns the Flood Lights 

ON for 30 seconds.  They 

should turn OFF automatically 

30 secs. after arming and 

leaving the building.

Controlling Homeworks QS Lights and Devices using Rules

TABLE 3c:  Conversion table from M1 Lighting Command Fade “Dim” Rate Commands

Fade Rate 0 = No fade or ramp 

Fade Rate 1 = Light(s) will fade (ramp) on over a 

2

 seconds 

Fade Rate 2 = Light(s) will fade (ramp) on over a 

4

 seconds

Fade Rate 3 = Light(s) will fade (ramp) on over a 

8

 seconds

Fade Rate 4 = Light(s) will fade (ramp) on over a 

16

 seconds

Fade Rate 5 = Light(s) will fade (ramp) on over a 

32

 seconds

Fade Rate 6 = Light(s) will fade (ramp) on over a 

46

 seconds

Then Operands

 are Turn Off, Turn On, Toggle (flip/flop), and Set to Level (Dim).  Note: Dim levels are also used for virtual button 

presses on Keypads.  See page 13.

Fade Rate (Ramp) - A dimmer device can be set to fade On/Off over a time period.  Settings are: 0=none, 1=2 Secs, 2=4 Secs, 

3=8 Secs, 4=16 Secs, 5=32 Secs, 6=46 Secs  NOTE: Fade Rate 7 has some unique functionality. See page 13 & 14 for details.

For  (Duration) -  Allows a duration to be set for the light, after which it will revert back to its previous state.  Duration can be Days, 

Hrs, Min, Sec, or a Custom Setting selection.

Note: Percent % (dim) values 2 thru 20 @ Fade Rate=0 and Fade Rate=7 are reserved.  This means it is not possible to di

-

rectly control a Homeworks QS Dimmer to % (dim) values 2 thru 20 UNLESS the Fade Rate is set to a value of 1, 2, 3, 4, 5, 

or 6.  The drawback is that setting a Homeworks QS Dimmer to dim level 1 thru 20 cannot be immediate.  Rather it will be 

slightly delayed by the value programmed as the Fade Rate. 

Summary of Contents for ELK-M1XSLC

Page 1: ...a Line HOMEWORKS QS INSTRUCTIONS Specifications are Subject to Change without notice NOTICE Drawings illustrations diagrams part numbers etc are provid ed as reference only and are based on equipment...

Page 2: ...less it was setup and programmed by the QS Designer software Lutron Certification training may be required to obtain this sofware This is restriction imposed by Lutron not Elk Integration Capacity Eac...

Page 3: ...pplied P1216 plug in AC to DC power supply Connect power supply to barrel connector on IP232 2 8 If all wired connections are complete and secure it is now OK to apply power to the M1 Control which al...

Page 4: ...re available h Choosing an update 1 Bootware Update This step may be skipped unless specifically required by the firmware update Please refer to the release notes for the current update Use the scroll...

Page 5: ...icult for the Configuration Utility to discover it Should this occur the most likely problems could be 1 The client s router is not assigning DHCP addresses 2 The client s router has reached its limit...

Page 6: ...168 1 157 for the Lutron Homeworks QS Processor A In the Outgoing Connection box click Add New to start the rule wizard B Enter the IP Address of the Lutron Homeworks QS Processor We highly recommend...

Page 7: ...known to be used by Lutron at the time this manual was printed Below are the Login prompts and the replies shown in BOLD For Prompt for User Name enter login For Prompt for Password enter password Fo...

Page 8: ...in doubt connect to M1 and select Receive All to bring all the info from M1 into your ElkRP account file 4 5 Select the first Homeworks QS Device ID and match it to its M1 Light Device number location...

Page 9: ...or ramp Fade Rate 1 Light s will fade ramp on over a 2 seconds Fade Rate 2 Light s will fade ramp on over a 4 seconds Fade Rate 3 Light s will fade ramp on over a 8 seconds Fade Rate 4 Light s will f...

Page 10: ...IS A REQUIREMENT During setup each device Controller Dimmer Keypad HVAC Thermostat will be assigned a unique Device ID Refer to the Reports Integration menu to view a listing of these device ids incl...

Page 11: ...BE MIXED combined with other HVAC Thermostat technologies or brands on the same job I E Do not mix hardwired units such as RCS RS485 Leviton RS232 or Aprilaire RS485 on the same M1 panel with Lutron...

Page 12: ...ostats E G Main Hallway Tstat 1 5 13 Click Set heating desired temperature to 5 14 In the value box scroll to set the temperature value Set the F or C box to your preference Then click OK The screen s...

Page 13: ...below M1 rules can be triggered in response to button presses on a wall or tabletop keypad providing a method to control outputs tasks etc when a button is pressed on the Homeworks QS device This is...

Page 14: ...d with M1 It is used to send the Device IDs of each thermostat to the M1XSLU This allows the M1XSLU 1 To know the ID of each existing Lutron thermostat 2 To query the status of each and to map the dat...

Reviews: