M1XSLC Installation Manual -
LUTRON HOMEWORKS QS
Page 8
LUTRON HOMEWORKS QS
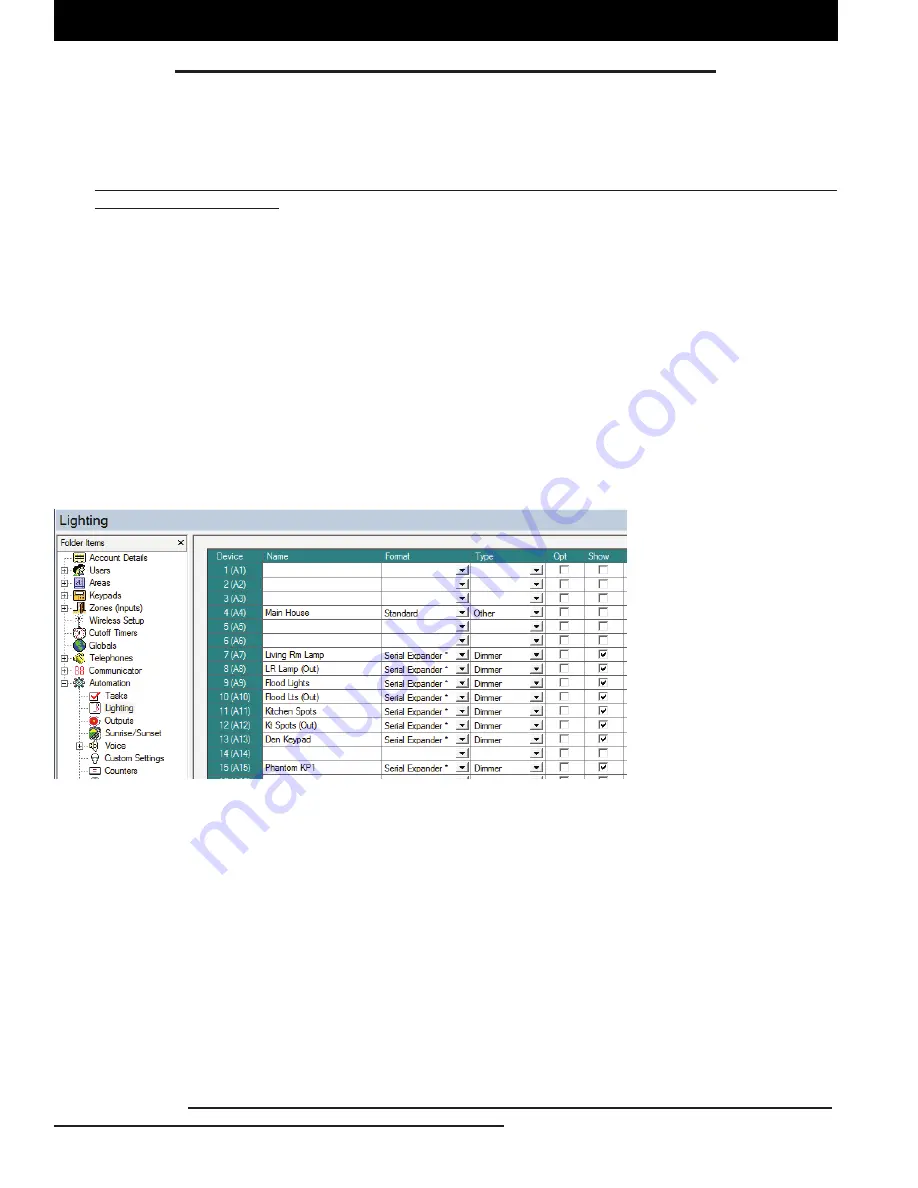
Each Lutron Homeworks QS device must have a unique Device ID. Integrating Homeworks QS lighting devices into M1
involves mapping their Lutron Device IDs to corresponding M1 Light Device numbered locations. Any M1 Light Device
locations that do not have a corresponding Lutron Device ID should be left blank (unprogrammed). The steps below
outline the programming of M1 Lighting using ElkRP > Automation > Lighting.
4.1
The Lutron Homeworks QS Designer PC software MUST BE USED to setup the Homeworks QS System.
THIS IS A REQUIREMENT!
Each device (dimmer, keypad, etc. will be assigned a unique DEVICE ID. Devices which directly connect to the
load may have two IDs assigned to them by the Homeworks QS Designer Software. One ID is associated with the
button(s) on the device, while the other ID is associated with the load. M1 can control devices using either ID. After
all the devices are added to the network the Homeworks QS Designer software is then used to configured their
operation, and to assign any programmed scenes or phantom buttons. Multiple devices can be fluidly controlled
together using scenes and phantoms. The primary difference between a scene and a phantom button is that
phantom buttons are associated with phantom keypads created within the Homeworks QS Designer software,
whereas scenes can be setup to be activated from physical buttons on wall or table mounted keypads.
4.2
The Homeworks QS Designer software provides a
Reports > Integration
menu to view a complete listing of all
devices IDs, their names, keypad button assignments (scenes), plus any of the phantom assignments.
4.3
Verify that the M1XSLU is connected to the Homeworks QS Processor.
4.4
Launch ElkRP Software and open or create an account for this job. If this is an existing account file be sure the
ElkRP file and M1 Panel are synchronized with the same data. If in doubt, connect to M1 and select
Receive All
to bring all the info from M1 into your ElkRP account file.
4.5
Select the first Homeworks QS Device ID and match it to its M1 Light Device number location. For example, if the
Lutron device ID is 7, it should be mapped to M1 light device 7 [A7].
4.6
Program a Name (up to 15 characters) describing the location or name of the device.
4.7
Set the Format to "Serial Expander" for all Lutron Devices that are controllable. Note: Lutron assigns Device IDs
to almost everything, and some IDs are only rooms or area names which are not controllable devices. To avoid
confusion with controllable devices we recommend programming these as Format=Standard and Type=Other.
4.8
Set the Type according to the particular device. (Dimmer or On/Off Switch) Appliance is not applicable.
4.9
DO NOT put a check mark in the Opt. location.
4.10
Put a check mark in the Show box IF the light needs to be displayed on touchscreens or keypads.
4.11
Voice Description is optional. Up to 6 words may be used to provide a spoken description for each light.
4.12
Make sure that ElkRP is connected to the M1 Control and then click
Send to Control
to transfer all of the above
programming into the M1.
DISCOVERY MODE:
When the M1XSLU is powered up it starts a Discovery Mode to obtain the current status of all
existing programmed lighting devices from the Homeworks QS Processor. For this reason, we recommended power
cycling the M1XSLU after any programming changes have been made to either the M1 or the Homeworks QS system.
Discovery takes approximately ~2 1/4 minutes to complete, during which the status LED will flash rapidly, momentarily
stop, and then rapid flash again for about ~16 seconds. (the 2nd rapid flash will only occur if a <TS thermostat status
is sent by the M1.
Please wait until the M1XSLU Discovery Mode is complete. DO NOT TOUCH OR DISTURB
anything until the rapid flashing changes to a slow 1 sec. flash.
Adding Lutron Homeworks QS Lighting Devices to M1
NOTE: Any M1 Lighting
Device location that does
not have a matching
Homeworks QS Device ID
to be mapped should be left
blank (unprogrammed ).


