background image

Stage 5:  Temperature and 

moisture sensor’s 

installation

The temperature and moisture sensor should be 
installed in the installation tube after the sur-

face has been completed. Then, the sensor’s wire 

should be fed into the protective conduit installed 
before the surface has been completed, with the 
so called “draw wire”. Under the sensor, the wire 

excess should be deposited min. 1 ft (30 cm) for 

the future sensor replacement, if required.

The sensor should be positioned approx. 0.2” (5 mm)  
below the surface level to enable water deposition 

on the sensor. After the sensor has been levelled, fill 

the vacant space e.g. with concrete.

Stage 4:  Finishing  

surface works

During surface works, level the installation 
tube, so that it is positioned 0.2” (5 mm) below 
the level of the surface. Due to this, the water 
will be deposited on the temperature and mois-
ture sensor.

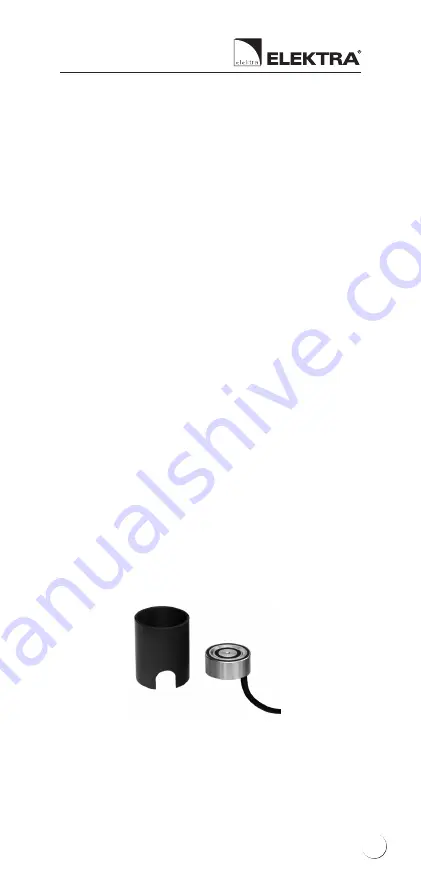
Ground temperature and moisture sensor ETOG-56T with 

installation tube (for soil, concrete flagstones, paving 

cobbles etc.) can be used for heating control of drive-

ways, traffic routes, etc.

19

Summary of Contents for VCD25

Page 1: ...www elektra eu ELEKTRA VCD25 Heating Cables Snow Ice Protection Installation manual...

Page 2: ...bles surfaces directly in concrete for the concrete slabs or reinforced concrete surfaces For the proper installation and operation of the ELEKTRA snow melting system it is recommended to first read t...

Page 3: ...les are connected to a 8 ft 2 5 m long power supply conductor and terminated at the end Specific heat output 7 5 W ft 25 W m Power supply voltage 240VAC 60 Hz rated supplied from an elec trical panel...

Page 4: ...ble connecting joint between the power supply conductor and the heating cable nameplates sticker 1 2 3 1 2 3 Note The power output of the heating cable can vary 5 10 from the provided rated specificat...

Page 5: ...r stretch or strain the cable excessively nor hit it with sharp tools Do not install the heating cables when ambient temperature drops below 23 F 5 C The label features the following pictograph IPX 7...

Page 6: ...onal climate conditions i e minimum ambient temperature snowfall intensity and wind strength The output higher than 28 W ft 300 W m is re quired if the heated area is exposed to low temperatures expos...

Page 7: ...ly selected control system will ensure adequate operation of the system only during snow and freezing rainfall A temperature controller with a temperature and moisture sensor will automatically recogn...

Page 8: ...face heated with the heating cable L heating cable s length To maintain fixed positioning of the cable and steady spacing conforming to the calculated values the cables need to be attached with the EL...

Page 9: ...for the asphalt surfaces and then compac ted ELEKTRA TME installation tapes or installa tion mesh are laid on the layer of the com pacted sand or dry concrete the heating cable fastened to them the c...

Page 10: ...ELEKTRA Heating Cables Example of ELEKTRA VCD25 heating cables as laid in the garage driveway made from paving cobbles 10...

Page 11: ...ntire surface but only the tyre tracks The temperature and moisture sensor should be placed within the heated area but not directly in the tyre tracks under the car tyres path in order to avoid snow a...

Page 12: ...s should be divided into expanded areas of the surface no larger than 100 ft2 9 m2 reinforced concrete flagstones into areas no larger than 375 ft2 35 m2 The length of the heating cables should be sel...

Page 13: ...0 mm grid made of 0 16 4 mm wire can be applied which would facilitate maintaining steady spacing of the cable conforming to the calculated values Applying thermal insulation layer to ferroconcrete fl...

Page 14: ...ation would greatly facilitate later surface finishing works and would not cause surface elevation If such elevation is acceptable e g in any al ready existing stairs then the cables will be placed di...

Page 15: ...layout on the steps 3 75 mm Laying thermal insulation on the steps and land ings of the stairs will increase efficiency by short ening the warm up time which will decrease the system s operation cost...

Page 16: ...s resistance should not vary from the one given on the label with more than 5 and 10 The insulation s resistance for the heating cable as measured with a tool of the rated voltage 1000 V e g megaohmm...

Page 17: ...black 1 yellow green Power supply conductors Ohmmeter Megaohmmeter black 1 black 2 Heating wire s resistance measurement Insulation resistance measurement 17...

Page 18: ...ompleted the protective pipe will enable feeding the temperature and moisture sen sor s wire In case of a significant sensor s distance from the switchboard or bending of the protective conduit it is...

Page 19: ...nt if required The sensor should be positioned approx 0 2 5 mm below the surface level to enable water deposition on the sensor After the sensor has been levelled fill the vacant space e g with concre...

Page 20: ...ntroller s installation The heating cable connection to the domestic electric circuit should be performed by an author ised electrician The connection of the 1 mains 2 power supply conductors of the h...

Page 21: ...wo phase circuit ETOG 56T ETOK T PE PE L2 L1 L2 L1 L2 brown green grey pink yellow white PE L1 Two phase electric circuit Connection diagram of ETO2 4550 controller with ETOG 56T sensor Protection of...

Page 22: ...TOG 56T sensors Protection of external surfaces two zones two phase circuit ETOG 56T ETOK T ETOG 56T ETOK T L brown brown green green grey pink yellow white grey pink yellow white PE N L1 L2 2 pole co...

Page 23: ...7 Surface finishing Special care must be taken when using power tools such as drills on the heated surface when installing the surface finish so as not to damage the heating cable Sand or concrete sur...

Page 24: ...heating cable All electrical work must be done by a qualified licensed electrician in accordance with local building and electrical codes and the National Electrical Code NEC especially Article 424 Pa...

Page 25: ...antly differ ent from the value on the nameplate label this indicates an open or short circuit and the cable has been damaged Contact the Manufacturer s Representa tive If the measurement is slightly...

Page 26: ...not working The thermostat is off Check if the thermostat s switch is on No power is supplied Measure power supply conductor s voltage at the thermostat The thermostat is defective Return the thermost...

Page 27: ...ave been wired in series In case more than one heating cable is to be used the cables must be connected in parallel i e cables of the same color must be connected to the same thermostat s terminal The...

Page 28: ...pped The thermostat is off Check if the thermostat s switch is on No power is supplied Measure power supply conductor s voltage at the thermostat The thermostat is defective Return the thermostat to t...

Page 29: ...ectly Incorrect programming Carefully read the thermostat s manual Incorrect voltage supplied Measure the voltage of the heating sys tem s power supply conductor at the ther mostat and make sure it ma...

Page 30: ...123 37 5 20 50 3 9 935 VCD 25 1160 VCD 25 1160 151 151 46 0 25 62 4 8 1160 VCD 25 1320 VCD 25 1320 174 174 53 0 28 71 5 5 1320 VCD 25 1520 VCD 25 1520 197 197 60 0 33 82 6 3 1520 VCD 25 1820 VCD 25 18...

Page 31: ...at repair has been undertaken by an unauthorised installer 3 The Warranty does not cover the damages inflicted as a result of a mechanical fault b incompatible power supply or temperature control c l...

Page 32: ...urning the Product recognized to be defective in materials and workmanship and not damaged as a result of misuse misapplication or improper installation to the Manufacturer s lo cal Representative s o...

Page 33: ...The warranty period starts from the date of product purchase INSTALLATION SITE Address Zip code City TO BE FILLED BY INSTALLER Name Electrician s Co name and licence Address e mail Zip code City Phon...

Page 34: ...furniture with a clearly marked position of the temperature sensor and of heating cables Note Please keep the photos of the heating cables layout for future reference ELEKTRA heating cable layout diag...

Page 35: ...p M Date Installer s legible signature Caution The measurement results of the heating core s resistance should not vary from the one given on the nameplate with more than 5 and 10 Resistance of the he...

Page 36: ...ELEKTRA Heating Cables NOTE Place the the self adhesive rating plate attached to the product here must be carried out prior to installing the heating system 36...

Page 37: ...37...

Page 38: ...www elektra eu EN 2020 04 v 3 5...

Reviews: