background image

WARNING!

Risk of electrical shock.

• Before replacing the lamp, disconnect

the appliance from the power supply.

• Only use lamps with the same

specifications.

2.6 Disposal

WARNING!

Risk of injury or suffocation.

• Disconnect the appliance from the

mains supply.

• Cut off the mains cable and discard it.

• Remove the door catch to prevent

children and pets to get closed in the

appliance.

2.7 Service

• To repair the appliance contact an

Authorised Service Centre.

• Use original spare parts only.

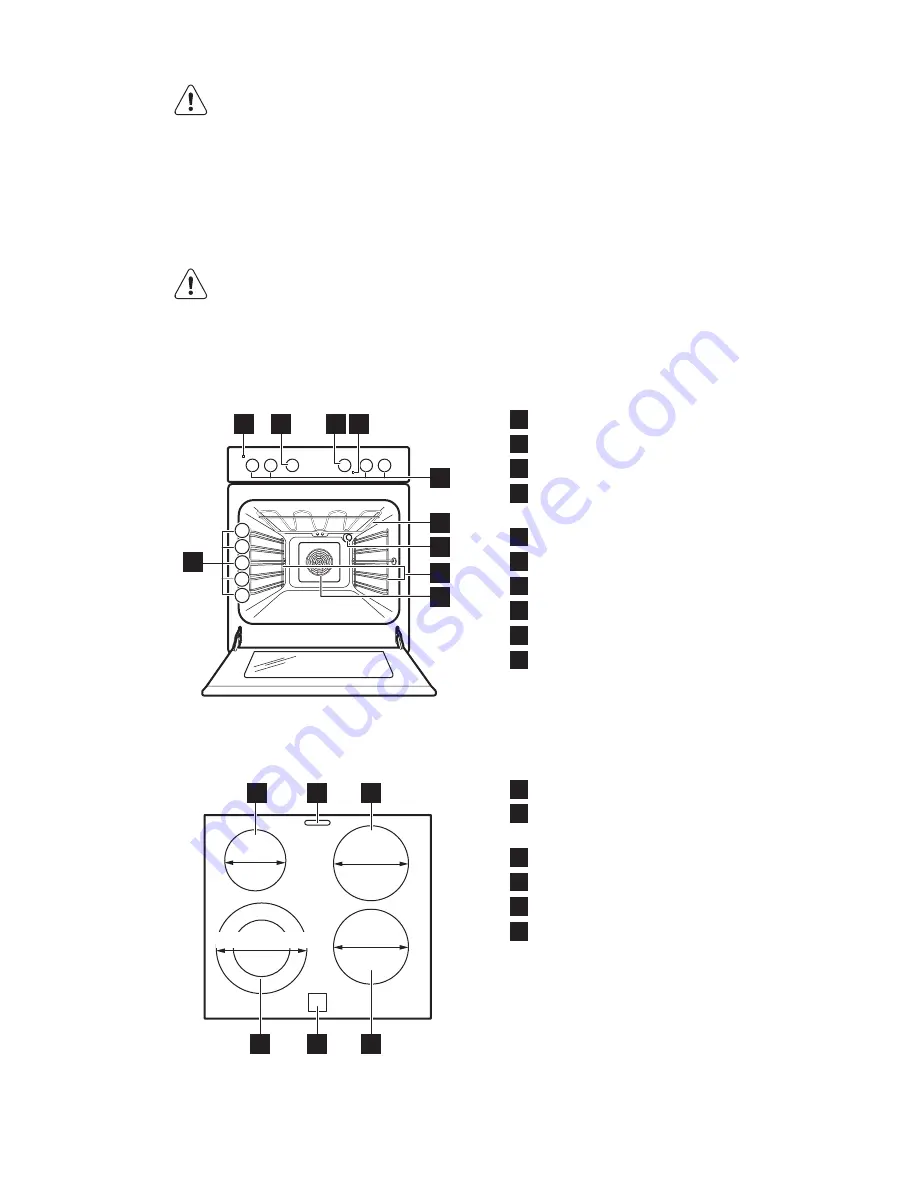
3. PRODUCT DESCRIPTION

3.1 General overview

8

5

4

3

2

1

6

7

9  

10

2

3

4

5

1

1

Power lamp / symbol / indicator

2

Knob for the oven functions

3

Knob for the temperature

4

Temperature lamp / symbol /

indicator

5

Knobs for the hob

6

Heating element

7

Lamp

8

Shelf support, removable

9

Fan

10

Shelf positions

3.2 Cooking surface layout

140/210 mm

180 mm

180 mm

145 mm

5

1

3

4

6

2

1

Cooking zone 1200 W

2

Steam outlet - number and position

depend on the model

3

Cooking zone 1800 W

4

Cooking zone 1800 W

5

Residual heat indicator

6

Cooking zone 1000 / 2200 W

ENGLISH

7

Summary of Contents for EKC6051BOX

Page 1: ...EKC6051BOX EN Cooker User Manual ...

Page 2: ... it you can be safe in the knowledge that you ll get great results every time Welcome to Electrolux Visit our website for Get usage advice brochures trouble shooter service information www electrolux com webselfservice Register your product for better service www registerelectrolux com Buy Accessories Consumables and Original spare parts for your appliance www electrolux com shop CUSTOMER CARE AND...

Page 3: ...concerning use of the appliance in a safe way and understand the hazards involved Do not let children play with the appliance Keep all packaging away from children Keep children and pets away from the appliance when it operates or when it cools down Accessible parts are hot Cleaning and user maintenance shall not be made by children without supervision 1 2 General Safety Only a qualified person mu...

Page 4: ...nce they can scratch the surface which may result in shattering of the glass If the supply cord is damaged it must be replaced by the manufacturer its Authorised Service Centre or similarly qualified persons in order to avoid a hazard Be careful when you touch the storage drawer It can get hot To remove the shelf supports first pull the front of the shelf support and then the rear end away from th...

Page 5: ...t be removed without tools Connect the mains plug to the mains socket only at the end of the installation Make sure that there is access to the mains plug after the installation If the mains socket is loose do not connect the mains plug Do not pull the mains cable to disconnect the appliance Always pull the mains plug Use only correct isolation devices line protecting cut outs fuses screw type fus...

Page 6: ...t iron aluminium or with a damaged bottom can cause scratches Always lift these objects up when you have to move them on the cooking surface This appliance is for cooking purposes only It must not be used for other purposes for example room heating 2 4 Care and Cleaning WARNING Risk of injury fire or damage to the appliance Before maintenance deactivate the appliance Disconnect the mains plug from...

Page 7: ...act an Authorised Service Centre Use original spare parts only 3 PRODUCT DESCRIPTION 3 1 General overview 8 5 4 3 2 1 6 7 9 10 2 3 4 5 1 1 Power lamp symbol indicator 2 Knob for the oven functions 3 Knob for the temperature 4 Temperature lamp symbol indicator 5 Knobs for the hob 6 Heating element 7 Lamp 8 Shelf support removable 9 Fan 10 Shelf positions 3 2 Cooking surface layout 140 210 mm 180 mm...

Page 8: ... the function and the maximum temperature 4 Let the appliance operate for 15 minutes 5 Set the function and the maximum temperature 6 Let the appliance operate for 15 minutes Accessories can become hotter than usual The appliance can emit an odour and smoke This is normal Make sure that the airflow in the room is sufficient 4 3 Opening and closing the door with the mechanical door lock The mechani...

Page 9: ...sition 5 2 Activating and deactivating the outer rings You can adjust the surface you cook to the dimension of the cookware To activate the outer ring turn the knob clockwise through a light resistance to Then turn the knob counterclockwise to the correct heat setting To deactivate the outer ring turn the knob to the off position The indicator goes out 5 3 Residual heat indicator WARNING There is ...

Page 10: ...arger quantities of food stews and soups 60 150 Up to 3 l liquid plus ingredi ents 6 7 Gentle fry escalope veal cordon bleu cutlets rissoles sausages liver roux eggs pancakes doughnuts as nec essary Turn halfway through 7 8 Heavy fry hash browns loin steaks steaks 5 15 Turn halfway through 9 Boil water cook pasta sear meat goulash pot roast deep fry chips 7 HOB CARE AND CLEANING WARNING Refer to S...

Page 11: ... The symbol shows whether the knob controls one of the cooking zones the oven functions or the temperature 1 Turn the knob for the oven functions to select an oven function 2 Turn the knob for the temperature to select a temperature 3 To deactivate the oven turn the knobs for the oven functions and temperature to the off position 8 2 Oven functions Symbol Oven function Application Off position The...

Page 12: ...deactivate the appliance the cooling fan can continue to operate until the appliance cools down 8 4 Locking the oven and hob The knob for the oven functions has a built in Function lock The Function lock does not deactivate the main power supply of the cooker Turn the knob to the symbol The knob comes out approximately 2 mm Unlocking the oven and hob Press the knob and turn it to the necessary pos...

Page 13: ... 15 minutes if you bake cakes on more than one shelf position Cakes and pastries at different heights do not always brown equally at first If this occurs do not change the temperature setting The differences equalize during the baking procedure With longer baking times you can deactivate the oven approximately 10 minutes before the end of the baking time and then use the residual heat When you coo...

Page 14: ...me The cake browns uneven ly The mixture is unevenly distributed Spread the mixture evenly on the baking tray The cake is not ready in the baking time given The oven temperature is too low The next time you bake set a slightly higher oven temperature 9 3 Hot Air Baking Food Temperature C Time min Shelf posi tion Bread rolls 175 185 15 20 2 4 Wholemeal rolls 165 180 20 30 2 4 Filled sandwiches 170 ...

Page 15: ...astry 150 160 finishing 35 45 2 4 Fruit tarts crumble pastry 170 180 30 40 2 4 9 4 Conventional Baking Food Temperature C Time min Shelf posi tion Bread rolls 200 225 8 12 3 4 Wholemeal rolls 190 200 20 25 3 4 Filled sandwiches 200 225 10 12 3 4 Ciabatta rolls 210 230 10 20 3 4 Foccacia 220 230 15 20 3 4 Pita bread 250 5 15 3 4 Pretzels 180 200 12 15 3 4 White loaf 190 210 25 40 1 2 Ciabatta 210 2...

Page 16: ...umble pastry 190 200 25 35 3 4 Marzipan ring cake 210 230 10 12 2 9 5 Pizza Table Food Temperature C Time min Shelf posi tion Ciabatta rolls 200 220 10 20 2 3 Foccacia 220 230 10 20 2 3 Ciabatta 190 200 15 25 2 3 Fruit tarts short crust pastry 170 180 35 45 2 3 Fruit tarts crumble pastry 175 200 25 35 2 3 Pizza home made thick with a lot of topping 180 200 25 35 1 2 Pizza home made thin crust 200 ...

Page 17: ...shing 165 175 30 40 2 4 Tarts frozen 175 25 352 2 4 1 When frying or boiling fish the cooking time depends on the thickness of the fish The fish is finished when the flesh is white Test by sticking a fork into the fish If the flesh comes easily away from the bone the fish is cooked 2 With cooking on two levels double portion the time is around 1 3 longer than that stated on the packaging If the ti...

Page 18: ...ime given is 30 min then the preparation time will be around 30 10 40 min 9 8 Roasting Use heat resistant ovenware to roast refer to the instructions of the manufacturer You can roast large roasting joints directly in the deep pan if present or on the wire shelf above the deep pan Roast lean meats in the roasting tin with the lid This keeps the meat more succulent All types of meat that can be bro...

Page 19: ...r Can be browned off after roasting under the grill or with top bottom heat at 250 C If you are using a meat probe remove it before grilling Lamb Food Temperature C Time min kg Shelf po sition Leg shoulder saddle 160 80 100 2 Pork Food Temperature C Time min kg Shelf po sition Roast pork1 175 60 70 2 3 Pork loin1 175 60 2 3 Neck fillets 160 90 120 2 3 Ham 150 60 100 1 2 1 Other Can be browned off ...

Page 20: ...teak roasting 160 50 60 2 3 Roast beef 180 90 120 1 3 1 Other Can be browned off after roasting under the grill or with top bottom heat at 250 C If you are using a meat probe remove it before grilling Veal Food Temperature C Time min kg Shelf posi tion Fillet of beef1 180 60 70 2 3 1 Other Can be browned off after roasting under the grill or with top bottom heat at 250 C If you are using a meat pr...

Page 21: ...an be browned off after roasting under the grill or with top bottom heat at 250 C If you are using a meat probe remove it before grilling 9 11 Browning Beef Food Temperature C Time in mi nutes per kg meat Shelf posi tion Rump steak browning 200 total 10 2 3 Rump steak roasting 150 50 60 2 3 Roast beef 160 90 120 1 2 Veal Food Temperature C Time min kg Shelf posi tion Fillet of beef1 160 60 70 2 3 ...

Page 22: ...r Can be browned off after roasting under the grill or with top bottom heat at 250 C If you are using a meat probe remove it before grilling 9 12 Grilling in general WARNING Always grill with the oven door closed Always grill with the maximum temperature setting Set the shelf into the shelf position as recommended in the grilling table Always set the deep pan to collect the fat into the first shel...

Page 23: ...l down After that finish the drying process Vegetables Food Temperature C Time h Shelf position 1 posi tion 2 posi tions Beans 60 70 6 8 3 2 4 Peppers 60 70 5 6 3 2 4 Vegetables for sour 60 70 5 6 3 2 4 Mushrooms 50 60 6 8 3 2 4 Herbs 40 50 2 3 3 2 4 Fruit Food Temperature C Time h Shelf position 1 posi tion 2 posi tions Plums 60 70 8 10 3 2 4 Apricots 60 70 8 10 3 2 4 Apple slices 60 70 6 8 3 2 4...

Page 24: ...lean the appliance interior after each use Fat accumulation or other food remains may result in a fire The risk is higher for the grill pan Clean stubborn dirt with a special oven cleaner Clean all accessories after each use and let them dry Use a soft cloth with warm water and a cleaning agent If you have nonstick accessories do not clean them using aggressive agents sharp edged objects or a dish...

Page 25: ...rst from one side and then the other When the cleaning procedure is completed insert the oven door in the opposite sequence Make sure that you hear a click when you insert the door Use force if necessary 10 5 Removing and cleaning the door glasses The door glass in your product can be different in type and shape from the examples you see in the images The number of glasses can also be different 1 ...

Page 26: ...f electrocution Disconnect the fuse before you replace the lamp The lamp and the lamp glass cover can be hot 1 Deactivate the appliance 2 Remove the fuses from the fuse box or deactivate the circuit breaker The back lamp The lamp glass cover is at the back of the cavity 1 Turn the lamp glass cover counterclockwise to remove it 2 Clean the glass cover 3 Replace the oven lamp with a suitable 300 C h...

Page 27: ...er ring first The oven does not heat up The oven is deactivated Activate the oven The oven does not heat up The necessary settings are not set Make sure that the settings are correct The lamp does not oper ate The lamp is defective Replace the lamp Steam and condensation settle on the food and in the cavity of the oven You left the dish in the oven for too long Do not leave the dishes in the oven ...

Page 28: ...ensions of the appliance are in the technical data table CAUTION Be careful when you put the appliance on the floor there is a risk of damage Lay the appliance on sheets of cardboard or polystyrene foam for protection Changing the height of the cooker A A A A 7 7 7 14 14 49 min 866 mm min 848 mm 180º If you have a mini kitchen installation you can move the cooker plinth back to fit behind the skir...

Page 29: ...Adjusting the cooker plinth When you install the appliance set the appliance top surface horizontally ENGLISH 29 ...

Page 30: ...e behind the appliance is smooth 1 Set the correct height and area for the appliance before you attach the anti tilt protection 2 Install the anti tilt protection 77 mm down from the top surface of the appliance and 49 mm from the left side of the appliance into the circular hole on the bracket See the illustration Screw it into the solid material or use applicable reinforcement wall 3 You can fin...

Page 31: ...b Hob inside Freestanding Cooker Number of cooking zones 4 Heating technology Radiant Heater Diameter of circular cooking zones Ø Left front Left rear Right front Right rear 21 0 cm 14 5 cm 18 0 cm 18 0 cm Energy consumption per cooking zone EC electric cooking Left front Left rear Right front Right rear 184 8 Wh kg 181 8 Wh kg 192 3 Wh kg 192 3 Wh kg Energy consumption of the hob EC electric hob ...

Page 32: ...ills Methods for measuring performance 13 4 Oven Energy saving The appliance contains features which help you save energy during everyday cooking General hints Make sure that the oven door is closed properly when the appliance operates and keep it closed as much as possible during the cooking Use metal dishes to improve the energy saving When possible put the food inside the oven without heating i...

Page 33: ...tainers to recycle it Help protect the environment and human health and to recycle waste of electrical and electronic appliances Do not dispose appliances marked with the symbol with the household waste Return the product to your local recycling facility or contact your municipal office ENGLISH 33 ...

Page 34: ...www electrolux com 34 ...

Page 35: ...ENGLISH 35 ...

Page 36: ...www electrolux com shop 867307251 D 342015 ...

Reviews: