background image

Replacing the Drum Cartridge 

41

2

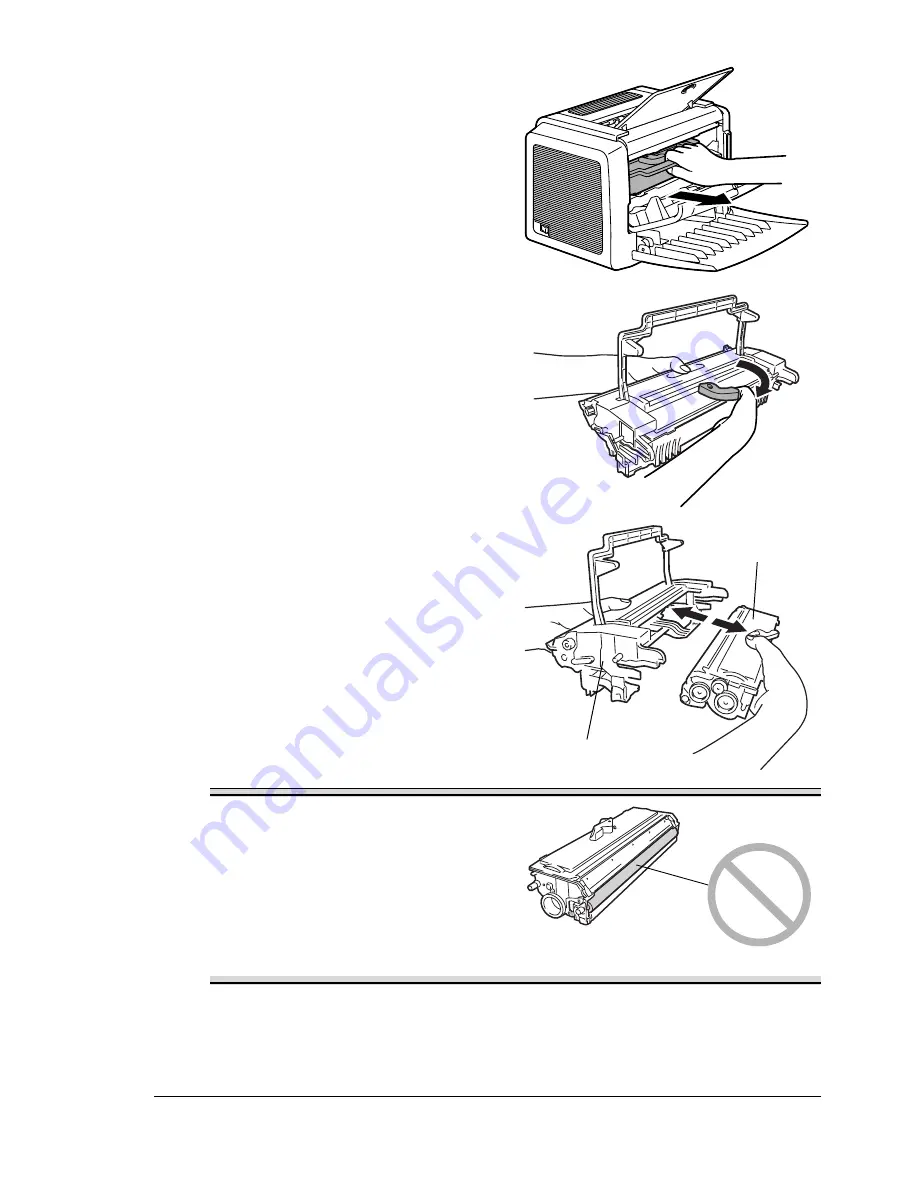
Pull the handle of the imaging 
cartridge toward you, and then 
pull out the imaging cartridge.

3

Move the lever on the toner car-
tridge in the direction of the 
arrow.

4

Using both hands, separate the 
toner cartridge and drum car-
tridge.

Note

When separating the toner 
cartridge and drum cartridge, 
keep them level.

Do not touch the developing roller 
of the toner cartridge, otherwise 
decreased image quality may 
result.

5

Remove a new drum cartridge from its box.

Drum cartridge

Toner cartridge

EDNord - Istedgade 37A - 9000 Aalborg - telefon 96333500

Summary of Contents for PagePro 1300W

Page 1: ...PagePro 1300W 1350W User s Guide 4136 7747 02A EDNord Istedgade 37A 9000 Aalborg telefon 96333500 ...

Page 2: ...EDNord Istedgade 37A 9000 Aalborg telefon 96333500 ...

Page 3: ...Error Message 3 Cancelling a Print Job 3 Status Message 4 2 Software Installation 7 Installing the USB Device Driver 8 Installing the USB Device Driver under Windows Me and 98 8 Installing the Printer Driver 9 Installing from the CD ROM 9 3 Working with the Printer Driver 11 Displaying Printer Driver Settings 12 Displaying Settings under Windows XP 12 EDNord Istedgade 37A 9000 Aalborg telefon 9633...

Page 4: ... Display Alerts 17 Recovering from a Status Display Alert 17 Closing the Status Display 18 5 Using Media 19 About Media 20 What sizes weights of media can I use 20 What type and amount of media can I load 21 Media Storage 21 Media Not Suitable for Printing 22 What Is the guaranteed imageable printable area 23 Page Margins 23 Loading Media 24 How do I refill Tray 1 24 Printing on Media 25 How do I ...

Page 5: ...s and Cable 62 Consumables Life Expectancies Chart 62 Our Concern for Environmental Protection 63 What is an ENERGY STAR product 63 CE Marking Declaration of Conformity 63 For European Users 63 CISPR 22 and Local Rules 63 Acoustic Noise 64 Safety Information 64 Warning and Precaution Symbols 64 Meaning of Symbols 64 WARNING 65 CAUTION 67 Working Safely with your Laser Printer 68 Notes on your Safe...

Page 6: ...Contents iv EDNord Istedgade 37A 9000 Aalborg telefon 96333500 ...

Page 7: ...Introduction EDNord Istedgade 37A 9000 Aalborg telefon 96333500 ...

Page 8: ...r with them Front View 1 Top cover 2 Output tray 3 Control panel 4 Imaging cartridge Toner cartridge plus Drum car tridge 5 Front cover 6 Tray 1 7 Front cover grip 8 Paper guide stopper 9 Paper guides 10 Ventilation grilles 11 Power switch Rear View 1 AC power connection 2 Parallel port 3 USB port 1 2 3 4 5 6 7 8 9 10 11 Imaging Drum cartridge Toner cartridge cartridge 1 2 3 EDNord Istedgade 37A 9...

Page 9: ... When there is no more paper in the tray When paper of a different format than that set in the printer driver was fed into the printer 1 Check that one of the above errors has occurred 2 Perform the remedial action according to the error 3 Press the Cancel button to operate the media feed The print job continues For details on the error messages refer to chapter 8 Troubleshooting on page 49 Cancel...

Page 10: ...inter The printer sta tus also can be checked on the Status Display Refer to the Working with the Status Display on page 16 Ready indicator green Error indicator orange Condition Action Off Off Power off None On Off Ready to print None Rapid blink ing Off Warming up None Blinking Off Processing data None Printing On On Initializing power on None Canceling a print job Slow blinking Off Power save m...

Page 11: ...peed On Slow blinking Toner near empty Prepare the new toner cartridge On Blinking Toner empty Replace the toner cartridge On Rapid blink ing Toner cartridge end Replace the toner cartridge No toner cartridge is installed Install the toner car tridge The installed toner car tridge is an unap proved type Install a KONICA MINOLTA toner cartridge Ready indicator green Error indicator orange Condition...

Page 12: ...About the Indicator Functions 6 EDNord Istedgade 37A 9000 Aalborg telefon 96333500 ...

Page 13: ...Software Installation EDNord Istedgade 37A 9000 Aalborg telefon 96333500 ...

Page 14: ... and 98 1 Turn on your computer 2 Turn on the printer 3 When Windows and the printer are both ready insert the CD ROM included with your printer into your computer s CD ROM drive 4 Connect the printer to the computer with the USB cable The Add New Hardware Wizard dialog box appears Follow the instructions on the screen Browse the printer driver CD ROM and navigate to drivers English Win9x for Wind...

Page 15: ... from the CD ROM 1 Insert the CD ROM in the CD ROM drive of your computer The CD ROM installer automatically starts If not browse with the Windows Explorer to the CD ROM and dou ble click on setup exe 2 Follow the instructions on the screen For a USB connection select USBxxx as the printer port For a Parallel connection select LPTx as the printer port EDNord Istedgade 37A 9000 Aalborg telefon 9633...

Page 16: ...Installing the Printer Driver 10 EDNord Istedgade 37A 9000 Aalborg telefon 96333500 ...

Page 17: ...Working with the Printer Driver EDNord Istedgade 37A 9000 Aalborg telefon 96333500 ...

Page 18: ...1350W printer icon 5 To display the printer driver settings from the File menu click Printing Preferences Displaying Settings under Windows 2000 Me 98 1 From the Start menu point to Settings and then click Printers to display the Printers directory 2 Select the KONICA MINOLTA PagePro 1300W PagePro 1350W printer icon 3 Display the printer driver settings Windows 2000 From the File menu click Printi...

Page 19: ...ick to save all changes without exiting the Properties dialog box Help Click to view online help Easy Set To save the current settings click Save Afterward the saved settings can be selected from the drop down list Select Default from the drop down list to reset the functions of the tab to their original values Page Layout Check this option button to display a sample of the page layout in the figu...

Page 20: ...ents to a specified media size Select the output media size Scale enlarge reduce documents Adjust the printing position Specify the number of copies Turn on off the printer s sorting function Turn on off the Proof Print function Specify the orientation of the media Rotate the print image 180 to the media orientation Quality Tab The Quality tab allows you to Specify the resolution Adjust the contra...

Page 21: ...Working with the Status Display EDNord Istedgade 37A 9000 Aalborg telefon 96333500 ...

Page 22: ...A PagePro 1300W PagePro 1350W Status Altering the Size of the Status Display Window From the Display menu choose Status Reduce to decrease the size of the window or From the Display menu choose Status Expand to increase the size of the window Using the Status Display When the background of the right hand printer graphic is green the printer is in standby mode or a job is printing normally When the...

Page 23: ...centage remaining of the toner cartridge Refer to the online help for information on all of its functions Recognizing Status Display Alerts When the Status Display detects a printing problem several actions occur at the same time depending on your settings First the icon changes from green to yellow or red depending on the severity of the printer problem Refer to the online help for further inform...

Page 24: ...m the File menu choose Exit If you click the X button in the upper right corner of the Status Display window to close the window the Status Display remains available at the bottom right of the taskbar Double click the icon to open it again EDNord Istedgade 37A 9000 Aalborg telefon 96333500 ...

Page 25: ...Using Media EDNord Istedgade 37A 9000 Aalborg telefon 96333500 ...

Page 26: ... Foolscap 203 330 8 13 G Letter 203 267 0 8 10 5 G Legal 216 330 8 1 2 13 Chinese 16 185 0 260 0 7 3 10 2 Chinese 32 130 0 185 0 5 1 7 3 16K 195 270 7 3 4 10 3 4 B5 ISO 176 0 250 0 6 6 9 8 Envelope 10 105 241 4 125 9 5 Envelope C5 162 0 229 0 6 4 9 0 Envelope DL 110 0 220 0 4 3 8 7 N A Envelope Monarch 98 0 191 0 3 875 7 5 60 90 g m 16 24 lb Envelope C6 114 0 162 0 4 5 6 4 Envelope Cho 3 120 235 4...

Page 27: ...other hand media that has been stored for a long time without staying in its packaging may dry up too much and also cause jamming Direct sunlight Excess heat up to 35 C 95 F Dust Leaning against other objects or placed in an upright position Before purchasing a large quantity or special media do a trial printing with the same media and check the print quality Media Source Maximum Amount Input Capa...

Page 28: ...cards etc Media that has already been printed with An inkjet printer A monochrome or color laser printer or copier A heat transfer printer Another printer or fax machine Wet or damp Layered Adhesive Folded creased curled embossed warped or wrinkled Perforated three hole punched or torn Too slick too coarse too textured Different in texture roughness on the front and back Too thin or too thick Stuc...

Page 29: ...e set through your application Some applications allow you to set custom page sizes and margins while others have only standard page sizes and margins from which to choose If you choose a standard format you may lose part of your image due to imageable area constraints If you can custom size your page in your application use those sizes given for the imageable area for optimum results 4 mm 0 157 i...

Page 30: ... maximum of 150 sheets 75 g m2 20 lb plain paper can be loaded If media is loaded past the media limit mark it may not be fed correctly Load letterhead with the side to be printed facing up and the pre printed letterhead at the top fac ing the printer 3 Squeeze the right paper guide and adjust the paper guides so that both the left and right sides of the media are secure EDNord Istedgade 37A 9000 ...

Page 31: ...e paper guides to the width of the custom media Note Improperly adjusted guides may cause poor print quality media jams or printer damage 5 Print the custom media How do I load and print envelopes Before printing on envelopes we recommend printing a test page If the print result is not oriented as desired select Rotated Paper tab Orientation option Do not use envelopes that have Sticky flaps Tape ...

Page 32: ...Paper tab Original Document Size option 3 Place the envelopes on a flat surface and flatten them by pressing down the corners 4 Flex the envelope stack including the edges to remove any stiffness 5 Correct any bent corners and tap the envelopes on a flat surface to align them 6 Squeeze the right paper guide and open the paper guides 7 Load the envelopes lengthwise and the printing side up as shown...

Page 33: ... How do I load and print labels A label consists of a face sheet the printing surface adhesive and a carrier sheet The face sheet must follow the plain paper specification The face sheet surface must cover the entire carrier sheet and no adhesive should come through on the surface You can print continuously with label paper However this could affect the media feed depending on the media quality an...

Page 34: ...s may cause poor print quality media jams or printer damage 5 Print the labels How do I load and print postcards Do not use postcards that are Coated Warped or bent Designed for inkjet printers Multicolored Preprinted or multicolored may result in printer jamming Use postcards that are Postcards 100 148 mm 3 9 5 8 in recommended for laser printers 1 In the printer driver Setup tab Media Type optio...

Page 35: ...that the image does not shift Do not use thick stock that is Mixed with any other media in the media trays as this will cause printer jamming Note Do not mix thick stock with any other media in the same tray as this will cause printer jamming 1 In the printer driver Setup tab Media Type option select Thick Paper 2 Select the size of the stock Paper tab Original Document Size option 3 Load the thic...

Page 36: ...only 1 10 sheets Do not use transparencies that Are coated such as transparencies designed for color printers or copiers Have static electricity that will cause them to stick together Use transparencies that are Monochrome uncoated transparencies also known as OHP film 1 In the printer driver Setup tab Media Type option select Transparency 2 Select the size of the transparency Paper tab Original D...

Page 37: ...etup tab Duplex Booklet option select the appro priate setting from Short Edge Binding Long Edge Binding Booklet Left Binding or Booklet Right Binding 2 From the print dialog box of your software select the necessary settings and print all pages 3 Remove the single sided print outs from the output tray and then insert them into Tray 1 with the same orientation that they were fed out 4 Click Procee...

Page 38: ...Manual Duplexing 32 EDNord Istedgade 37A 9000 Aalborg telefon 96333500 ...

Page 39: ...Replacing Consumables EDNord Istedgade 37A 9000 Aalborg telefon 96333500 ...

Page 40: ...ge Part Number EU 5250216 200 5250216 400 Standard Capacity Toner Cartridge 1710566 002 High Capacity Toner Cartridge 1710567 002 AP GC 5250216 350 5250216 600 Standard Capacity Toner Cartridge 1710566 003 High Capacity Toner Cartridge 1710567 003 JP 5250216 300 Standard Capacity Toner Cartridge 1710566 004 High Capacity Toner Cartridge 1710567 004 Printer Type Printer Part Number Toner Cartridge ...

Page 41: ...ner cartridge as soon as possi ble In this manual a toner car tridge attached to a drum cartridge is referred to as an imaging cartridge 1 Grab the front cover grip and open the front cover 2 Pull the handle of the imaging cartridge toward you and then pull out the imaging cartridge Note Do not expose the imaging cartridge to light for a long period of time If the drum cartridge is exposed to ligh...

Page 42: ...dge 36 3 Move the lever on the toner car tridge in the direction of the arrow 4 Using both hands separate the toner cartridge and drum car tridge Drum cartridge Toner cartridge EDNord Istedgade 37A 9000 Aalborg telefon 96333500 ...

Page 43: ...eep them level Do not touch the OPC drum under the flap of the drum cartridge otherwise decreased image quality may result Do not touch any metal parts of the drum cartridge and toner cartridge otherwise damage from static electricity may result EDNord Istedgade 37A 9000 Aalborg telefon 96333500 ...

Page 44: ...toner car tridge 6 Holding it firmly with both hands rock the toner cartridge left and right to distribute the toner evenly 7 Remove the protective cover from the toner cartridge Note Do not touch the developing roller of the toner cartridge otherwise decreased image quality may result EDNord Istedgade 37A 9000 Aalborg telefon 96333500 ...

Page 45: ... two cartridges together 9 Align the imaging cartridge with the guides in the printer and then insert the cartridge Note Do not insert the imaging cartridge at an angle or with extreme force otherwise the printer may be damaged 10 Press on the front cover grip and close the front cover 11 Place the used toner cartridge into the box that came with the new toner cartridge EDNord Istedgade 37A 9000 A...

Page 46: ...nu in the Status Display print out the Configuration page Print Config Page and then check the total number of printouts Note The OPC drum is extremely sensitive to bright light direct sunlight and touch Always leave the drum cartridge in its protective package until you re ready to install it In this manual a toner car tridge attached to a drum cartridge is an imaging car tridge 1 Grab the front ...

Page 47: ... of the arrow 4 Using both hands separate the toner cartridge and drum car tridge Note When separating the toner cartridge and drum cartridge keep them level Do not touch the developing roller of the toner cartridge otherwise decreased image quality may result 5 Remove a new drum cartridge from its box Drum cartridge Toner cartridge EDNord Istedgade 37A 9000 Aalborg telefon 96333500 ...

Page 48: ...ridges together Note Do not touch the OPC drum under the flap of the drum cartridge otherwise decreased image quality way result Do not touch any metal parts of the drum cartridge and toner cartridge otherwise damage from static electricity may result 7 Align the imaging cartridge with the guides in the printer and then insert the cartridge Note Do not insert the imaging cartridge at an angle or w...

Page 49: ...he Drum Cartridge 43 8 Press on the front cover grip and close the front cover 9 Place the used drum cartridge into the box that came with the new drum cartridge EDNord Istedgade 37A 9000 Aalborg telefon 96333500 ...

Page 50: ...Replacing the Drum Cartridge 44 EDNord Istedgade 37A 9000 Aalborg telefon 96333500 ...

Page 51: ...Maintaining the Printer EDNord Istedgade 37A 9000 Aalborg telefon 96333500 ...

Page 52: ... on the printer s surface the spray could penetrate through the air vents of the printer and damage the internal circuits CAUTION Do not spill water or detergent into the printer otherwise the printer will be damaged and an electric shock may occur EDNord Istedgade 37A 9000 Aalborg telefon 96333500 ...

Page 53: ...nd then pull out the imaging cartridge Note Do not expose the imaging cartridge to light for a long period of time If the drum cartridge is exposed to light decreased image quality may result CAUTION The fusing unit is extremely hot Touching any part near the fusing unit may result in burns Do not touch the image transfer roller inside the printer otherwise decreased image quality may result EDNor...

Page 54: ... cartridge with the guides in the printer and then insert the cartridge Note Do not insert the imaging cartridge at an angle or with extreme force otherwise the printer may be damaged 6 Press on the front cover grip and close the front cover EDNord Istedgade 37A 9000 Aalborg telefon 96333500 ...

Page 55: ...Troubleshooting EDNord Istedgade 37A 9000 Aalborg telefon 96333500 ...

Page 56: ... to a lower resolution Rapid blinking alter nately No media in the tray specified in the printer driver Load the appropriate type of media into Tray 1 Media size error If the Auto Continue option has been acti vated in the Status Dis play the sheet already fed in is automatically ejected after a predeter mined time Load the appropriate size media into Tray 1 Waiting for the Manual Duplex Load the ...

Page 57: ... front cover and then continue with the print job Off On Front cover or top cover is open Close the front cover or top cover Ready indicator green Error indicator orange Condition Action Off Rapid blink ing Fatal error Turn the printer off then on again If the problem persists contact your vendor or authorized ser vice provider Ready indicator green Error indicator orange Condition Action EDNord I...

Page 58: ...nd open the front cover 2 Pull the handle of the imaging cartridge toward you and then pull out the imaging cartridge Note Do not expose the imaging cartridge to light for a long period of time otherwise decreased image quality may result Transfer roller Pick up roller Feed roller EDNord Istedgade 37A 9000 Aalborg telefon 96333500 ...

Page 59: ...e fusing unit pull the media downward to remove it CAUTION The fusing unit is extremely hot Touching any part near the fusing unit may result in burns Do not touch the image transfer roller inside the printer otherwise decreased image quality may result EDNord Istedgade 37A 9000 Aalborg telefon 96333500 ...

Page 60: ...in the printer and then insert the cartridge Note Do not insert the imaging cartridge at an angle or with extreme force otherwise the printer may be damaged 5 Press on the front cover grip and close the front cover EDNord Istedgade 37A 9000 Aalborg telefon 96333500 ...

Page 61: ...vendor or refer to the General Information Guide Print too light The toner cartridge may running out of toner Remove the toner cartridge and shake it left and right a few times to distribute remaining toner If the problem persists replace the toner cartridge The toner cartridge may be defective Remove the toner cartridge and check it for damage Replace the toner cartridge if necessary The Contrast...

Page 62: ...dge if necessary Uneven print density The toner may be unevenly distributed inside the toner cartridge Remove the toner cartridge and shake it left and right a few times to distribute remaining toner The toner cartridge may be defective Remove the toner cartridge and check it for damage Replace the toner cartridge if necessary The image transfer roller may be defective Contact your local vendor Ir...

Page 63: ...endor Toner smudges The toner may be unevenly distributed inside the toner cartridge Remove the toner cartridge and shake it left and right a few times to distribute remaining toner The toner cartridge may be defective Remove the toner cartridge and check it for damage Replace the toner cartridge if necessary Smudges on the media indi cate a dirty feed roller Contact your local vendor Symptom Caus...

Page 64: ...ew dry media Media with specifications not covered by the printer warranty is being used Use media that is covered by the printer warranty The media type may be incor rectly set When printing envelopes labels thick stock and trans parencies the appropriate media type must be specified in the printer driver Symptom Cause Solution EDNord Istedgade 37A 9000 Aalborg telefon 96333500 ...

Page 65: ...Appendix EDNord Istedgade 37A 9000 Aalborg telefon 96333500 ...

Page 66: ... 9254 class B GB 17625 1 Australian model AS NZS 3548 class B Type Desktop laser beam printer Print system Electrostatic dry powder imaging system Exposure system Laser diode polygon mirror scanning Developing system Electrophotographic printing system Resolution 1200dpi 1200dpi at half speed 600dpi 600dpi or 1200dpi 600dpi Print speed 600dpi 600dpi or 1200dpi 600dpi PagePro 1300W 16 pages per min...

Page 67: ... Thick paper 90 to 163g m2 24 to 43 lb Postcard Letterhead Label sheet Paper feeding Tray 1 Input capacity Tray 1 150 sheets Output capacity Output tray 100 sheets Operating temperature 10 to 35 C 50 to 95 F Operating humidity 15 to 85 Power supply 110 127 V 50 60 Hz 220 240 V 50 60 Hz Power consumption 120 V 900 W 220 240 V 900 W Amperage 120 V 8 0 A or less 220 240 V 4 5 A or less Acoustic Noise...

Page 68: ...ments IEEE 1284 compliant type B connector Connectors Printer Series B plug Computer Series A plug Cable type Require twisted data conductors or a shielded Pin assignments 1 VBUS 2 D 3 D 4 GND Shell Shield Item Average Life Expectancy in Simplex Pages Toner Cartridge At 5 coverage using A4 size media Starter Cartridge 1 500 printing Replacement Cartridge 3 000 continuous printing or 2 400 intermit...

Page 69: ...opean Users This product complies with the following EU directives 89 336 EEC 73 23 EEC and 93 68 EEC directives This declaration is valid for the areas of the European Union EU only This device must be used with a shielded parallel interface cable and shielded USB interface cable The use of non shielded cables is likely to result in interference with radio communications and is prohibited under 8...

Page 70: ...ting equipment problems Make sure you observe all of the precautions listed in this manual Note that some parts of the contents of this section may not correspond with the purchased product Warning and Precaution Symbols Meaning of Symbols Ignoring this warning could cause serious injury or even death Ignoring this caution could cause injury or damage to property A triangle indicates a danger agai...

Page 71: ...er outlet for more than the marked current value could result in a fire or electrical shock Do not unplug and plug in the power cord with a wet hand as an electrical shock could result Plug the power cord all the way into the power outlet Failure to do this could result in a fire or electrical shock Do not scratch abrade place a heavy object on heat twist bend pull on or damage the power cord Use ...

Page 72: ...r unusual odor or noise immediately turn OFF the power switch unplug the power cord from the power out let and then call your authorized service representative If you keep on using it as is a fire or electrical shock could result If this product has been dropped or its cover damaged immediately turn OFF the power switch unplug the power cord from the power outlet and then call your authorized serv...

Page 73: ... an unstable or tilted bench or in a location subject to a lot of vibration and shock It could drop or fall causing personal injury or mechanical breakdown After installing this product mount it on a secure base If the unit moves or falls it may cause personal injury Do not store toner units and PC drum units near a floppy disk or watch that are susceptible to magnetism They could cause these prod...

Page 74: ...near the machine and shall be easily accessible as the power plug may be diffi cult to pull out when an emergency occurs Always use this product in a well ventilated location Operating the product in a poorly ventilated room for an extended period of time could injure your health Ventilate the room at regular intervals Whenever moving this product be sure to disconnect the power cord and other cab...

Page 75: ...roperly can result in a fire or an electric shock Do not place any heavy objects on the machine Do not open any covers on the machine while printing is in progress Do not switch off the unit while printing is in progress Do not place any magnetic objects near the machine Do not use any flammable sprays liquids or gases in the vicinity of the machine Do not remove any safety devices and do not alte...

Page 76: ... any phase of user operation Internal Laser Radiation Maximum average radiation power 36 903µW at the laser aperture of the print head unit Wavelength 770 800 nm This product employs a Class 3b laser diode that emits an invisible laser beam The laser diode and the scanning polygon mirror are incorporated in the print head unit The print head unit is NOT A FIELD SERVICEABLE ITEM Therefore the print...

Page 77: ...ogical Health CDRH of the U S Food and Drug Administration FDA of the Department of Health and Human Services DHHS This means that the product does not produce hazardous laser radiation The label shown above indicated compliance with the CDRH regulations and must be attached to laser products marketed in the United States CAUTION Use of controls adjustments or performance of procedures other than ...

Page 78: ...er IEC60825 sikkerheds kravene Dansk Dette er en halvlederlaser Laserdiodens højeste styrke er 15 mW og bølgelængden er 770 800 nm For Norway Users ADVERSEL Dersom apparatet brukes på annen måte enn spesifisert i denne bruksanvis ning kan brukeren utsettes for unsynlig laserstråling som overskrider grensen for laser klass 1 Dette en halvleder laser Maksimal effekt till laserdiode er 15 mW og bølge...

Page 79: ...t alttiina näkymättömälle laser säteilylle Älä katso säteeseen VARNING Osynlig laserstrålning när denna del är öppnad och spärren är urkopplad Betrakta ej strålen Ozone release During printer operation a small quantity of ozone is released This amount is not large enough to harm anyone adversely However be sure the room where the machine is being used has adequate ventilation especially if you are...

Page 80: ...Safety Information 74 EDNord Istedgade 37A 9000 Aalborg telefon 96333500 ...

Page 81: ...ice messages 51 Status message 4 Installing USB Device driver 8 9 Interference causing equipment standard 63 L Laser CDRH 71 Internal laser radiation 70 Laser safety 70 Laser safety label 71 Loading Media 21 24 M Manual Duplexing 31 Media Clearing jams 52 Loading 21 24 Size 20 Storage 21 Type 21 EDNord Istedgade 37A 9000 Aalborg telefon 96333500 ...

Page 82: ...g 12 Setup tab 14 Printing Envelope 25 Label 27 Postcard 28 Thick stock 29 Transparency 30 Q Quality tab 14 S Safety information 64 Setup tab 14 Status display Closing 18 Opening 16 Using 16 T Toner cartridge Replacing 35 Troubles shooting 49 Clearing jams 52 U USB USB Device driver 8 9 EDNord Istedgade 37A 9000 Aalborg telefon 96333500 ...

Reviews: