- 42
-
ENGLISH
bracket and lower horizontal ceramic element
bracket and upper horizontal ceramic element
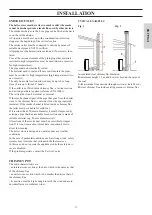
COVERING INSTALLATION
Fig. 4/5
Disassemble the two metal brackets (C-D) that fasten the hori
-
zontal ceramic elements by removing the eight side screws (Y)
and the four screws inside the top (Z).
Fig. 6
On the back, fit the lower (F) and upper (G) horizontal ceramic
elements and the metal fastening brackets (C-D) using the holes
and the M4 milled pins provided.
NB:
Each horizontal ceramic element has 6 positions for fixing it to
the metal brackets.
Secure the horizontal ceramic elements in each position using
opening A or B of the metal brackets (depending on where the
threaded insert lies on the horizontal ceramic element).
The metal bracket must be centred on the horizontal ceramic
element.
Use the following hardware for each fixing position:
- 1 x M4 milled screw;
- 1 Ø5x15 washer placed between the horizontal ceramic ele
-
ments and the metal brackets;
- 1 Ø5x15 washer placed between the metal bracket and the M4
milled screw.
F
G
C
D
fig. 6
fig. 4
fig. 5
C
D
Y
Y
Z
CERAMICA SUPERIORE CO N S U P P O R T O M E T A L L I C O
X
posizione 4
posizione 2
posizione 5
posizione 3
posizione 2
posizione 3
posizione 1
posizione 5
posizione 6
CERAMICA INFERIORE CO N S U P P O R T O M E T A L L I C O
posizione 1
posizione 4
posizione 6
rondella
Mattonella in ceramica
rondella
Supporto metallico
per ceramica
DETTAGLIO X
vite M4 con
testa zigrinata
Ø5x15
Ø5x15
A
posizione 1
B
horizontal ceramic
element
metal bracket
A
B
bracket and upper horizontal ceramic element
bracket and lower horizontal ceramic element
washer
Ø5x15
M4 milled
screw
position 1
position 1
position 1
position 2
position 2
position 3
position 3
position 4
position 4
position 5
position 5
position 6
position 6
washer
Ø5x15


