background image


31-7-2014                                                                      21                                                                 ebode IPV58P2P 


Click IR LED Lights and there are two modes to adjust the infrared led: Auto and Off . 

The default mode is Auto. 


Auto:


Select it and the camera will adjust the infra led (on or off) automatically. 


Manual:


Select it and turn off the infra led manually. 


Schedule: Select it and the IR led light will be off at the schedule period. If you want to 

define or change the IR led lights schedule time, please go to


Settings


Video 

 IR LED 

Schedule page. 


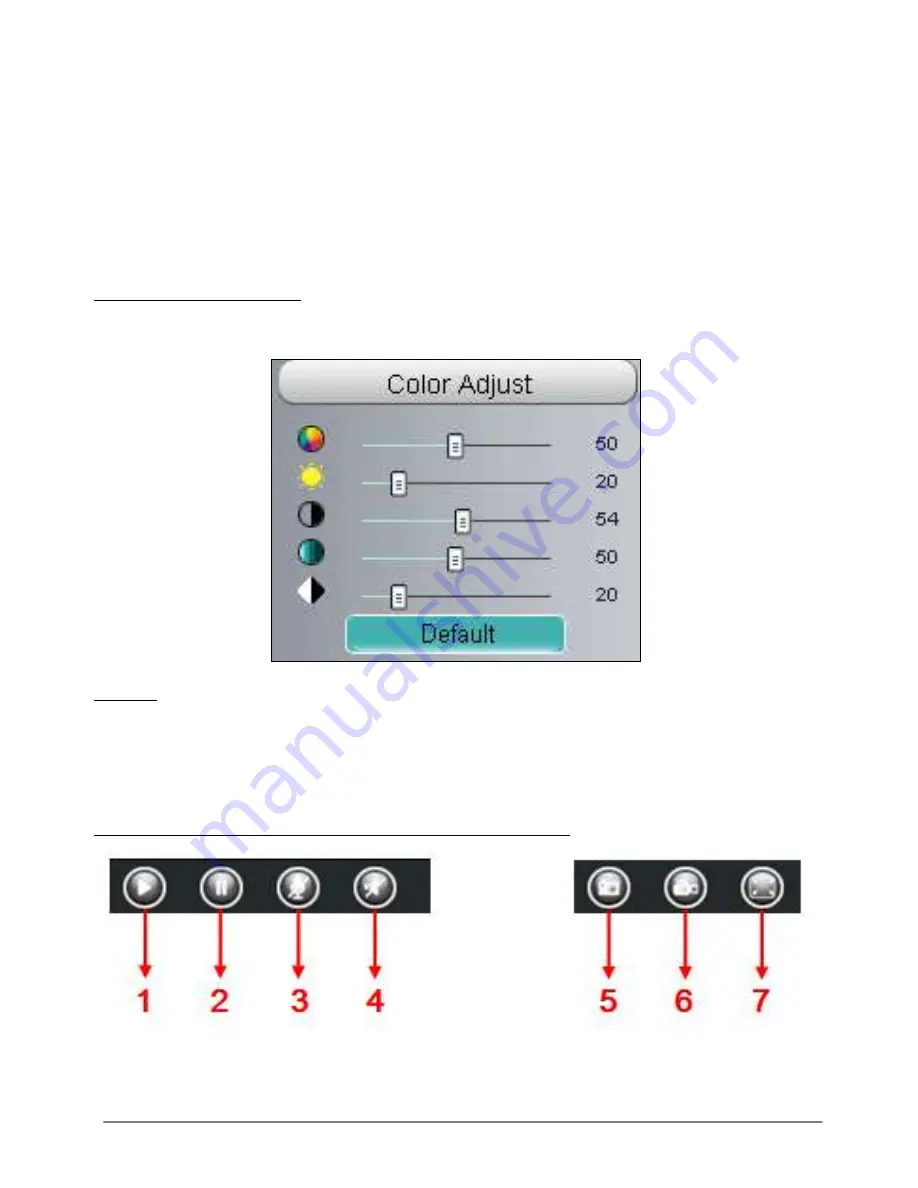
7.  Image quality settings 

In this page, you can tune Hue, Brightness, Contrast, Saturation, and Sharpness to get 

higher quality. 


8.  OSD 

If you have added time and camera name in the video, you can see it in the live window.  

Go  to  Settings  ---Basic  settings---Camera  name  panel,  and  you  can  change  another 

device name. The default device name is anonymous. 

Go to Settings ---Basic settings---Camera time panel and adjust the device time. 

Go to Settings ---Video---On Screen Display panel, you can add or no add OSD. 


9. Play/Stop/ Talk/Audio/ Snap/ Record/ Full screen button 


Summary of Contents for IPV58P2P

Page 1: ...ectronics eu User Manual IPV58P2P Wi Fi HD720P Waterproof Outdoor P2P IP Camera Before using this product please read this document carefully and visit www ebodeelectronics eu for latest manual Softwa...

Page 2: ...0P Waterproof IP Camera P2P Feature for Easy Remote Access H 264 Video Compression IR LEDs On Off Auto Switch Motion Detection Alarm via E Mail and FTP Free ebode DDNS Service embedded Compatible with...

Page 3: ...9 4 3 Using the VLC player 13 4 4 IP Camera connection to the server 15 5 Surveillance Software GUI 16 5 1 Login Window 16 5 2 Modify the Username and Password 17 5 3 Surveillance Window 17 6 Advanced...

Page 4: ...ified and authorized service personnel Defected pieces must be replaced by original spare parts Batteries keep batteries out of the reach of children Dispose of batteries as chemical waste Never use o...

Page 5: ...Phone users please search and install the application named ebode on Google Play for Android devices or on APP Store for iOS devices then you can view your camera anywhere anytime on your smart mobile...

Page 6: ...2014 6 ebode IPV58P2P 3 3 Physical Description Front Panel Figure 3 1 1 Infrared LED Wireless Antenna 2 LENS CMOS sensor with fixed focus lens 3 Induction IC 4 Infrared LED 12 IR LEDs Interface Figure...

Page 7: ...2V 2A power 5 Audio input interface The jack is used to plug external input device such as sound pick up device directly Here microphone cannot directly insert to the interface it must connect to comm...

Page 8: ...nd the camera s IP address automatically after you plug in the network cable Figure 4 1 Double click the IP address of the camera your default browser will open to the camera login page 2 Https LAN IP...

Page 9: ...t number in your standard browser For example you would enter http 183 37 28 254 85 NOTES Make sure port forwarding is successful You can do port forwarding two ways 1 Login to your router to enable t...

Page 10: ...WAN IP address is constantly changing you will have a fixed hostname you can use to access your cameras at all times You can access the camera directly from the Internet using the hostname and port n...

Page 11: ...be accessed from anywhere in the world Click http portforward com help portforwarding htmto learn more about port forwarding How do we configure Port Forwarding For this section we will be using an ex...

Page 12: ...Network on the left then click DDNS to get to the DDNS settings page Here you can see the unique domain name of your camera Figure 4 9 Now you can use http Domain name HTTP Port to access the camera v...

Page 13: ...ct hostname user name and password and try to redo the settings NOTE If you have set Third Party DDNS successfully the IPCAM Domain Name will be invalid The Third Party DDNS and the IPCAM Domain Name...

Page 14: ...31 7 2014 14 ebode IPV58P2P Figure 4 10 Figure 4 11...

Page 15: ...k the port mapping You can read Quick Installation Guide about How to configure port forwarding NOTE If you modify the camera s username or password you had better reboot the camera or else the new us...

Page 16: ...username is admin with no password please reset the password at first using and prevent unauthorized users login the camera read chapter 5 2 4 about how to change 2 Stream The camera supports two stre...

Page 17: ...he username and password will appears 5 2 Modify the Username and Password When you log in for the first time it will come to the operating of modify the username and password automatically Figure 5 2...

Page 18: ...Mirror Flip buttons Mode 1 50Hz Indoor surveillance Region Europe China 2 60Hz Indoor surveillance Region USA Canada 3 Outdoor Mode Outdoor surveillance Stream The default stream supports multiple mo...

Page 19: ...video 4 Bit rate Generally speaking the larger the bit rate is the clearer video will become But the bit rate configuration should combine well with the network bandwidth When the bandwidth is very na...

Page 20: ...nal PT device you can use this feature The default cruise tracks have two types Vertical the camera will rotate from up to down and Horizontal the camera will rotate from left to right Start cruise St...

Page 21: ...edule time please go to Settings Video IR LED Schedule page 7 Image quality settings In this page you can tune Hue Brightness Contrast Saturation and Sharpness to get higher quality 8 OSD If you have...

Page 22: ...it pop up a window which picture you snapshot right click in the window and save the picture to anywhere you want 6 Record Click the icon and the camera start recording you can see a green dot in the...

Page 23: ...se it 6 Advanced Camera Settings Click the button Settings goes to Administrator Control Panel to make advanced camera settings 6 1 Device Status Device Status contains four columns Device Information...

Page 24: ...a Time The system time of the device Click Basic Settings and go to Camera Time panel and adjust the time System Firmware version Display the System Firmware version of your camera App Firmware versio...

Page 25: ...ou can define a name for your camera here such as apple Click Save to save your changes The alias name cannot contain special characters Figure 6 5 6 2 2 Camera Time This section allows you to configu...

Page 26: ...on to synchronize the date and time of the Network Camera with your computer Manually The administrator can enter the date and time manually Please select the date and time format use DST Select the u...

Page 27: ...sword then select Change password enter the old password and the new password lastly click modify to take effect Figure 6 8 How to add account Select one blank column then enter the new user name pass...

Page 28: ...utton to take effect NOTE The default administrator account cannot be deleted but you can add other administrator users How to change the username Firstly select the account which you want to change t...

Page 29: ...indow Add cameras in LAN In Multi Device Settings page you can see all devices searched in LAN The 1st Device is the default one You can add more cameras in the list in LAN for monitoring The camera s...

Page 30: ...31 7 2014 30 ebode IPV58P2P Figure 6 13 Back to Surveillance Windows and click Four Windows option you will see four cameras you added Figure 6 14...

Page 31: ...hem using DDNS domain name Firstly make sure all of the cameras you added can be accessed through the internet Read How to configure DDNS settings in chapter 6 3 3 Login to the first camera using a DD...

Page 32: ...user name and password and then choose Add Figure 6 17 1 The camera model MJ or H264 2 The 2nd camera s name 3 Fill in the 2nd camera s DDNS host not LAN IP 4 Enter the 2nd camera s user name and pass...

Page 33: ...gure 6 18 Return to video window You will see all of the cameras accessible through the internet When you are away from home you can use the first camera s DDNS domain name and port to view all the ca...

Page 34: ...ge Keep the camera in the same subnet of your router or computer Figure 6 20 Changing settings here is the same as using the IP Camera Tool Figure 4 23 4 24 It is recommended that you use the subnet m...

Page 35: ...een then click Wireless Settings Click the Scan button and the camera will detect all wireless networks around the area It should also display your router in the list Figure 6 23 There are two DNS ser...

Page 36: ...e camera is configuring a wireless connection Wait about 1 minute the camera should obtain a wireless connection and the LAN IP of the camera will show again on the window of the IP Camera Tool The IP...

Page 37: ...n the Settings Network panel you can see the domain name Figure 6 26 Now you can use http Domain name HTTP Port to access the camera via internet Take hostname cp4911 myipcamera org and HTTP Port no 8...

Page 38: ...ogin on www no ip com and click No IP Free to register Figure 6 27 Please register an account step by step according to instructions on www no ip com After registration please login your email which u...

Page 39: ...31 7 2014 39 ebode IPV58P2P Figure 6 28 Figure 6 29 Please create the domain name step by step according to instructions on www no ip com...

Page 40: ...is successful If failed please double check if you have input the correct hostname user name and password and try to redo the settings NOTE If you have set Third Party DDNS successfully the IPCAM Doma...

Page 41: ...be configured for port forwarding Back to the Device Status panel you can see the UPnP status Figure 6 32 The camera s software will be configured for port forwarding There may be issues with your rou...

Page 42: ...like to change the port of right click on the IP address and click on Network Configuration this brings up the network configuration box as shown in Figure 6 34 and 6 35 Figure 6 34 Figure 6 35 Select...

Page 43: ...port is 443 You can use the URL to access the camera https IP HTTPS port ONVIF port By default the ONVIF port is set to 888 Also they can be assigned with another port number between 1 and 65535 excep...

Page 44: ...31 7 2014 44 ebode IPV58P2P Figure 6 37 Figure 6 38...

Page 45: ...igure 6 40 If you cannot play the video in the VLC player please check the port mapping You can read Quick Installation Guide about How to configure port forwarding NOTE If you modify the camera s use...

Page 46: ...u use Gmail Transport Layer Security must be set to TLS or STARTTLS and SMTP Port must be set to 465 or 25 or 587 which port you choose should be decided by which Transport Layer Security you select 2...

Page 47: ...Test 1 Cannot connect to the server 2 Network Error Please try later 3 Server Error 4 Incorrect user or password 5 The sender is denied by the server Maybe the server need to authenticate the user ple...

Page 48: ...u can set as Figure 6 49 Port Default is port 21 If changed external FTP client program must change the server connection port accordingly FTP Mode Here supports two modes PORT and PASV Username passw...

Page 49: ...will become But the code flux will become larger too and it will take up more bandwidth Different models support different specific types Bit rate Generally speaking the larger the bit rate is the cl...

Page 50: ...ee the system date on the video Display Camera Name There are two options Yes or NO Select Yes and you can see the device name on the video 6 4 3 Privacy Zone This page is used to add privacy zone on...

Page 51: ...e following picture Figure 6 50 6 4 4 Snapshot Settings On this page you can set the snapshot pictures image quality and the storage path Figure 6 51 Image Quality Low Middle and High The higher the q...

Page 52: ...umn of TUE turns to red that means during Tuesday whole day the camera will capture Press the left mouse and drag it on the time boxes you can select the serial area 4 Click Save button to take effect...

Page 53: ...1 Enable Motion detection 2 Sensitivity It supports three modes Low Middle and High The higher the sensitivity the camera will be more easily alarmed Select one motion sensitivity 3 Trigger interval T...

Page 54: ...e view window as a still picture and load it to the FTP Make sure you have set FTP and set FTP as the storage path in Video Snapshot settings panel If you select Send Email at the same time the pictur...

Page 55: ...ll alarm Figure 6 57 Specify an alarm schedule Click the week day words the corresponding column will be selected For example click TUE the all column of TUE turns to red that means during Tuesday who...

Page 56: ...TE You must set the detection area and detection schedule or else there is no alarm anywhere and anytime 6 6 Record 6 6 1 Storage Location On this page you can change the manually recording storage pa...

Page 57: ...t the main stream or sub stream from the drop down You can set the store path of the recording file on the Storage Location page Click Save button to take effect 6 7 PTZ Not available for this camera...

Page 58: ...C s IP addresses It is composed of the following columns Block access from these IP addresses and Only allow access from these IP addresses Figure 6 66 Enable firewall If you select Only allow access...

Page 59: ...restore the restore the parameters Figure 6 67 6 9 2 System Upgrade Click Browse choose the correct bin file System firmware or Web UI and then click System upgrade Don t shut down the power during up...

Page 60: ...ackage before you upgrade 3 Upon downloading the firmware check the sizes of the bin files They must match the size in the readme txt file If not please download the firmware again until the sizes are...

Page 61: ...camera This is similar to unplugging the power to the camera Figure 6 72 7 Appendix 7 1 Frequently Asked Questions NOTE Any questions you would meet please check Network connections firstly Check the...

Page 62: ...e click the plug in to install it Figure 7 2 Continue to finish the installation and then it will be successful Figure 7 3 Please check if the plug in was successfully installed or not Figure 7 4 Rest...

Page 63: ...may prompt you to download plugin Figure 7 5 Drag the download file to Firefox web page and it will prompt you to Install it Figure 7 6 Reboot the Firefox after the plugin installation is successfully...

Page 64: ...oftware on your computer does not block the active download and installation If you are unable to run the ActiveX control try shutting down the firewall or antivirus program 7 1 3 How to download and...

Page 65: ...issue The steps are open IE browser Tool Internet Properties Security Trusted sites Sites Add Or open IE browser then right click select Run as administrator 7 1 6 Subnet doesn t match Check whether y...

Page 66: ...controls and plug ins Figure 7 10 If you allow the ActiveX running but still could not see living video Please change another port number to try Don t use port 8000 Figure 7 11 Make sure that your fir...

Page 67: ...not connect wireless after you set wireless settings and plug out the cable Please check whether your settings are correct or not Normally camera can t connect wireless mainly because of wrong setting...

Page 68: ...the junk icon to remove it Camera will prompt you to install the latest one when next logging Figure 7 14 Remove the plug in from Firefox If you need to remove the plug in from Firefox please open a...

Page 69: ...olor CMOS Sensor Display Resolution 1 0 Megapixels Min Illumination 0 Lux With IR Illuminator Lens Lens Type Glass Lens focal length f 2 8mm Aperture F1 2 Angle of View 70 Video Image Compression H 26...

Page 70: ...e version or compatible browser Mozilla Firefox Google Chrome Apple Safari Other Features Motion Detection Alarm via E Mail upload alarm snapshot to FTP Privacy Block Set privacy area manually User Ac...

Page 71: ...environment This equipment generates uses and can radiate radio frequency energy and if not installed and used in accordance with the installation manual may cause harmful interference to radio commun...

Page 72: ...e available and can be obtained from ebode electronics PB 25 NL 4264ZG the Netherlands User Information for Consumer Products Covered by EU Directive 2002 96 EC on Waste Electric and Electronic Equipm...

Page 73: ...conforme aux exigences essentielles et aux autres dispositions pertinentes de la Directive 1999 5 EC Espa ol Spanish Este equipo cumple con los requisitos esenciales asi como con otras disposiciones d...

Page 74: ...martphone tablet or laptop wireless to your BT Sound Receiver You easily hook this up to your amplifier stereo set or your car audio system Enjoy your favourite songs with all your friends at home and...

Page 75: ...such as single dual or triple infrared emitters either in a blinking or non blinking version Our optional emitter shields prevent unwanted external IR signals from passing through ebode is focusing o...

Page 76: ...31 7 2014 76 ebode IPV58P2P www ebodeelectronics eu...

Reviews: