


23
07/09 MN03407002Z-EN
3
Commissioning
This section tells you how to take the gateway into
operation.
X
Before switching on the supply voltage for the gateway
ensure that the contactor coils, the bus connection and the
SmartWire system are correctly connected.
Initial starting
X
Make sure that the gateway’s MODBUS RTU address, the
parity and the baud rate for the MODBUS RTU network are
set correctly with the DIP switches on the gateway’s
underside.
X
Switch on the supply voltages for the contactors and the
gateway.
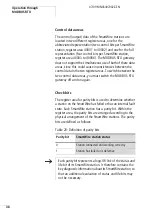
Die gateway’s LEDs now indicate the following states:
• The ready LED of the SWIRE-GW-MB flashes.
• The U-Aux LED of the SWIRE-GW-MB is permaneltly ON.
• The MODBUS-RTU-LED is OFF (no communication via
MODBUS-RTU).
• The SmartWire LED flashes as the SmartWire slaves have
not yet been configured.
• The first SmartWire module flashes the ready LED.
• The ready LEDs on all other SmartWire modules flash in
pulses.
X
Press the configuration button on the gateway and keep it
pressed for about 2 s until the ready LED switches from
flow flashing to fast flashing.
The actual configuration of the SmartWire system, i.e. all
connected SmartWire modules, are now automatically read
into the gateway. An address is assigned in turn to each
SmartWire station, starting with address 1 and incrementing
in steps of 1. When the configuration has been read in to the
SmartWire system, the SWIRE status LED on the MODBUS
RTU gateway and the Ready LEDs on the SmartWire module
change from slow flashing to continually lit. The SmartWire
Summary of Contents for SWIRE-GW-MB
Page 14: ...10 07 09 MN03407002Z EN ...
Page 26: ...22 07 09 MN03407002Z EN ...
Page 30: ...26 07 09 MN03407002Z EN ...
Page 58: ...54 07 09 MN03407002Z EN ...
Page 63: ...Dimensions 59 07 09 MN03407002Z EN Dimensions M4 7 5 35 5 7 5 90 102 110 105 109 4 5 ...
Page 64: ...60 07 09 MN03407002Z EN ...