background image

8

5. Installation

5.6 Hot Plugging

All KVM switches support hot plugging—components can be removed and added back into the installation by unplugging their cables from 

the ports without having to shut the switch down. However, in order for hot plugging to work properly, these procedures must be followed:

Switching Station Positions

Switch station positions by simply unplugging the daisy-chain cable from the old parent and plugging into a new one. After you do, in order 

for the OSD menus to correspond to the change, you must reset the Station IDs via the OSD. See page 17 for details.

Hot Plugging CPU Ports

Switch CPU ports by unplugging the KVM cable kit and replugging into the desired port. In order for the OSD menus to correspond to the 

change made, you must manually reconfigure the OSD information for the new port. See the 

F3 SET 

(page 15) and 

F4 ADM 

(page 16) 

functions for details.

Note:

 If the computer’s Operating System does not support hot plugging, this function may not work properly.

Hot Plugging Console Ports

Keyboard, monitor, and mouse can all be hot plugged. When hot plugging the mouse:

1.  You may unplug the mouse and plug it back in again (to reset the mouse, for example), as long as you use the same mouse.
2.  If you plug in a different mouse, all the stations and all the computers on the installation must be shut down for 10 seconds then 

restarted using the Power Up Sequence described on page 8.

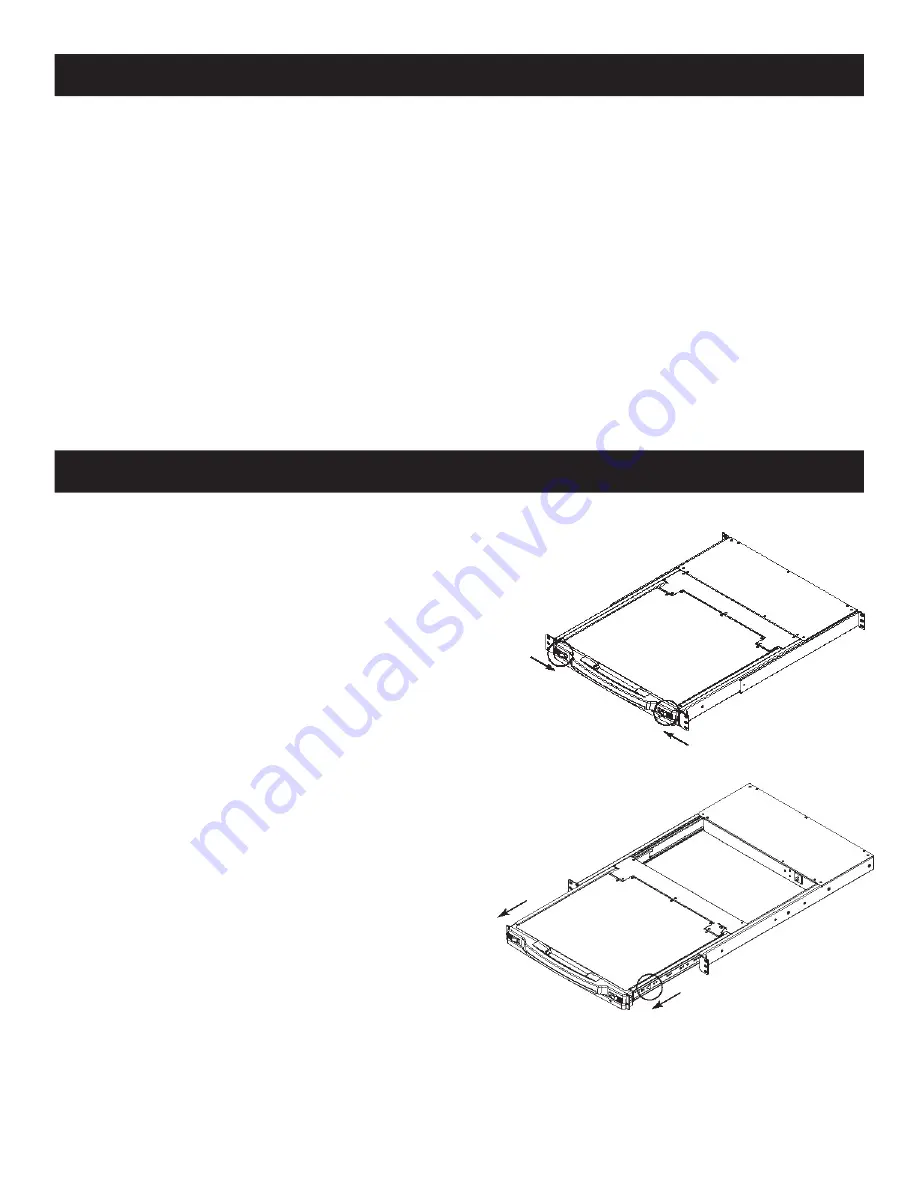
6.1 Opening the NetDirector Console KVM

The console is located under the top cover. To access the console, slide 

the console module out and raise the cover.

Note: 

As a safety precaution, to keep the console from accidentally sliding out, the console 

is locked into the “in” position. Before you can pull the console module out, first release it by 

pushing the catches on the unit’s front panel toward the center of the switch.

6.2 Closing the NetDirector Console KVM

To slide the console module back in, close the cover and do the 

following:

1. Pull the safety catches on the unit’s side rails toward you and push 

the module in until it stops.

2. Release the catches; pull the module slightly toward you; then push 

it all the way in.

Note:

 The purpose of the two-step procedure is to minimize the chances of  pinching 

your fingers when sliding the module in.

6. Basic Operation

Summary of Contents for NetDirector TRIPP LITE Series

Page 1: ...1 Owner s Manual Purchased product may differ from image B020 U16 19 KG B020 U16 19 KF NetDirector Console KVM Switch 16 Port...

Page 2: ...8 OSD On Screen Display Operation 13 8 1 OSD Overview 13 8 2 Logging In for the First Time 13 8 3 OSD Invocation Sequence 13 8 4 OSD Navigation 13 8 5 OSD Main Screen Headings 13 8 6 OSD Functions 14...

Page 3: ...rds and mice Keyboard and mouse emulation PS 2 and USB allows for simultaneous booting of computers even when the console focus is elsewhere The B020 U16 19 KG uses a German QWERTZ keyboard layout and...

Page 4: ...o indicate that the unit is receiving power 9 Rackmounting Tabs The rackmounting tabs located at each corner of the unit secure the chassis to a system rack Refer to page 7 for rackmounting details 10...

Page 5: ...er spill liquid of any kind on the device Unplug the device from the wall outlet before cleaning Do not use liquid or aerosol cleaners Use a damp cloth for cleaning The device should be operated from...

Page 6: ...ic mixture with air oxygen or nitrous oxide Rack Mounting Safety Instructions Before working on the rack make sure that the stabilizers are secured to the rack extended to the floor and that the full...

Page 7: ...d installation 1 Ensure that power to all the connected devices has been turned off 2 Connect the included USB PS2 Combo Console Cable Kit to the console connector on the back of the unit then connect...

Page 8: ...or and mouse can all be hot plugged When hot plugging the mouse 1 You may unplug the mouse and plug it back in again to reset the mouse for example as long as you use the same mouse 2 If you plug in a...

Page 9: ...e Console KVM Switch s LCD panel can be used to share USB peripherals between connected computers Simply connect a USB peripheral device to this port and any connected computer you switch to will have...

Page 10: ...While the Ctrl key is held down press and release the F12 key 3 After releasing the F12 key release the Ctrl key When Hotkey Mode has been invoked The monitor goes blank and the hotkey command line i...

Page 11: ...nvoke Previous Next Switching 5 Invoke Hotkey Mode 6 Key in Arrow refers to any of the arrow keys on the keyboard After you press Arrow you automatically exit Hotkey Mode and enter Skip Mode You can s...

Page 12: ...7 13 Restore Default Values This Administrator ONLY hotkey restores the KVM switch to its default values See page 17 for details on restoring the KVM default values via OSD To restore the default val...

Page 13: ...rently logged in User are visible see SET ACCESSIBLE PORTS page 16 for details 4 If the port list is collapsed into stations simply click on the plus sign next to the desired station number or highlig...

Page 14: ...to indicate that it is currently selected F3 Set Environment SET This function allows each User and the Administrator to set up their own working environment A separate profile for each is stored by t...

Page 15: ...your changes have been saved Usernames and passwords can be up to 16 characters long using any combination of letters and numbers A Z 0 9 and the following characters Asterisk Parentheses Plus Minus C...

Page 16: ...the following 1 Highlight the desired port or click on it using the touchpad 2 Press the Spacebar to toggle between four options WIN MAC SUN and OTHER Each port is set to WIN by default 3 You do not n...

Page 17: ...an S appears in front of the Port ID display to indicate that it is being accessed under Auto Scan Mode While Auto Scan Mode is in effect the keyboard and mouse will not function You must exit Auto S...

Page 18: ...ice s firmware levels with that of the upgrade files If it finds that the device s version is higher than the upgrade version it brings up a dialog box informing you of the situation and gives you the...

Page 19: ...he Normal position 4 Upgrade your firmware using the steps from pages 18 19 10 1 Specifications Specification B020 U16 19 KG B020 U16 19 KF Keyboard Type German Keyboard French Keyboard Port Selection...

Page 20: ...hen using key combinations press and release the first key Ctrl then press and release the activation key PC Keyboard Mac Keyboard Shift Shift Ctrl Ctrl Ctrl 1 Ctrl 2 Ctrl 3 Ctrl 4 Alt Alt Print Scree...

Page 21: ...iance Identification Numbers For the purpose of regulatory compliance certifications and identification your product has been assigned a unique series number The series number can be found on the prod...

Reviews: