background image

14

8. OSD (On-Screen Display) Operation

8.6 OSD Functions

OSD functions allow the KVM to be controlled and configured via the OSD. Using these functions you can quickly jump to a port on the 

installation, start an auto-scan, limit the port list that displays when you access the OSD, create/edit port names, etc. To access any of the 

OSD functions, simply click on their corresponding function number at the top of the OSD or hit their corresponding function number on the 

keyboard. When in the OSD function submenus, simply hit the 

[Esc]

 key to exit and return to the previous menu.

F1 Go To (GOTO)

Click the 

F1


field or press 

[F1]


to


activate the GOTO function. GOTO allows you to switch directly to a port either by keying in the port’s 

Name

 or its 

Port ID

.

•  To use the Name, enter 

[1]

; key in the port’s Name; then press 

[Enter]

•  To use the Port ID, enter 

[2]

; key in the 

Port ID

; then press 

[Enter]

   Note: 

A partial Name or Port ID can be entered. The screen will show all the computers that match the Name or Port ID pattern AND that the User is allowed to access.

To return to the OSD Main Menu without making a choice, press 

[Esc]

.

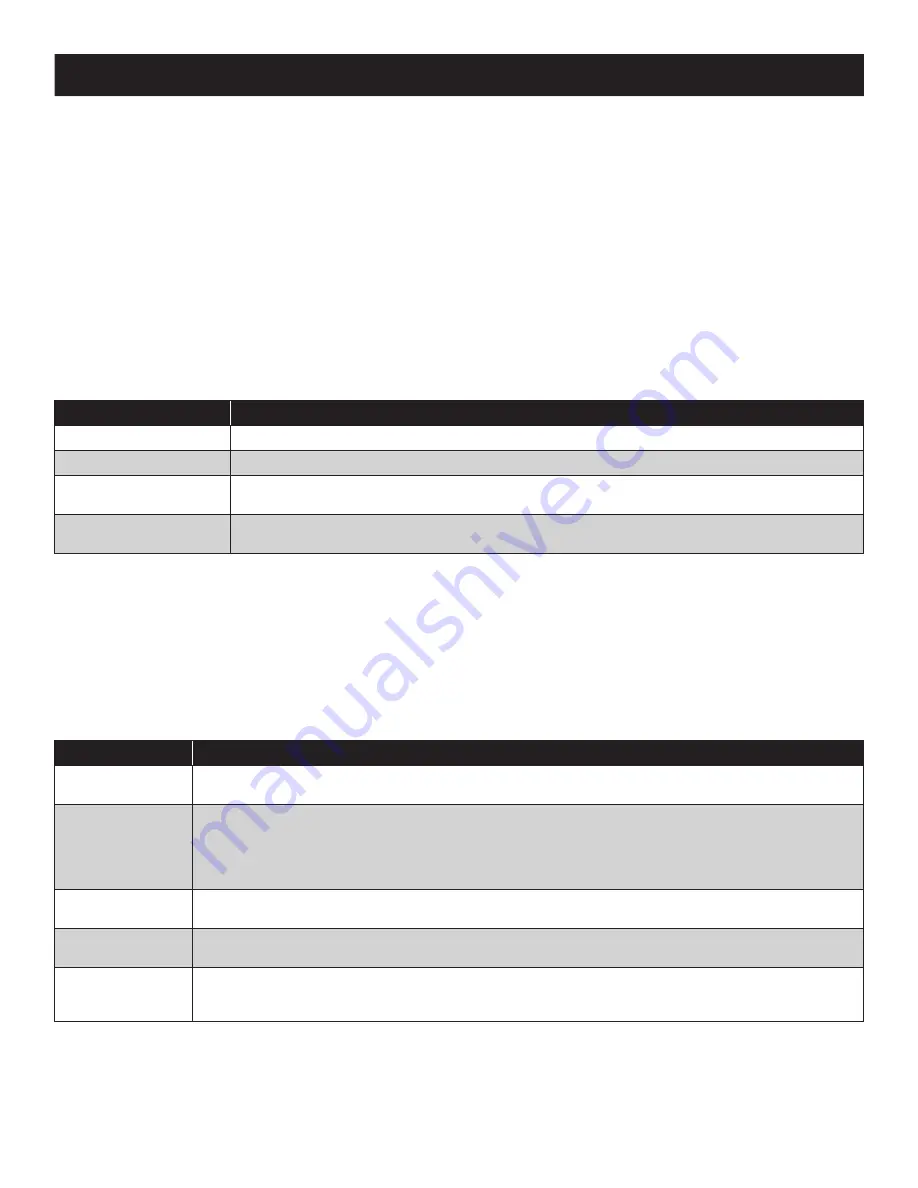
F2 List Ports (LIST)

This function lets you tailor the list of ports the OSD will display on the Main Screen. The submenu choices and their meanings are given in the 

table below:

Choice

Description

ALL

Lists all of the ports on the installation that are accessible to the logged-on User.

POWERED ON

Lists all of the ports on the installation that are accessible to the logged-on User AND powered-on.

QVIEW

This is an Administrator-ONLY option. When selected, it will display only the ports that have been marked as Quick 

View ports.

QVIEW + POWERED ON

This is an Administrator-ONLY option. When selected, it will display only the ports that have been marked as Quick 

View ports AND are powered-on.

Move the Highlight Bar to the desired choice and press 

[Enter]

. An icon appears next to the choice to indicate that it is currently selected.

F3 Set Environment (SET)

This function allows each User and the Administrator to set up their own working environment. A separate profile for each is stored by the OSD 

and is activated according to the Username that was provided during login.
To change a setting:

1) Double-click the item; or move the highlight bar to it and press 

[Enter]

.

2)  After you select an item, a submenu with more choices will appear. To make a selection, either double-click a choice or move the 

Highlight Bar to the desired place and press


[Enter]

. An icon will appear beside the selected choice to identify it. The settings are 

explained in the following table:

Setting

Function

OSD HOTKEY

Select the hotkey that activates the OSD function: use either 

[Scroll Lock] [Scroll Lock]


or 

[

Ctrl] [Ctrl]

. Since the 

[Ctrl]


key combination may conflict with programs running on the computers, the default is the 

[Scroll Lock]

 combination.

PORT ID DISPLAY 

POSITION

Position the Port ID identifier anywhere on the screen. The default is the upper right corner. Use the Mouse or the Arrow 

Keys plus 

[Pg Up]

[Pg Dn]

[Home]

[End]

 and 

[5] 

(on the numeric keypad with 

[Num Lock]

 off) to position the Port ID 

display, then double-click or press 

[Enter]

 to lock the position and return to the Set submenu.

Note:

 The position for the ID identifier is set independently for each port on the installation; the choice specified here only applies to the port that 

is currently active.

PORT ID DISPLAY  

DURATION

This selection gives you the option of displaying the Port ID for 3 seconds, or having the Port ID always off. The default is to 

display for 3 seconds.

PORT ID DISPLAY  

MODE

Select how the Port ID is displayed: the Port Number alone 

(PORT NUMBER)

; the Port


Name alone 

(PORT NAME)

 or the 

Port Number plus the Port Name 

(PORT PORT NAME)

. The default is 

(PORT PORT NAME)

.

SCAN DURATION

Determine how long each port is connected as the KVM cycles through the ports in Auto-Scan Mode (see F7 SCAN 

page 18). Key in a value from 1 - 255 seconds, then press 

[Enter]

. The default is 5 seconds; a setting of 0 (zero) disables 

the Auto-Scan Function.

Summary of Contents for NetDirector TRIPP LITE Series

Page 1: ...1 Owner s Manual Purchased product may differ from image B020 U16 19 KG B020 U16 19 KF NetDirector Console KVM Switch 16 Port...

Page 2: ...8 OSD On Screen Display Operation 13 8 1 OSD Overview 13 8 2 Logging In for the First Time 13 8 3 OSD Invocation Sequence 13 8 4 OSD Navigation 13 8 5 OSD Main Screen Headings 13 8 6 OSD Functions 14...

Page 3: ...rds and mice Keyboard and mouse emulation PS 2 and USB allows for simultaneous booting of computers even when the console focus is elsewhere The B020 U16 19 KG uses a German QWERTZ keyboard layout and...

Page 4: ...o indicate that the unit is receiving power 9 Rackmounting Tabs The rackmounting tabs located at each corner of the unit secure the chassis to a system rack Refer to page 7 for rackmounting details 10...

Page 5: ...er spill liquid of any kind on the device Unplug the device from the wall outlet before cleaning Do not use liquid or aerosol cleaners Use a damp cloth for cleaning The device should be operated from...

Page 6: ...ic mixture with air oxygen or nitrous oxide Rack Mounting Safety Instructions Before working on the rack make sure that the stabilizers are secured to the rack extended to the floor and that the full...

Page 7: ...d installation 1 Ensure that power to all the connected devices has been turned off 2 Connect the included USB PS2 Combo Console Cable Kit to the console connector on the back of the unit then connect...

Page 8: ...or and mouse can all be hot plugged When hot plugging the mouse 1 You may unplug the mouse and plug it back in again to reset the mouse for example as long as you use the same mouse 2 If you plug in a...

Page 9: ...e Console KVM Switch s LCD panel can be used to share USB peripherals between connected computers Simply connect a USB peripheral device to this port and any connected computer you switch to will have...

Page 10: ...While the Ctrl key is held down press and release the F12 key 3 After releasing the F12 key release the Ctrl key When Hotkey Mode has been invoked The monitor goes blank and the hotkey command line i...

Page 11: ...nvoke Previous Next Switching 5 Invoke Hotkey Mode 6 Key in Arrow refers to any of the arrow keys on the keyboard After you press Arrow you automatically exit Hotkey Mode and enter Skip Mode You can s...

Page 12: ...7 13 Restore Default Values This Administrator ONLY hotkey restores the KVM switch to its default values See page 17 for details on restoring the KVM default values via OSD To restore the default val...

Page 13: ...rently logged in User are visible see SET ACCESSIBLE PORTS page 16 for details 4 If the port list is collapsed into stations simply click on the plus sign next to the desired station number or highlig...

Page 14: ...to indicate that it is currently selected F3 Set Environment SET This function allows each User and the Administrator to set up their own working environment A separate profile for each is stored by t...

Page 15: ...your changes have been saved Usernames and passwords can be up to 16 characters long using any combination of letters and numbers A Z 0 9 and the following characters Asterisk Parentheses Plus Minus C...

Page 16: ...the following 1 Highlight the desired port or click on it using the touchpad 2 Press the Spacebar to toggle between four options WIN MAC SUN and OTHER Each port is set to WIN by default 3 You do not n...

Page 17: ...an S appears in front of the Port ID display to indicate that it is being accessed under Auto Scan Mode While Auto Scan Mode is in effect the keyboard and mouse will not function You must exit Auto S...

Page 18: ...ice s firmware levels with that of the upgrade files If it finds that the device s version is higher than the upgrade version it brings up a dialog box informing you of the situation and gives you the...

Page 19: ...he Normal position 4 Upgrade your firmware using the steps from pages 18 19 10 1 Specifications Specification B020 U16 19 KG B020 U16 19 KF Keyboard Type German Keyboard French Keyboard Port Selection...

Page 20: ...hen using key combinations press and release the first key Ctrl then press and release the activation key PC Keyboard Mac Keyboard Shift Shift Ctrl Ctrl Ctrl 1 Ctrl 2 Ctrl 3 Ctrl 4 Alt Alt Print Scree...

Page 21: ...iance Identification Numbers For the purpose of regulatory compliance certifications and identification your product has been assigned a unique series number The series number can be found on the prod...

Reviews: