background image

 Chapter 1 Creating CardScan Address Book 

 1-4

  CardScan, Inc.

1

 Verifying Accuracy

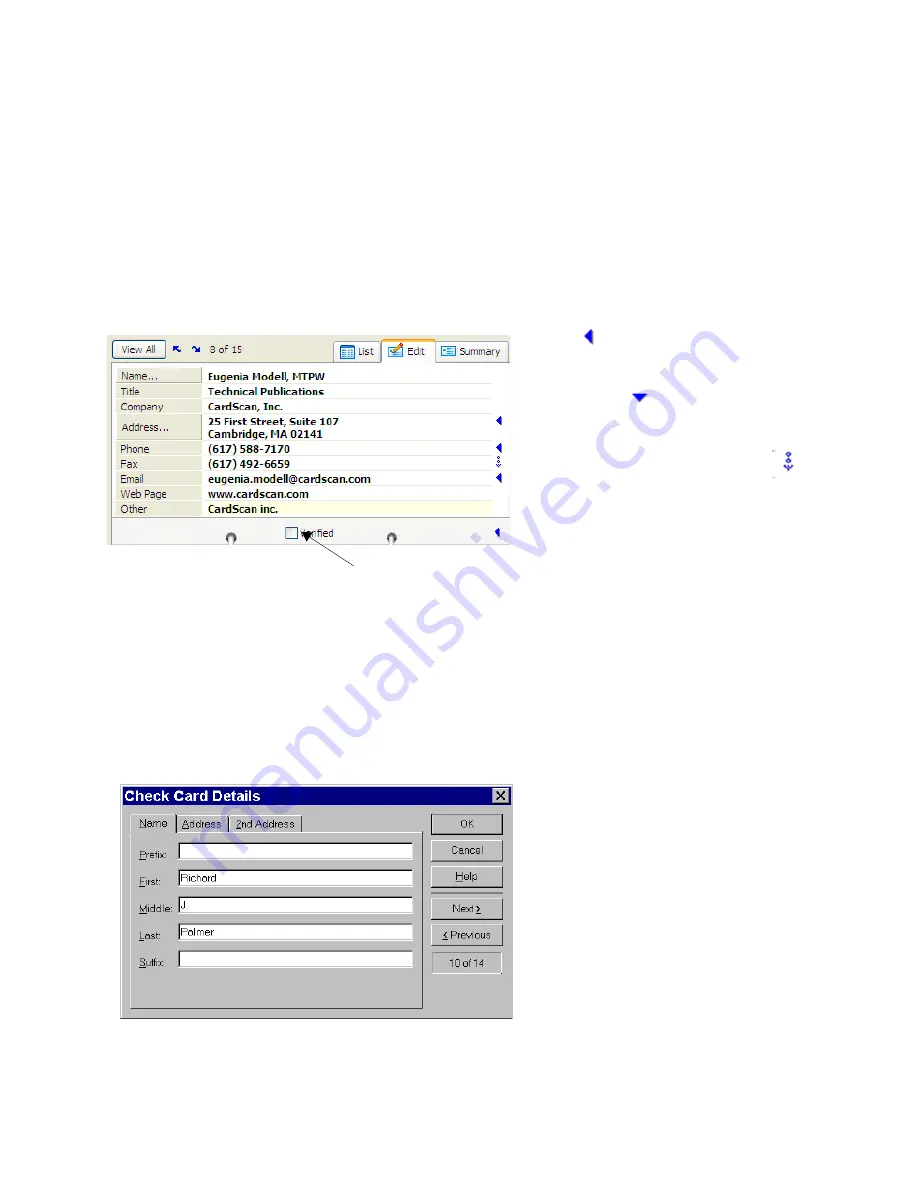
To verify a contact’s accuracy, display the contact in the Edit view, as illustrated 

on page 1-2

Verify Fields Highlighted by CardScan. 

CardScan highlights any field it suspects of 

containing incomplete or inaccurate information. To verify a highlighted field, compare its contents 
with the information in the card’s image. 

Note that when you click on a field, CardScan highlights the 

corresponding part of the image

.

Verify Fields and Text Hidden from View. 

Make sure you have reviewed fields and lines of 

text that may be hidden from view.

Check Details of Names and Street Addresses. 

People’s names often involve complex 

details. For example, some names contain titles or designations—such as Rev., Ph.D, and the like. 
Such details must be placed correctly, especially for export, transfer, or synchronization purposes. 

As more people choose elaborate designs for their business cards, it is important to check street 
addresses, to make sure their components are in the correct fields. This is also very important when 
you scan business cards of people from other countries.

To begin checking details of Names and Addresses, click either the 

Name

 or the 

Address 

button in 

the Edit view. The following dialog appears:

When you are satisfied with the contact’s accuracy, check the “Verified” box. 

The 

button indicates an 

additional field or additional lines of 
text. When clicked, the arrow 
changes to 

 and the field opens. 

When the fields containing 
information are not visible, 
CardScan displays this symbol 

To view the hidden information, 
click directly above the symbol. 

Check this box when satisfied with the accuracy. 

If you click the 

Name 

button,


the 

Name

 tab appears on top. If you 

click the 

Address

 button, the 

Address 

tab appears on top. 

You can edit text in this dialog—as 
any text in the Edit view—by typing, 
dragging and dropping text, cutting 
and pasting text. 

Summary of Contents for LabelWriter 450 Turbo

Page 1: ...1 Chapter Getting Started with CardScan ...

Page 2: ...expressly set forth in this agreement CardScan Inc disclaims and excludes any and all implied warranties of merchantability title or fitness for a particular purpose CardScan Inc does not warrant that the software or documentation will satisfy your requirements or that the software and documentation are without defect or error or that the operation of the software will be uninterrupted LIMITATION ...

Page 3: ...iness Cards 2 1 Use Additional Fields for More Information 2 2 Organizing Contacts with Categories 2 2 Major Features for Finding Contacts 2 3 Finding and Removing Duplicates 2 4 Working with Multiple Contact Files 2 4 Safeguarding Your Contacts 2 5 Updating Contacts by Scanning 2 6 Chapter 3 Using CardScan Data in Microsoft Outlook and other Desktop Applications Choosing Best Option with Data Exc...

Page 4: ...ii CardScan Inc Chapter 5 Copying Contacts to and from Windows Mobile Devices Choosing Best Option with Data Exchange Wizard 5 1 Synchronizing Selected Files 5 2 Appendix A Compliance with FCC and EC ...

Page 5: ...data with another desktop application or a handheld device CardScan s Data Exchange Wizard assists you in choosing and following the best method for copying data to and from CardScan You can then use these data in Microsoft Outlook and other contact managers and Personal Information Managers PIMs as well as with Personal Data Assistants PDAs such as Palm handhelds and Windows Mobile Devices CardSc...

Page 6: ...ication The usability of an address book depends on how accurate the data is CardScan makes it easy for you to verify the data by drawing your attention to the fields where the information may be inaccurate CardScan s Check Details feature helps you verify that the details of names and addresses have been placed in the correct fields and enables you to correct any errors easily Intuitive Graphical...

Page 7: ...ice Review and accept or reject updates from your browser Exchanging Data with Other Programs and Devices Use the Data Exchange Wizard to automatically discover applications installed on your computer and choose the most suitable method to copy data to and from CardScan The Wizard simplifies copying data to and from Other Desktop Applications for example Microsoft Outlook Palm OS Handheld Devices ...

Page 8: ... the UK Tel 49 0 2203 9113332 English speaking callers anywhere Fax 49 0 2203 9113390 http support cardscan org Others please contact your local reseller Find your local reseller on www cardscan com Online Help Use the online help for instructions detailed descriptions of features and for troubleshooting tips For help with dialogs click Help on the dialog The dialog help is displayed in a tri pane...

Page 9: ...rting CardScan as the last step of the installation procedure therefore you must start CardScan first Follow these steps 1 Start CardScan by choosing Start Programs CardScan CardScan CardScan starts by opening the Welcome Wizard 2 Follow the Welcome Wizard to set up CardScan to work with your scanner and to enable the features that will enhance your experience using CardScan When the setup is fini...

Page 10: ...s CardScan processes the images and displays the details of the last one in Edit view to help you review the accuracy Click to delete the image displayed Click the left and right arrows to step through saved images Click the up down arrow to collapse the dialog to hide the saved images NOTE The name of the contact displayed in detail is highlighted on the Navigation Bar For more about the Navigati...

Page 11: ...ol varies depending on the probability of the contact s being inaccurate However even accurate contacts are accompanied by question marks until you have checked the verified box in the Edit view See Verifying Accuracy on page 1 4 AtYourService Updates Status see page 2 5 View All button displays all contacts in file QuickAccess Bar Letter Bar to list only contacts starting with the same letter Num...

Page 12: ...or synchronization purposes As more people choose elaborate designs for their business cards it is important to check street addresses to make sure their components are in the correct fields This is also very important when you scan business cards of people from other countries To begin checking details of Names and Addresses click either the Name or the Address button in the Edit view The followi...

Page 13: ... Summary View This is an example of visiting your contact s website from CardScan s Summary view 1 Select a contact and click the Summary tab The Summary view of the contact appears 2 Point at the web address Click when the cursor s shape changes to a pointing hand Reaching a Contact from List View You can choose how List View displays the contacts in the file by clicking the buttons on the right ...

Page 14: ...ay Map of Address Follow these steps 1 Display the contact in Summary View or select in List View Then either point at the address in the window or choose Card Display Map of Address The dialog Select Map Web Service appears 2 Choose the service you want and click OK CardScan launches your browser and displays the map using the service you selected If the browser is already open CardScan displays ...

Page 15: ...ts from other applications and the Web Importing files Creating Contacts by Typing To create a contact by typing follow these steps 1 Click the New Card button on the QuickAccess toolbar CardScan opens a blank contact in the Edit view 2 Type contact information in the appropriate fields NOTE CardScan has already checked the Verified box assuming you enter the information accurately If unsure you c...

Page 16: ...tact in the Edit view and click the Notes tab Organizing Contacts with Categories Categories allow you to organize contacts into meaningful groups This helps you find contacts quickly select contacts for printing mailing labels etc For more information please consult the Online Help You can assign categories to Individual contacts by opening the contact in the Edit view and clicking the Categories...

Page 17: ...this collection and then use the items inside each panel to find contacts An example below illustrates how by clicking the Verified panel on the Navigation Bar you can isolate the verified and unverified contacts Finding Contacts with QuickSearch You can search for contacts in any number of open files On the QuickAccess Toolbar the QuickSearch component looks like this Navigation Bar Panels Click ...

Page 18: ...s of the contacts in the same file simultaneously Dragging and dropping contacts from one file to another The following example explains the difference between dragging and dropping contacts from file to file inside the same window and performing this task with the files displayed in separate windows When you drag and drop contacts from one file to another in the same window you drop the selected ...

Page 19: ...dd edit or delete contacts When you return to your own PC CardScan has updated your file with the changes you made on AtYourService If you have a PC at home and at work install CardScan on both of them Keep a local copy of your contacts in both places AtYourService keeps the files synchronized With AtYourService you can take advantage of contact information updates provided by the contacts themsel...

Page 20: ...n Inc 1 Updating Contacts by Scanning If you have a contact s new card you can update the contact s front image and the information in the corresponding fields by scanning the new card into the existing contact To do so select the contact and choose Card Replace ...

Page 21: ...g example describes how the Data Exchange Wizard assists the users whose contact manager is Microsoft Outlook If you use a different contact manager simply provide the Wizard with your information and it will guide you to the option that is right for you Example Microsoft Outlook To choose the option that suits you best follow these steps 1 To use the Data Exchange Wizard start CardScan choose Fil...

Page 22: ...ct to select an Outlook folder The dialog Select Outlook Folder appears 7 Select the Contacts folder to synchronize with CardScan and click OK The Configure Synchronization dialog appears 8 Review this dialog to be sure the selected CardScan file and Outlook folder are the ones you want to synchronize 9 Optional Click Options to review the default synchronization options The default options may be...

Page 23: ...up automatic synchronization click AutoSync on the CardScan Synchronization dialog TIP You can use CardScan contacts from within Microsoft Outlook without copying these contacts to Outlook CardScan has a feature that allows you to designate any CardScan file as a personal address book in Microsoft Outlook You can Configure as many CardScan Address Books for Outlook as you like To do so choose Tool...

Page 24: ...Chapter 3 Using CardScan Data in Microsoft Outlook and other Desktop Applications 3 4 CardScan Inc 1 This page is left blank intentionally ...

Page 25: ...ktop software on your PC You must install your Palm Desktop software before installing the CardScan software Choosing Best Option with Data Exchange Wizard To choose the most efficient option use the Data Exchange Wizard Follow these steps 1 Start CardScan choose File Data Exchange The Data Exchange menu appears 2 Choose Wizard from the Data Exchange menu The Data Exchange Wizard starts 3 On the f...

Page 26: ...enerated The following steps describe setting up this option 4 Click Next The screen introducing the CardScan Conduit for Palm appears 5 Click Continue The CardScan Conduit Options dialog appears 6 On the General tab select Enable CardScan Conduit This enables all CardScan Conduit options 7 Set the options as you like and click OK to save the settings and close the CardScan Conduit Options dialog ...

Page 27: ...o synchronize with CardScan your Windows Mobile device must be running Microsoft Windows CE 3 0 or later Choosing Best Option with Data Exchange Wizard To choose the most efficient option use the Data Exchange Wizard Follow these steps 1 Start CardScan choose File Data Exchange and choose Wizard from the Data Exchange menu The first screen of the Data Exchange Wizard appears 2 Select the option Co...

Page 28: ...fying the current setup click Settings The CardScan ActiveSync Options dialog appears 8 Click Browse and select the CardScan file for synchronization 9 Optional If your CardScan file is password protected select the option Use this password and type your password This will allow CardScan to open the file automatically at every new connection instead of prompting you for the password 10 Click OK to...

Page 29: ... which can be determined by turning the equipment off and on the user is encouraged to correct the interference by one of the following measures Reposition the receiving antenna Increase the distance between the equipment and the receiver Connect the scanning and computer equipment to an outlet on a circuit different from the receiver s EC Declaration of Conformity Equipment Description Model Card...

Page 30: ...A 2 CardScan Inc 1 This page is left blank intentionally ...

Reviews: