


Machine head
Service Instructions 745-35-10 D - 00.0 - 10/2017
67
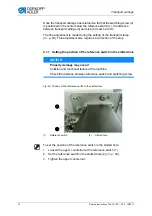
Proper setting
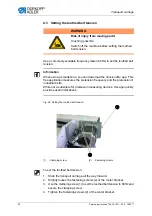
The upper edge of the hook thread trimmer (1) must be level with the top
side of the throat plate.
If the hook thread trimmer is set too high, the sewing material may become
damaged.
If the hook thread trimmer is set too low, the hook threads will not be
cut off.
The limit plates (4) attached on the cylinder (3) set the opening width of
the thread clamping plates (5). Pneumatically opened thread clamping
plates (5) require that both hook tips pass with a safe distance.
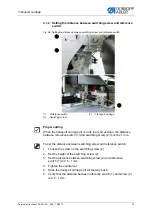
Fig. 58: Setting the trimming and clamping device for the hook threads (2)
To set the trimming and clamping device for the hook threads:
1.
Loosen the screw (7).
2.
Align the openings of the hook thread trimmer (1) with the center of
the thread grooves in the throat plate.
3.
Tighten the screw (7).
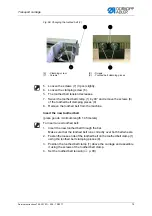
4.
Loosen the screw (6).
5.
Set the height of the hook thread trimmer (1).
The upper side of the hook thread trimmer (1) and the top side of the
throat plate must be in the same plane.
6.
Tighten the screw (6).
7.
Align the thread clamping plates (5).
The thread clamping plates must abut on the throat plate panel and
exert a light spring pressure.
8.
Check the safety distance between the hook tips and the pneumatically
opened thread clamps.
(6)
- Screw
(7)
- Screw
⑥
⑦
Summary of Contents for 745-35-10 D
Page 1: ...745 35 10 D Service Instructions...
Page 6: ...Table of Contents 4 Service Instructions 745 35 10 D 00 0 10 2017...
Page 10: ...About these instructions 8 Service Instructions 745 35 10 D 00 0 10 2017...
Page 74: ...Machine head 72 Service Instructions 745 35 10 D 00 0 10 2017...
Page 84: ...Transport carriage 82 Service Instructions 745 35 10 D 00 0 10 2017...
Page 116: ...Light barriers 114 Service Instructions 745 35 10 D 00 0 10 2017...
Page 122: ...Aligning the machine head 120 Service Instructions 745 35 10 D 00 0 10 2017...
Page 128: ...Folder 126 Service Instructions 745 35 10 D 00 0 10 2017...
Page 146: ...Throw over stacker 144 Service Instructions 745 35 10 D 00 0 10 2017...
Page 282: ...Programming 280 Service Instructions 745 35 10 D 00 0 10 2017...
Page 292: ...Maintenance 290 Service Instructions 745 35 10 D 00 0 10 2017...
Page 294: ...Decommissioning 292 Service Instructions 745 35 10 D 00 0 10 2017...
Page 296: ...Disposal 294 Service Instructions 745 35 10 D 00 0 10 2017...
Page 308: ...Troubleshooting 306 Service Instructions 745 35 10 D 00 0 10 2017...
Page 337: ......