
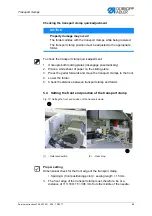


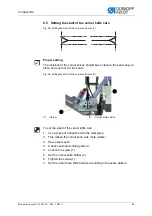
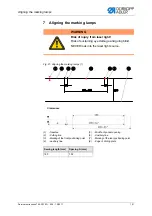


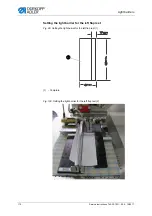


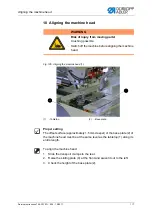

Aligning the marking lamps
102
Service Instructions 745-35-10 D - 00.0 - 10/2017
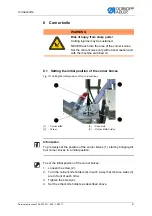
Fig. 92: Aligning the marking lamps (2)
Information
Laser module (11) marks the seam beginning, laser module (10) marks
the middle of the pocket opening, and laser module (9) marks the seam
end.
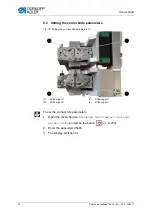
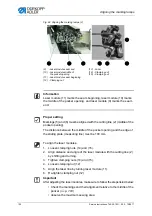
Proper setting
Markings (5) and (6) must be aligned with the cutting line (2) (middle of the
pocket opening).
The distance between the middle of the pocket opening and the edge of
the sliding plate (measuring line) must be 100 mm.
To align the laser modules:
1.
Loosen clamping nuts (14) and (15).
2.
Align distance and angle of the laser module with the cutting line (2)
by shifting and turning.
3.
Tighten clamping nuts (14) and (15).
4.
Loosen clamping nut (12).
5.
Align the laser line by turning laser module (11).
6.
Re-tighten clamping nut (12).
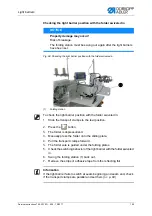
Important
After adjusting the laser modules, make sure to follow the steps listed below:
• Check the markings and their alignment relative to the middle of the
pocket (
• observe the maximum sewing area
(9)
- Laser module seam end
(10) - Laser module middle of
the pocket opening
(11) - Laser module seam beginning
(12) - Clamping nut
(13) - Laser
(14) - Clamping nut
(15) - Clamping nut
⑨
⑩
⑪
⑫ ⑬
⑭
⑮
Summary of Contents for 745-35-10 D
Page 1: ...745 35 10 D Service Instructions...
Page 6: ...Table of Contents 4 Service Instructions 745 35 10 D 00 0 10 2017...
Page 10: ...About these instructions 8 Service Instructions 745 35 10 D 00 0 10 2017...
Page 74: ...Machine head 72 Service Instructions 745 35 10 D 00 0 10 2017...
Page 84: ...Transport carriage 82 Service Instructions 745 35 10 D 00 0 10 2017...
Page 116: ...Light barriers 114 Service Instructions 745 35 10 D 00 0 10 2017...
Page 122: ...Aligning the machine head 120 Service Instructions 745 35 10 D 00 0 10 2017...
Page 128: ...Folder 126 Service Instructions 745 35 10 D 00 0 10 2017...
Page 146: ...Throw over stacker 144 Service Instructions 745 35 10 D 00 0 10 2017...
Page 282: ...Programming 280 Service Instructions 745 35 10 D 00 0 10 2017...
Page 292: ...Maintenance 290 Service Instructions 745 35 10 D 00 0 10 2017...
Page 294: ...Decommissioning 292 Service Instructions 745 35 10 D 00 0 10 2017...
Page 296: ...Disposal 294 Service Instructions 745 35 10 D 00 0 10 2017...
Page 308: ...Troubleshooting 306 Service Instructions 745 35 10 D 00 0 10 2017...
Page 337: ......