background image

Danish Interpretation Systems 


Installation Manual 


Manual 01 19 60011 


20

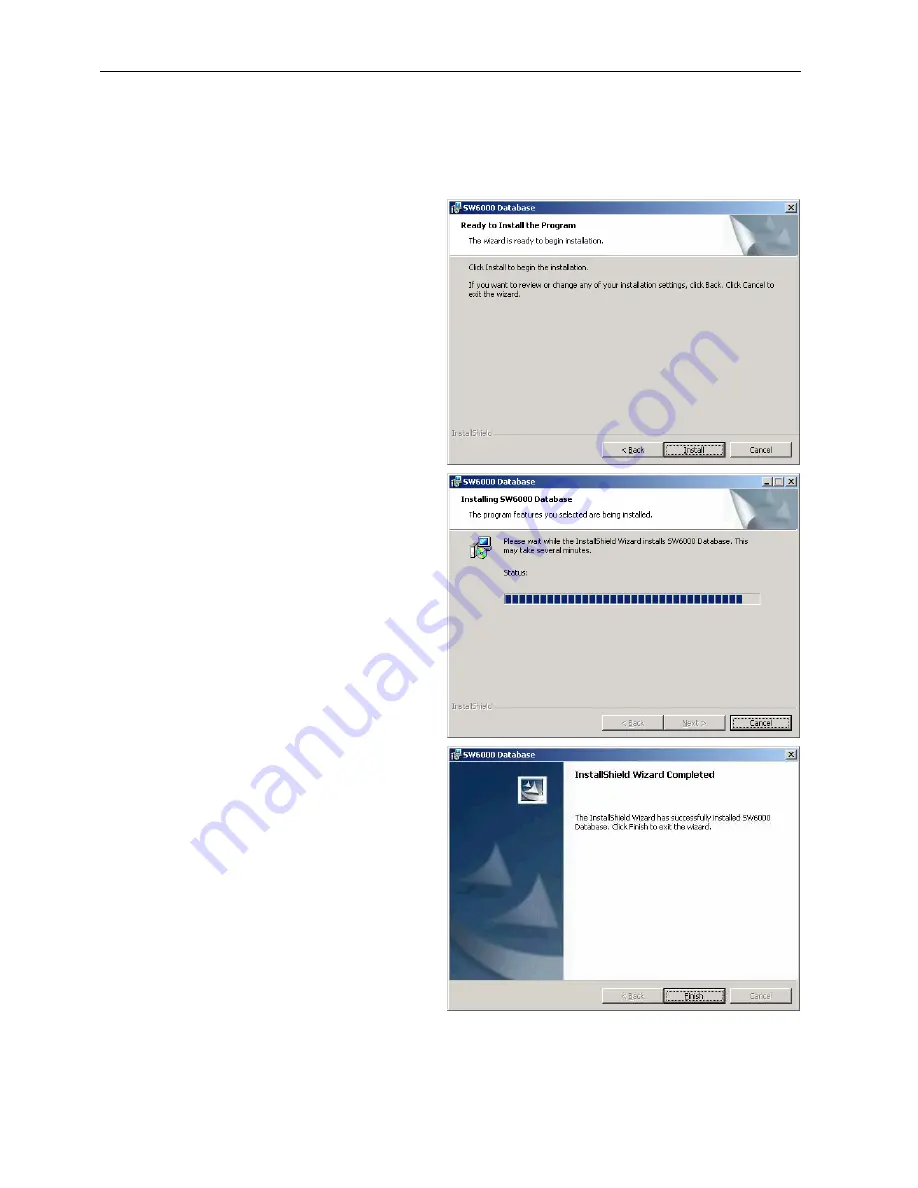
Ready to Install the Program 

Click ‘Install’ to install the program 


Installing SW6000 Database 


Installation is now Completed. 


Click ‘Finish’ to exit the InstallShield wizard. 


Summary of Contents for DCS-6000

Page 1: ...DCS 6000 Installation Manual Danish Interpretation Systems DIS Digital Conference System SW 6000 Conference Management Software Version 3 3 Installation Manual ...

Page 2: ...ems Installation Manual Copyright 2006 DIS SW 6000 INSTALLATION MANUAL VER 3 3 DOC 05 05 2006 No part of this publication may be reproduced or utilised in any form or by any means without permission in writing from the publisher ...

Page 3: ...0 Database 17 Prior to installation 17 Installation 17 Installing the CUI CU Interface 21 Starting and configuring the CUI 26 Installing the CUA Conference User Application 29 Customer logo 33 Installing the CAA Conference Administrator Application 34 Creating Multiple Halls Definitions 38 Installing the ECU External Control Application 39 Starting and configuring the ECA 42 Installing the CDA Con...

Page 4: ...IS SW 6000 INSTALLATION MANUAL VER 3 3 DOC 05 05 2006 No part of this publication may be reproduced or utilised in any form or by any means without permission in writing from the publisher To install MSMQ on Windows XP follow these steps 65 Microsoft Service Packs 65 ...

Page 5: ...bases 3 A description of the connect string 4 Installing Microsoft Message Queuing 5 Installing Service Packs Important The system has to be designed as the SW 6000 Software Package gives options for all in between a small installation with one PC and a large installation with more than 1000 PC s So before installing any applications please consult the Section System design Minimum requirement The...

Page 6: ... Microsoft Message Queuing MSMQ Microsoft NET Framework Version 1 1 You need to install the proper language version dotnetfx in accordance with the PC s operating system language In the Miscellaneous folder in the installation CD you will find some of the languages If you cannot find the language in accordance to the operating system language you have to connect your PC to the Internet and downloa...

Page 7: ...e names Conference names etc is stored in one of the following database installation 1 MSDE Microsoft SQL Server Desktop Engine MSDE 2 SQL Microsoft SQL server Enterprise Edition or Standard Edition Depending on the system design the PC operations system can be 1 W2000 Microsoft Windows 2000 Professional 2 XP Microsoft XP Professional 3 W2000SRV Windows 2000 Server 4 W2000ASRV Windows 2000 Advance...

Page 8: ... the system to release 5 1 is needed Please consult your Distributor for information about updating your system SW 6000 CD ROM A set up application for the SW 6000 Software Applications can be found on the SW 6000 CD ROM On the CD you will also find the set up application for installing an MSDE database and for creating initial data in the database All manuals as well as sample geographic layouts ...

Page 9: ...ious system designs with SW 6000 applications The abbreviations shown above are used in the schematics Design Chairman Design characteristics This design is used where no technician is needed and where the control and administration can be done from the PC placed in the Meeting Room Reservations The CU 6010 has to be placed close to the PC normally max 2 m or a special RS232 long distance interfac...

Page 10: ...needed from the Meeting Room All control of the system and administration is done on the Technician PC Reservations The CU 6010 has to be placed close to the Technician PC normally max 2 m or a special RS232 long distance interface has to be used CAT5 cable 3 4 2 1 Printer cable RS232 cable PC User Technician Installed SW Windows2000 XP MSDE CUI CAA CUA ...

Page 11: ...the system if needed Administration is done on the Technician PC Reservations The CU 6010 has to be placed close to the Technician PC normally max 2 m or a special RS232 long distance interface has to be used The cable between the two PC s has to be crossed CAT5 cable DCS LAN 3 4 2 1 RS232 cable PC User Technician Installed SW Windows2000 XP MSDE CUI CAA CUA PC User Chairman Installed SW Windows20...

Page 12: ...to be placed close to the Technician PC normally max 2 m or a special RS232 long distance interface has to be used The MSDE database is only suitable for up to 10 PC s CAT5 cable DCS LAN 3 4 2 1 RS232 cable PC User Technician Installed SW Windows2000 XP MSDE CUI CAA CUA PC User Chairman Installed SW Windows2000 XP CUA PC User VIP Installed SW Windows2000 XP CUA PC User Delegate Installed SW Window...

Page 13: ... the Technician PC or on the two Administration PC s Reservations The CU 6010 has to be placed close to the Technician PC normally max 2 m or a special RS232 long distance interface has to be used An SQL Server database has to be used This database requires license from Microsoft A PC or server with Windows 2000 Server or Windows 2000 Advanced Server has to be used for the installation of the data...

Page 14: ...on the Technician PC or on the two Administration PC s Reservations The CU 6010 has to be placed close to the Technician PC normally max 2 m or a special RS232 long distance interface has to be used An SQL database has to be used This database requires license from Microsoft Two PC s or server s with Windows 2000 Server or Windows 2000 Advanced Server has to be used for the installation of the dat...

Page 15: ...tion Utility 3 2 55 to 3 3 10 by clicking Setup 2 Start the Utility by clicking the Icon on the desktop 3 The default database is SW6000 1 Click Upgrade to start the upgrade of the database 4 After Upgrade of the database close the utility As the utility shall not be used again the utilty can be removed from the PC in the Control Panel Add Remove programs 5 Install the licensed application like CA...

Page 16: ...er Desktop Engine 1 On the SW 6000 CD ROM open the folder 1 MSDE Installation 2 Double click on the file Setup Exe 3 A window will appear to show the installation progress The program will automatically close when the MSDE installation is complete NB The Microsoft SQL Server Desktop Engine MSDE instance can be uninstalled using the Add or Remove Programs function is the Windows Control Panel The p...

Page 17: ...he following information should be available to the installer The name of the computer on which the database engine MSDE is running The number of databases to be created You will need one database for each CU 6010 you will connect to SW 6000 The SW 6000 system can handle up to 4 databases in each database engine The names of the databases are limited to SW6000 1 SW6000 2 SW6000 3 and SW6000 4 For ...

Page 18: ...ion 1 1 4322 Please install the Net Framework and run this setup again The NET Framework can be obtained from the web Would you like to do this now 3b If Microsoft SQL Server Desktop Engine is not already installed A window will pop up with the message Select OK and then Close to exit the installation Go back to install Microsoft SQL Server Desktop Engine You must have Microsoft SQL Desktop Engine...

Page 19: ...o create a database ConnectionString using either MSDE or SQL Server The MSDE option is pre selected by default Select Windows Authentication You have an option to create up to 4 databases The names of the databases are limited to SW6000 1 SW6000 2 SW6000 3 and SW6000 4 The SW6000 1 database is pre selected by default At least 1 database must be selected Type in the name of the computer where the ...

Page 20: ...Systems Installation Manual Manual 01 19 60011 20 7 Ready to Install the Program Click Install to install the program 8 Installing SW6000 Database 9 Installation is now Completed Click Finish to exit the InstallShield wizard ...

Page 21: ...W 6000 Database and the CU 6010 This installation will install the CUI application files and communication software for sending data to the CU 6010 Before you continue you should know the following 1 Name of the computer where the database engine MSDE or SQL Server is located 2 Name of the database instance the default is SW6000 1 To install CU Interface CUI 1 On the SW 6000 CD ROM open the folder...

Page 22: ...elect the database engine By default the MSDE option is selected The Create Hall Definitions checkbox must be checked if multiple CU interfaces will be running on the same computer Details on hall definition settings are present in the Creating Multiple Hall Definitions section Click Next to continue 6 Select Installation Folder page On this window you have an option to change the default folder w...

Page 23: ...stall the Program Click Install to install the program 8 Installing CU Interface 9 Test MSDE database connection Click Yes if you like to modify this dialog box will only appear if and installation of the CUA or CAA has taken place previously or if the CUI has been installed previously ...

Page 24: ... generate the ConnectionString according to the parameters provided The resulting ConnectionString will be displayed in a textbox at the bottom of the window 11 Press Test connection button to check the validity of the newly created ConnectionString If the database can be successfully connected with this ConnectionString a confirmation window with the message Connection succeeded will appear Click...

Page 25: ...ues for these properties are Comport 1 Baud rate 115200 Data bit 8 Stop bit 1 Parity N Please change comport if you are not using Com1 You will be asked for a queue name to use for communicating with the CU 6010 Use the default Click the Update button to store the settings in the database Click Next to continue 15 Installation is now Completed Click Finish to exit the InstallShield wizard ...

Page 26: ...e started to get communication to the CU 6010 Central Control Unit Starting the CUI 1 After the CUI has been installed the CUI shortcut is placed on the Desktop and in the start folder Click the CU Interface shortcut 2 When starting the CUI Interface the following window appears The COM ports which are configured will are highlighted ...

Page 27: ...is used for changing the settings made in the previous section Install the CU Interface CUI or for assigning a ConnectString to additional COM ports COM2 to COM4 Select a COM port and click Create 6 Setting the connection for the MSDE database Two parameters have to be supplied to these windows Computer name and default database name Computer name is the name of the computer on which the database ...

Page 28: ...t to test the connection Click Close to exit port setting 8 By selecting a Com port and Click Select the CUI application starts with connection to the port chosen NB If the user want to have the CUI application to start up automatically which is the normal procedure please refer to the next section Automatic start up of the CUI ...

Page 29: ...are will install the CUA application files To install the Conference User Application CUA 1 On the SW 6000 CD ROM open the folder 4 CUA Conference User Application 2 Double click on the file Setup Exe 3 Welcome page Click Next to continue 4 License Agreement page Select I Agree radio button to accept the agreement then click Next to continue ...

Page 30: ...l have an option to select the database engine By default the MSDE option is selected Click Next to continue 6 Select Installation Folder page On this window you have an option to change the default folder where the database will be installed Click Next to continue 7 Ready to Install the Program Click Install to install the program ...

Page 31: ...lied to these windows Computer name is the name of the computer on which the database engine is running Default database name is the name of one of the database s you ve selected previously After filling in the computer name and default database name press Create default ConnectionString button to generate the ConnectionString according to the parameters provided The resulting ConnectionString wil...

Page 32: ...ated ConnectionString If the database can be successfully connected with this ConnectionString a confirmation window with the message Connection succeeded will appear Click OK 12 Click Save ConnectionString button to save the ConnectionString Click Next to continue 13 Installation is now Completed Click Finish to exit the InstallShield wizard ...

Page 33: ...d open the file with the customer logo 3 Select the part of the logo which shall be used Select copy 4 Select the part of the logo which shall be used and select copy 5 Insert the selected part of the customer logo into the background file and edit the colours if needed 6 Save the file as logo jpg or logo bmp 24 bit 7 Move or copy the just created logo file to the same directory as the CUA i e C P...

Page 34: ...e Conference Administrator Application files To install the Conference Administrator Application CAA 1 On the SW 6000 CD ROM open the folder 5 CAA Conference Administrator Application 2 Double click on the file Setup Exe 3 Welcome page Click Next to continue 4 License Agreement page Select I Agree radio button to accept the agreement then click Next to continue ...

Page 35: ...itions checkbox must be checked if multiple CU interfaces will be running on the same computer Details on hall definition settings are present in the Creating Multiple Hall Definitions section Click Next to continue 6 Select Installation Folder page On this window you have an option to change the default folder where the database will be installed Click Next to continue 7 Ready to Install the Prog...

Page 36: ... supplied to these windows Computer name is the name of the computer on which the database engine is running Default database name is the name of one of the database s you ve selected previously After filling in the computer name and default database name press Create default ConnectionString button to generate the ConnectionString according to the parameters provided The resulting ConnectionStrin...

Page 37: ...ated ConnectionString If the database can be successfully connected with this ConnectionString a confirmation window with the message Connection succeeded will appear Click OK 12 Click Save ConnectionString button to save the ConnectionString Click Next to continue 13 Installation is now Completed Click Finish to exit the InstallShield wizard ...

Page 38: ... to Room Name ConnectionString The string which the CU Name CU Interface uses to connect the specified database which has information on delegates and conferences held in Room Name Pressing the Create ConnectionString button at the bottom of the window creates the ConnectionString There are 4 buttons at the bottom of the window Delete button will delete the current row in the grid Save button will...

Page 39: ...String on the current row in the grid can be used to successfully connect to the database Installing the ECU External Control Application This installation will install the ECU External Control Application The utility is used for connection control system like AMX or Creston to a COM port on a PC To install the ECU External Control Application 1 On the SW 6000 CD ROM open the folder 8 ECU External...

Page 40: ...Systems Installation Manual Manual 01 19 60011 40 4 License Agreement page Select I Agree radio button to accept the agreement then click Next to continue 5 6 Ready to Install the Program Click Install to install the program ...

Page 41: ...Click Finish to exit the InstallShield wizard 8 After the Utility has been installed a shortcut is placed on the Desktop and in the start folder Clicking the shortcut will start the application Please refer to the ECU User Manual for instructions in how to use the utility External Control Application lnk ...

Page 42: ...be started to get communication to the External Control Unit Starting the ECA 1 After the ECA has been installed the ECA shortcut is placed on the Desktop and in the start folder Click the External Control Application shortcut 2 When starting the ECA the following window appears The COM ports which are configured will be highlighted ...

Page 43: ...hoices Port setting 4 Port setting This window is used for making the communication Select the COM port where the connection to the external equipment is made Insert Server Name the name of the computer where the database is installed Type in the name of the database Change any of the Com Port settings if needed Click Save ...

Page 44: ...pretation Systems Installation Manual Manual 01 19 60011 44 5 The message Setting is saved appears Click OK Click Close 6 Click at the COM port which was configured in point 5 Click Select to start the application ...

Page 45: ...n is used for generating displays for showing on large screen projectors To install the CDA Conference Display Application 1 On the SW 6000 CD ROM open the folder 9 CDA Conference Display Application 2 Double click on the file Setup Exe 3 The installation will then proceed as the installation of the CAA and CUA application 4 Please refer to the CDA User Manual for information on starting the CDA a...

Page 46: ... Interpretation Systems Installation Manual Manual 01 19 60011 46 3 Welcome page Click Next to continue 4 License Agreement page Select I Agree radio button to accept the agreement then click Next to continue ...

Page 47: ...l Manual 01 19 60011 47 5 Customer Information Fill in the fields User Name and Organization Click next to continue 6 Setup Type Select Complete or Custom and click Next to continue 7 Ready to Install the Program Click Install to install the program ...

Page 48: ...ted Click Finish to exit the InstallShield wizard 8 After the Utility has been installed a shortcut is placed on the Desktop and in the start folder Clicking the shortcut will start the application Please refer to the CAA User Manual for instructions in how to use the utility SW6000 Backup Utility lnk ...

Page 49: ... to have Local Administrator Rights to perform the upgrading procedure To install the SW6000 Migration Utility 1 On the SW 6000 CD ROM open the required folder 7x SW6000 Migration Utility x x to x x see the section Upgrading from previous versions 2 Double click on the file Setup Exe 3 Welcome page Click Next to continue 4 License Agreement page Select I Agree radio button to accept the agreement ...

Page 50: ...tallation folder On this window you have an option to change the default folder where the database will be installed Click Next to continue 7 Ready to Install the Program Click Install to install the program 8 Installation is now Completed Click Finish to exit the InstallShield wizard ...

Page 51: ...ration Utility lnk SW6000 Migration 2 Utility lnk Installing the CP 6000 Chip Card Programmer The CP 6000 Chip Card programmer is used for programming and reading DIC chip cards To install the programmer follow the instructions 1 Connect the programmer to an available USB port on the PC where a CAA application is installed Your windows operating system will automatically detect the CP 6000 by show...

Page 52: ...floppy CD ROM Click Next If the Windows Installer cannot find the driver please proceed to point 5 4 The driver has been installed and the CP 6000 Chip Card Programmer is now ready to use 5 If the Windows Installer cannot find the driver please click the Include the location in the search and click Browse ...

Page 53: ...retation Systems Installation Manual Manual 01 19 60011 53 6 Include the driver folder as shown to be found in the SW6000 v3 3 CD Rom at the folder Miscellaneous Driver for ACS Chip card reader Click OK 7 Click next ...

Page 54: ... the following conditions are desirable The CUI CUA and CAA start up automatically when the PC is turned on No Windows log on for CUI and CUA Automatic start up of CAA CUA and CDA 1 The automatic start up is a feature of the Windows Operating system Move or copy the short cut to the application you want to start up automatically to the Startup folder In the picture the short cut to the CAA applica...

Page 55: ...he Startup folder 3 After restarting the PC the application with shortcut placed in the Startup folder will start up automatically Automatic start up of CUI It is normally desirable to have the CUI automatically start up when the PC in powered on The procedure is as follows 1 Rename the shortcut s to i e CUI RS232 1 for COM1 CUI RS232 2 for COM2 etc 2 Make a Copy of the CUI shortcut on the desktop...

Page 56: ...ck OK 5 If more COM ports are in use do the same for the other COM ports COM2 etc 6 Move or copy the new shortcuts to the Startup folder After restarting the PC the CUI application with shortcuts placed in the Startup folder will start up automatically Automatic start up ECA It is normally desirable to have the ECA automatically start up when the PC in powered on The procedure is as follows 1 Make...

Page 57: ...ine parameter COM1 This parameter will start the ECA connected to COM 1 Click OK 4 Move or copy the new short cuts to the Startup folder After restarting the PC the ECA application with shortcuts placed in the Startup folder will start up automatically No windows logon For the CUI and the CUA application it is normally not desirable to have the standard Windows logon To avoid the windows logon do ...

Page 58: ... to Start Settings Control panel User and Passwords Uncheck the Users must enter name and password to use this computer Click OK The Automatically Log ON window will appear Enter the User name and Password for the user that will be automatically logged on to the system Click OK ...

Page 59: ...w Mimic diagram Creating a Mimic diagram requires the user to import a bitmap showing the room or hall as a background image and then to import all seats onto the Mimic diagram and position the coloured dots representing a microphone or seat 7 Select the User Type screen from the Setup sub menu and create a set of user types e g Chairman Delegate Guest Technician etc to be used when creating the l...

Page 60: ...stallation Be aware that once a language has been used it cannot be deleted only modified 12 Select the Label screen from the Setup sub menu to create translations for the language that has been added If some or all labels are not translated then the default language translation English for a particular label will be used 13 Select the Message screen and create messages The system is now ready for...

Page 61: ...e database is running To find the computer name of a computer follow these instructions 1 Open Control Panel 2 Double click on the System icon 3 On the System properties window select the Network identification tab 4 Click on the Properties button 5 The name of the computer can be found in the textbox labelled Computer name NB You should not use the Full computer name The computer name must not in...

Page 62: ...ct strings used by the applications accordingly For a description of connects strings see Connect string Connect string When the applications are connecting to the databases to get access to data they use a connect string This connect string identifies which database should be used by the application and how For the SW 6000 the connect string is located in registry key HKEY_LOCAL_MACHINE SOFTWARE ...

Page 63: ...to the SQL Server you might change this to more appropriate value and for example add a password to the Connect string If you do please note that this password will be public to anyone with access to the registry on the client machines Installing Microsoft Message Queuing MSMQ Before installing any of the applications in the SW 6000 Software Package Microsoft Message Queuing MSMQ needs to be insta...

Page 64: ...ng Services checkbox Press Next 5 A window with the title Message Queuing Type appears Check Independent client radio button but leave Manually select access mode to Active Directory checkbox unchecked Click Next to continue 6 A window with the title Message Queuing Server appears Check Message Queuing will not access a directory service Click Next to continue ...

Page 65: ... Windows Components Wizard window appears In Components list select and check Message Queuing checkbox 5 When Message Queuing line is selected press the Details button 6 Message queuing window appears Uncheck Active Directory Integration checkbox 7 Press OK button on the Message Queuing window The Message Queuing window will close 8 Press Next on the Windows Components Wizard window and finish the...

Reviews: