


【
3-6
】
BRAKE
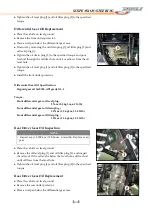
Rear Caliper Removal
●
Remove the rear wheel (see Wheels/Tires chapter).
●
Remove the exhaust pipe.
●
Remove the rear drive shaft.
●
Loosen the banjo bolt at the brake hose lower end, and tighten it
loosely.
●
Unscrew the caliper mounting bolts, and detach the caliper from
the disc.
●
Unscrew the banjo bolt and remove the brake hose from the
caliper.
Caliper Installation
●
Install the caliper and brake hose lower end.
○
Replace the washers that are on each side of hose fitting with new
ones.
●
Tighten:
Torque -Caliper Mounting Bolts:25N-m(2.5kg-m,18.0ft-lb)
Brake Hose Banjo Bolt:25N-m(2.5kg-m,18.0ft-lb)
●
Check the fluid level in the brake reservoir.
●
Bleed the brake line (see Brake Line Air Bleeding).
●
Check the brake for good braking power, no brake drag, and no
fluid leakage.
NOTE
○
If the caliper is to be disassembled after removal and if
compressed air is not available, disassemble the caliper before
the brake hose is removed (see Caliper Disassembly).
WARNING
Do not attempt to drive the vehicle until a full brake lever is
obtained by pumping the brake lever until the pads are against
each disc. The brakes will not function on the first application of
the lever if this is not done.
C
CAUTION
Immediately wash away any brake fluid that spills.
Summary of Contents for DL702
Page 1: ... 0 0 FOREWORD INDEX ...
Page 88: ... 7 13 ELECTRICAL SYSTEM Wiring Diagram ...
Page 89: ... 7 14 ELECTRICAL SYSTEM Wiring Diagram ...
Page 90: ... 7 15 ELECTRICAL SYSTEM NOTE ...


