


CLM–36
©
Dinel, s.r.o.
12
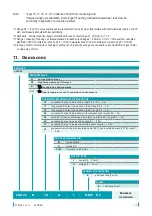
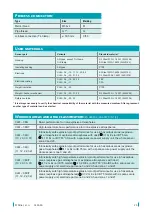
8 . Electrical connection
The level meter is designed to be connected to supply unit or to controller through a cable with
the outer diameter of 6 ÷ 8 mm (recommended cross-section of cores 0.5 ÷ 0.75 mm
2
) by means
of connector which is standard part of CLM level meter. The diagram and the inside view of the
connector are shown in the figures. Disassemblable connector IP67 with a 5m long PVC cable
can be supplied as an above-standard accessory.
Procedure to connect the cable to the level meter:
1. Unscrew connector from the body of the level meter using a suitable screwdriver.
2. Use a flat screwdriver to remove the inner part of the connector (screwdriver into the gap
marked by arrow).
3. Unscrew the cable gland and put the cable inside.
4. Connect the cable wires to the screw terminals as shown in Fig. 7 (current output 4-20 mA) or
Fig. 9 (voltage output 0-10 V). Tighten the terminals firmly.
5. Push the terminals back into the connector so that the terminal no. 3 is oriented toward the
cable entry. Tighten the cable gland.
6. Check the seal on the connector and connect the connector back to the body of the sensor.
Fig. 6: Connection scheme with current
output
Shielding
(GNYE)
+U (BN)
0V (BU)
Fig. 7: Connection scheme with
current output
Fig. 8: Connection scheme with voltage
output
U
out
(BK) +U (BN)
Shielding
(GNYE)
0V (BU)
Fig. 9: Connection scheme with
voltage output


