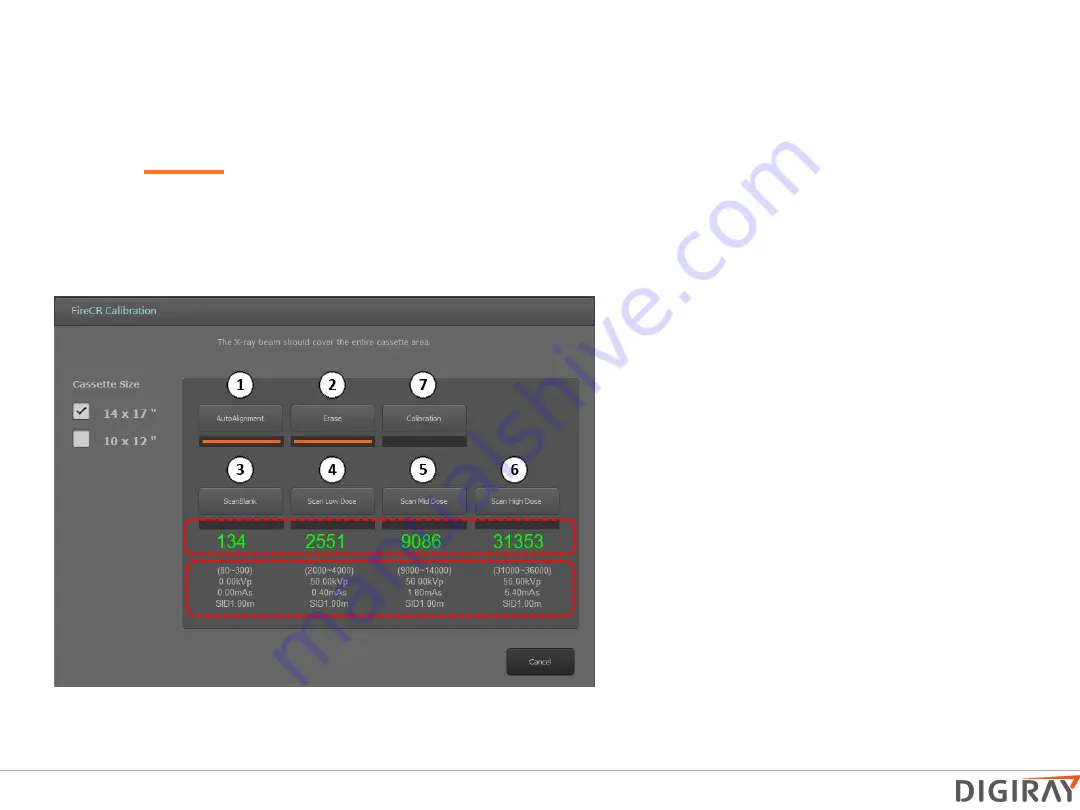
Step 1: Auto alignment
Step 2: Erase
Run an erase cycle to remove any residual radiation that
may be left on the phosphor.
Step 3: Scan Blank
Without exposing the cassette, insert it into the
reader and press the “Scan Blank” button
.
Note:
Use the same cassette for the entire calibration.
Step 4, 5, & 6:
Scan Low, Medium, & High
Dose
Expose the entire cassette at the recommended
values and if the value is out of range adjust
mAs until the numbers are green.
Note: mAs
and calibration values are directly proportional,
so a 5% increase in mAs will equal a 5%
increase in calibration value, etc.
Step 7: Calibration!
Press and wait until the software confirms that the
calibration was successful.
Note: Cancelling the
calibration before completion will force you to
start over.
Calibration and Images
Calibration Procedure
This screen will appear:
- X-ray setting
recommendation
- X-ray Intensity
Summary of Contents for FireCR
Page 1: ...DIGIRAY CORP Basic Guide of FireCR Scanner...
Page 5: ...for User manual download for Quantor software download...
Page 10: ...the Windows Security Dialog Box pops up after installation click Allow access...
Page 11: ...7 PC requirement Recommended PC requirement Minimum PC requirement...
Page 13: ...Basic configuration of CR Computed Radiography system Imaging Plate Cassette Housing...
Page 16: ...FireCR Scanner Video on how to use https www youtube com watch v xVkq_ sIabc...
Page 20: ...Main Board Core Board...
Page 33: ...Understanding FireCR Flash Calibration Note X ray exposure must cover entire cassette...
Page 41: ...2 Disassembly Top Cover 1 Pull back cover...
Page 48: ...2 Disassembly BLDC Board 4 Remove 4 screws 2 5mm hex 5 Reinstall in reverse order...
Page 49: ...2 Disassembly Main Board 1 Unscrew the 6 screws that hold down the board and replace 2 5mm hex...
Page 54: ...2 Disassembly Aligner Motor 1 Remover back over...
Page 61: ...2 Disassembly 5 Remove the two screws at the edge of the eraser 6 Pull back eraer Fiber Bundle...
Page 74: ......


