


2. INSTALLATION
Page 11
© 2008 DH Instruments, a Fluke Company
2.4
OPERATIONAL CHECK
2.4.1
RPM4-E-DWT PRESSURE MEASUREMENT
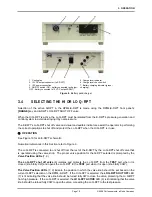
See Figure 1 and Figure 7 for an E-DWT view and schematic when following this procedure.
Check that one of the two green Valve Status LEDs on the front panel of the E-DWT is lit
(the red LED should NOT be ON). If neither of the green LEDs on the E-DWT front panel
lights, check that the 12 pin circular connector at the rear of the RPM4-E-DWT itself is
properly connected to the J1 ACC. connector.
Let the RPM4-E-DWT warm up with power ON for approximately 15 minutes.
Open the reservoir vent valve by turning it CCW.
Open the reservoir shut off valve by turning it CCW.
Put the lo Q-RPT shut off valve into the Lo Q-RPT Active
position (turn fully CCW) . This
opens the Lo and Hi Q-RPTs to the E-DWT TEST port.
Use [RANGE] (see Section 3.7.2) to select the Lo Q-RPT. If desired, change the
pressure unit of measure using [UNIT] (see Section 3.7.3).
The value indicated should be near zero. Press [AutoZ]. This runs AutoZ to zero the Q-
RPT reading (see Section 3.7.10). Upon return to the main run screen, observe that the
indication of measured pressure has zeroed. If the display fails to zero properly, the
E-DWT may need repair.
Use [RANGE] to select the Hi Q-RPT (see Section 3.7.2) and repeat the zeroing process.
If the display fails to zero properly, the E-DWT may need repair.
It is normal for RPM4-E-DWT to indicate a value other than zero when vented when gauge
mode is first entered or ranges are changed, especially if AutoZ is OFF, RPM4-E-DWT has been
OFF for some time or its location has changed.
2.4.2
E-DWT PRESSURE GENERATION AND CONTROL
Perform RPM4-E-DWT pressure measurement operational check (see Section 2.4.1) before
the pressure generation and control check.
Refer to Figure 9 and Figure 10 when following this procedure.
Check that there is calibration fluid (di-ethyl hexyl sebacate) in the E-DWT reservoir (the
E-DWT is supplied with the reservoir full).
Open the reservoir vent valve by rotating it CCW.
Open the reservoir shut off valve.
Set the variable volume to start position. Rotate variable volume handles CCW until red
of variable volume piston position indicator on top of E-DWT is fully retracted.
Put the Lo Q-RPT shut off valve into the Lo Q-RPT Active
position (rotate valve fully CCW).
This opens the Lo and Hi Q-RPTs to the E-DWT pressure generation and control system.
Use [RANGE] (see Section 3.7.2) to select the Lo Q-RPT. If desired, change the
pressure unit of measure using [UNIT] (see Section 3.7.3).
With the Lo Q-RPT connected, never exceed pressure of 1000 psi (7 MPa) or the Lo Q-RPT
could be permanently damaged. If the red CAUTION indicator flashes and/or an audible alarm
sounds, immediately reduce pressure to avoid damaging an E-DWT Q-RPT.


