background image

System component description 

System ID21 

14 

78438 7.0 

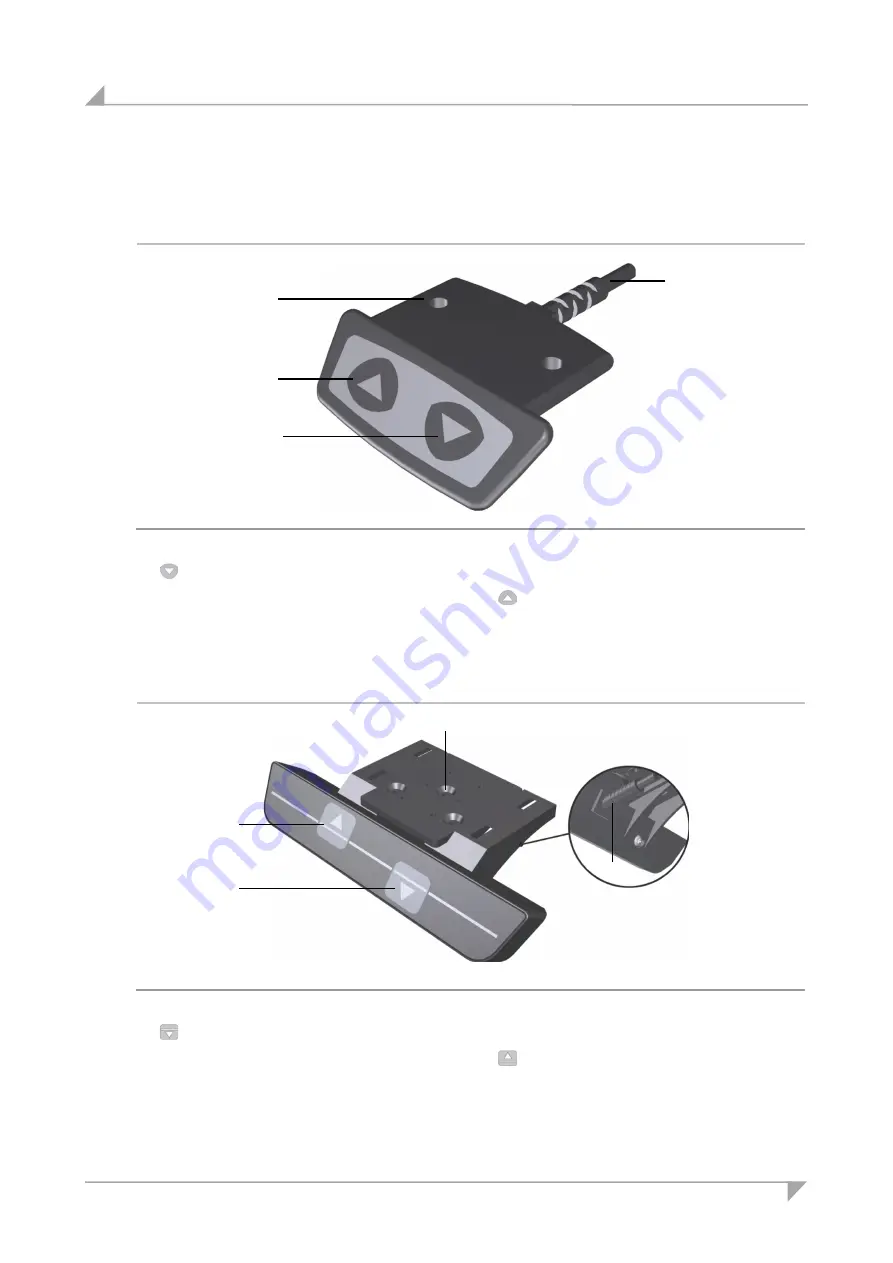
3.4.2  HSCO control keypad 

The HSCO control keypad has two keys for the up and down adjustments. 


Figure 7 

HSCO control keypad 

 key (adjusting down) 

Mounting surface 

Connection cable 

 key (adjusting up) 


3.4.3  HSU Varioline control keypad 

The HSU Varioline control keypad has two keys for the up and down adjustments. 


Figure 8 

HSU Varioline control keypad 

 key (adjusting down) 

Mounting surface 

Connection cable  

 key (adjusting up) 


Summary of Contents for ID21

Page 1: ...Installation Instructions Translation of the original installation instructions System ID21 ...

Page 2: ......

Page 3: ...lete operating instruction manual for the entire end product These instructions are only intended to be used by the end product manufacturer They should not be given to the operator of the end product The factual information contained within may be used as a basis when creating the end product manual The warning and danger notices are best suited for use in the end product s manual However it is n...

Page 4: ... 10 3 1 Complete installed system 10 3 2 Complete installed system 11 3 3 SMART and COMPACT control units 12 3 4 Control keypads 13 3 5 ID21 lifting column 21 4 Configuration options for the ID21 system 22 5 Installation 24 5 1 Safety notices to observe during installation 24 5 2 Installing the ID21 lifting columns 26 5 3 Installing the control keypads 30 5 4 Installing the SMART COMPACT control u...

Page 5: ...rror messages on the control keypad s display 71 9 3 Error messages as indicated by clicking tones from the control unit 74 9 4 Error messages displayed by the LEDs COMPACT control unit 74 10 Maintenance and cleaning 75 10 1 Maintenance 75 10 2 Cleaning 75 11 Technical specifications and product designation 76 11 1 Table 76 11 2 SMART and COMPACT control units 77 11 3 Dimensions of the SMARTeco co...

Page 6: ...llowing the guidelines during installation and connection procedures will help to minimize the risk of accident and injury and damage to the drive system or the end product These installation instructions have been written with due care and attention However we cannot guarantee that the data images and drawings are complete and correct nor do we ac cept any liability for the information contained ...

Page 7: ...anufacturer expressly declares the compliance of the end product The manufacturer of the end product must create a manual for the users of that product The safety notices in the end product manual must be written based on the end product s risk as sessment 1 3 Conventions used Notices which do not relate to safety are indicated in these instructions with a symbol Triangular notice symbol Explanati...

Page 8: ...s already present ID21 system type A EN527 1 CAUTION Risk of accident The ID21 system should only be used for the purpose described above Any other use is forbid den Improper usage can lead to accidents or destruction of the unit Such non approved applica tions will lead immediately to the expiration of all guarantee and warranty claims on the part of the end product manufacturer against the manuf...

Page 9: ...n Only these parts will guarantee a sufficient level of safety CAUTION Danger of pinching crushing injuries There is a danger of being crushed when the table position is changed This is particularly true when there is no protective mechanism guarding against crushing injuries However crushing injuries may even occur in exceptional cases when a safety guard is installed Make sure that there are no ...

Page 10: ... control units connected 3 1 Complete installed system DESKFRAME C ID A 30x30 DESKFRAME C ID A 40x40 Figure 1 Example ID21 system with two ID21 lifting columns A Traverse cross bar B Tabletop C SMART or COMPACT control units D ID21 lifting column double telescopic E Table base F Control keypad 3 1 1 Dimensions Specifications for the installed system Max lengthwise extension 1200 2000 mm Max transv...

Page 11: ... F Traverse cross bar for two lifting columns DESKFRAME C ID A 30x30 DESKFRAME C ID A 40x40 G Traverse cross bar extension with one lifting column DESKFRAME C ID A 30x30 3L DESKFRAME C ID A 40x40 3L 3 2 1 Dimensions Specifications for the installed system Max lengthwise extension 1200 2000 mm Max transverse extension 800 1000 mm The max permissible tabletop size is 1200 2000 x 800 1000 x 1200 1500...

Page 12: ...ifting columns Figure 3 SMARTeco control unit A Connection for the control keypad B Mains power supply connection C Connection for the lifting columns 3 3 2 SMARTneo SMARTneo pro control unit The SMARTneo and SMARTneo pro control units are used to adjust one or two lifting columns Figure 4 SMARTneo SMARTneo pro control unit A Connection for the control keypad B Sensor connection only for SMARTneo ...

Page 13: ...Ds E Sensor connection cascade connection 3 4 Control keypads The control keypads are used to adjust the table height to save positions optional and to ad just motor group 2 The table positions and optional saved programmed positions can be moved to directly 3 4 1 Motion Assist control keypad The Motion Assist control keypad has two keys for the up and down adjustments Figure 6 Motion Assist contr...

Page 14: ...Figure 7 HSCO control keypad A key adjusting down B Mounting surface C Connection cable D key adjusting up 3 4 3 HSU Varioline control keypad The HSU Varioline control keypad has two keys for the up and down adjustments Figure 8 HSU Varioline control keypad A key adjusting down B Mounting surface C Connection cable D key adjusting up D B C A D A C B ...

Page 15: ...ad has two keys for the up down adjustment movements four memory keys a save key and a display Figure 9 HSU control keypad A key adjusting down B Mounting surface C Connection cable D key adjusting up E memory key 1 F memory key 2 G memory key 3 H memory key 4 I Display J save key E D C B A I H G F J ...

Page 16: ...ments four memory keys two keys for motor group 2 a save key and a display Figure 10 HSF control keypad A key adjusting down B Mounting surface C Connection cable D key adjusting up E memory key 1 F memory key 2 G memory key 3 H memory key 4 I Display J save key K motor group 2 adjust downward L motor group 2 adjust upward E D C B A H G J F I L K ...

Page 17: ...wn adjusting movements Figure 11 TOUCHbasic inlay control keypad A key adjusting down D key adjusting up 3 4 7 TOUCHbasic down control keypad The TOUCHbasic down keypad has two keys for the up and down adjusting movements Figure 12 TOUCHbasic down control keypad A key adjusting down B Mounting surface C Connection cable D key adjusting up D A D A B C ...

Page 18: ...pad has two keys for the up down adjustment movements four memory keys a save key and a display Figure 13 TOUCHfx control keypad A key adjusting down B Mounting surface C Connection cable D key adjusting up E Memory key 1 F Memory key 3 G Memory key 2 H Memory key 4 I Display J save key E D B C F H G I J A ...

Page 19: ...control keypad has two keys for the up down adjustment movements four mem ory keys a save key and a display Figure 14 TOUCHdown control keypad A key adjusting down B Mounting surface D key adjusting up E Memory key 1 F Memory key 2 G Memory key 3 H Memory key 4 I Display J save key E D B F H G I J A ...

Page 20: ...control keypad The TOUCHinlay control keypad has two keys for the up down adjustment movements two memory keys a save key and a display Figure 15 TOUCHinlay control keypad A key adjusting down D key adjusting up E Memory key 1 F Memory key 2 I Display J save key E A D F J I ...

Page 21: ...trol cable The end product will be attached to the head of the lifting column The foot base is attached to the foot end of the lifting column Posi tional sensors are built in to allow for synchronized adjustments with multiple columns Figure 16 Major components of the ID21 lifting column A Connection cable B Head of the lifting column C Outer column with two internal telescopic columns D Foot of t...

Page 22: ...5 4 1 page 37 Connect the control keypad and the lifting columns to the control unit see section 5 5 1 page 40 Connect the power supply cable see section 5 5 1 page 40 Configuration 2 SMARTneo SMARTneo pro control unit with one or two ID21 lifting columns and con trol keypad Installation steps Install the lifting columns see section 5 2 page 26 Install the control keypads see section 5 3 page 30 I...

Page 23: ...s Install the lifting columns see section 5 2 page 26 Install the control keypads see section 5 3 page 30 Install the COMPACT control unit see section 5 4 3 page 39 Connect the control keypad and the lifting columns to the control unit see section 5 5 3 page 42 Connect the power supply cable see section 5 5 3 page 42 Example Motion Assist Refer to section 3 3 for other control keypads ...

Page 24: ... and kink prevention methods 5 1 1 Reliability The safety and reliability of the end product containing DewertOkin components can be en sured by using the proper construction methods as described below Overheating A thermal monitor switches the SMART COMPACT control unit off if it overheats CAUTION The SMART COMPACT control unit is equipped with a thermal monitor circuit breaker that trig gers whe...

Page 25: ...contradicts the proper and intended usage is forbid den The manufacturer or installer of the end product must ensure that all legal and regulatory require ments regarding the end product s manufacture installation and customer support are followed 5 1 2 Selecting the tabletop The DIN Technical Report 147 describes the following information Corner and edge design Exterior surfaces Surface brightnes...

Page 26: ...e observing all of the safety notices found in the Safety notices to observe during installation section 5 2 1 Installing the table base Use M6 bolts with strength grade 8 8 as shown in Figure17 The tightening torque is 10 Nm Figure17 Mounting the table base dimensions in mm A Base plate B M6 bolts 8 8 C Foot of the lifting column B C A min 9 max 11 50 35 C ...

Page 27: ...late B M6 bolts 8 8 C Foot of the lifting column 1 Use four screws to attach the table base to the foot end of the ID21 lifting column as shown in Figure 18 tightening torque is 10 Nm The mounting dimensions are shown in Figure17 2 Repeat step 1 with all other lifting columns C A B ...

Page 28: ...able frame Use M6 bolts with suitable length and strength grade 8 8 as shown in Figure 19 The tight ening torque is 10 Nm Figure 19 Mounting the table frame dimensions in mm A Table frame B M6 bolts 8 8 C Head of the lifting column min 9 max 11 B B C A 47 28 C ...

Page 29: ... 10 Nm The mounting dimensions are shown in Figure 19 2 Screw the other lifting columns to the table frame 5 2 3 Dismantling the lifting column CAUTION Work on electrical components should be conducted only when the mains power connection for the control unit is unplugged 1 Move the table to the starting position so that the lifting columns are fully retracted 2 Pull out the control unit s mains p...

Page 30: ... that the user can reach it easily NOTICE Please observe the thickness of the tabletop 5 3 1 Motion Assist control keypad Two screws are used to attach the Motion Assist control keypad to the underside of the table at the table s front edge as shown in Figure 22 Figure 21 Motion Assist control keypad installation dimensions in mm 32 11 5 13 51 25 12 53 4 0 ...

Page 31: ...ents of DIN 7981 with Ø 3 9 mm and of suitable length 10 mm plus the screw in depth into the table screw head Ø 7 5 mm Figure 22 Example Mounting the Motion Assist control keypad A Motion Assist control keypad B Screws C Tabletop 5 3 3 HSCO control keypad Figure 23 HSCO control keypad installation dimensions in mm A B C 58 5 13 32 16 5 11 43 5 4 3 ...

Page 32: ...5 3 4 HSU Varioline control keypad Figure 24 HSU Varioline control keypad installation dimensions in mm 5 3 5 HSU control keypad Figure 25 HSU control keypad installation dimensions in mm 135 8 12 30 5 26 69 4 3 0 135 8 12 30 5 26 69 4 3 0 ...

Page 33: ...33 5 3 6 HSF control keypad Figure 26 HSF control keypad installation dimensions in mm 5 3 7 TOUCHbasic inlay control keypad Figure 27 TOUCHbasic inlay keypad mounting dimensions in mm 129 58 100 9 151 5 1 68 65 19 30 27 30 5 20 5 142 76 ...

Page 34: ...438 7 0 5 3 8 TOUCHbasic down control keypad Figure 28 TOUCHbasic down keypad mounting dimensions in mm 5 3 9 TOUCHfx control keypad Figure 29 TOUCHfx keypad mounting dimensions in mm 58 22 38 24 52 4 4 7 11 132 5 39 70 34 85 9 5 9 ...

Page 35: ... 3 10 TOUCHdown control keypad Figure 30 TOUCHdown keypad mounting dimensions in mm 5 3 11 TOUCHinlay control keypad Figure 31 TOUCHinlay keypad mounting dimensions in mm 170 4 34 75 38 8 150 3 5 5 14 8 95 4 90 18 7 42 37 7 28 3 106 5 5 5 5 ...

Page 36: ...the screw using a maximum torque of 2 Nm CAUTION You should only install and uninstall the control unit when it is completely disconnected from any live current Install the control unit as shown in Figure 33 control unit SMARTeco Figure 35 control unit SMARTneo SMARTneo pro or Figure 37 control unit COMPACT 1 Mark the drill holes The drilling dimensions are specified in Figure 32 control unit SMAR...

Page 37: ...System ID21 Installation 78438 7 0 37 5 4 1 Control unit SMARTeco Figure 32 Mounting dimensions SMARTeco control unit in mm Figure 33 Mounting the SMARTeco control unit 167 9 50 2 50 2 1 2 3 ...

Page 38: ...on System ID21 38 78438 7 0 5 4 2 SMARTneo SMARTneo pro control unit Figure 34 Mounting dimensions SMARTneo SMARTneo pro control unit in mm Figure 35 Mounting the SMARTneo SMARTneo pro control unit 200 49 2 1 2 3 ...

Page 39: ...System ID21 Installation 78438 7 0 39 5 4 3 COMPACT control unit Figure 36 Mounting dimensions COMPACT control unit in mm Figure 37 Mounting the COMPACT control unit 1 2 3 252 51 5 6 5 51 5 ...

Page 40: ...ting columns and the control keypad to the SMARTeco control unit The lifting columns and the control keypad are both connected to the front of the SMARTeco control unit the unit for adjusting one or two lifting columns The following illustration shows the location of these connections Figure 38 Connection ports on the SMARTeco control unit Model used for two lifting columns A Connection for the co...

Page 41: ...ne or two lifting columns The following il lustration shows the location of these connections Figure 39 Connections on the SMARTneo SMARTneo pro control unit Model used for two lifting columns A Connection for the control keypad B Connection for the lifting columns C Sensor connection only for SMART neo pro D Cascading connection E Mains power supply connection NOTICE Be sure to connect the power ...

Page 42: ...control unit can optionally be connected with a cable to the top of the control unit Figure 40 Connection ports on the COMPACT control unit A Connection for the control keypad B Mains power supply connection C Connection for the lifting columns D Status LEDs E Sensor connection cascade connec tion F Protective earth connection NOTICE Be sure to connect the power cable into the control unit after a...

Page 43: ... Figure 41 Figure 41 Sensor A Sensor B Connecting cable connection to the SMARTneo pro control unit NOTICE This protective mechanism only works when the sensor is correctly installed Make sure that the side of the sensor marked with a yellow dot is facing the tabletop CAUTION You should only install and remove the sensor when it is completely disconnected from any live current This safety mechanis...

Page 44: ...t to the table frame as shown in Figure 42 Before mounting the sensor make sure that the cables are long enough to reach the sen sor in that position Also make sure that the cables are routed so that they cannot be pinched during the up and down movements 1 If no holes are pre drilled mark the drill holes for mounting the sensor on underside of table top and on table frame 2 Drill the holes for mo...

Page 45: ...ide with the yellow dot should be mounted to the underside of the tabletop Observe the recommended torques Mount to table frame 3 Nm Mount to tabletop 2 2 5 Nm depending on the type of wood in use CAUTION In order to ensure the effectiveness of the safety mechanism note the following when connecting the processor If only one sensor is being connected it should be connected to the socket number 1 I...

Page 46: ...g cable for connection to processor C Connection for the sensor cable D Processor E Connecting cable for control unit NOTICE This protective mechanism only works when the sensor is correctly installed Make sure that the side of the sensor marked with a yellow dot is facing the tabletop CAUTION You should only install and remove the sensor when it is completely disconnected from any live current Th...

Page 47: ... enough to reach the sen sor in that position Also make sure that the cables are routed so that they cannot be pinched during the up and down movements 1 Mark the drill holes used for mounting the processor Drill pilot holes and then screw the processor on the underside of the tabletop so that it is in the vicinity of the control unit 2 If no holes are pre drilled mark the drill holes for mounting...

Page 48: ...ow dot should be mounted to the underside of the tabletop Observe the recommended torques Mount to table frame 3 Nm Mount to tabletop 2 2 5 Nm depending on the type of wood in use CAUTION In order to ensure the effectiveness of the safety mechanism note the following when connecting the processor If only one sensor is being connected it should be connected to the socket number 1 If a second sensor...

Page 49: ...egional version USA continental Europe the UK Japan or Australia CAUTION Only use the proper power cable that is permitted in your country Be sure to use the correctly shaped plug as shown in the following illustration SMARTeco and COMPACT Figure 45 Variants of the SMARTeco and COMPACT mains power cable A COMPACT control unit B Control unit SMARTeco C Mains power supply connection D Power plug USA...

Page 50: ... EURO flat plug D Power plug United Kingdom E Power plug USA After plugging the power plug into the power outlet NOTICE There is a delay after the supply voltage is applied before the device actually turns on Wait at least seven seconds before beginning the commissioning You will need to carry out a reset movement on the control unit see section 6 1 on page 51 after the initial commissioning C D E...

Page 51: ...nit for the ID21 system 6 1 Reset during initial commissioning and after the removal of connecting cables CAUTION Danger of pinching crushing injuries No system based safety mechanism is enabled during the reset process 1 Connect the power cable to the control unit s power connection 2 Insert the mains power plug into a power outlet 3 Press and hold the key adjusting downward until the tabletop mo...

Page 52: ...a slight delay after the power cord is plugged in and voltage is applied Wait at least seven seconds before beginning the commissioning Power on time intermittent operations NOTICE The SMART COMPACT control units have been designed for intermittent operations Intermittent operation is an operational mode where the drive must pause after a specified maximum period of operation power on time This pr...

Page 53: ...ction please contact your supplier or sales agent Shutting down the ID21 system in an emergency Pull out the power plug in order to shut off the ID21 system The power plug must always be accessible during operations so that emergency shut off is possible Avoiding cable damage Be sure that your operating instructions inform the user about the possible cable risks NOTICE The cables in particular the...

Page 54: ...nwards D Key for adjusting upwards located on the underside of the control keypad 8 1 1 Key assignments for the Motion Assist control keypad Button Function Adjusting downwards Adjusting upwards For carrying out the reset motion after a malfunction refer to 6 1 Press the key on the control keypad to raise or lower the table Keep pressing the key until the desired height of the table is reached D A...

Page 55: ...downwards D Key for adjusting upwards 8 2 1 Key assignments for the HSCO control keypad Button Function Adjusting downwards Adjusting upwards For carrying out the reset motion after a malfunction refer to 6 1 Press the key on the control keypad to raise or lower the table Keep pressing the key until the desired height of the table is reached D A ...

Page 56: ...ting downwards D Key for adjusting upwards 8 3 1 Key assignments for the HSU Varioline control keypad Button Function Adjusting upwards Adjusting downwards For carrying out the reset motion after a malfunction refer to 6 1 Press the key on the control keypad to raise or lower the table Keep pressing the key until the desired height of the table is reached D A ...

Page 57: ...wnwards E Memory key 1 F Memory key 2 G Memory key 3 H Memory key 4 I Display J Save key S 8 4 1 Key assignments for the HSU control keypad Key indicator Function Key indicator Function Display Memory key 3 Memory key 1 Memory key 4 Save key S Adjusting upwards Memory key 2 Adjusting downwards For carrying out the reset mo tion after a malfunction refer to 6 1 E D A I H G F J ...

Page 58: ...save 073 The position is shown on the display e g 73 cm 2 Press the green Save key 5 S is now shown on the display 3 Press the desired memory key e g 2 5 2 S 2 is shown on the display 4 The set table position is now saved for the selected memory key A double click noise can then be heard After about 2 seconds the saved table position is displayed Adjusting the table to a saved height position This...

Page 59: ... upwards 8 5 1 Key assignments for the HSF keypad Key indicator Function Key indicator Function Display and LED indi cators refer to section 8 5 2 Memory key Motor group 2 adjust upwards Memory key 3 Motor group 2 adjust downwards Memory key 4 Memory key 1 Adjusting upwards Memory key 2 Adjusting downwards For carrying out the reset mo tion after a malfunction refer to 6 1 Using the keys for upwar...

Page 60: ...cates that important information is displayed on the positional information display Depending on control unit model in use PIN LED This LED indicates that the PIN CODE function is enabled 8 5 3 Advanced functions Saving a position Any table position can be saved using this function When the control unit is turned on for the first time all positions are equal to the smallest table position the lowe...

Page 61: ...u to set the table motor group 2 to a saved table position If there is no second motor group then the and keys are assigned the same functions as the and keys Move table upwards motor group 2 1 Press the key for moving up Press the key down until the table has reached the saved position The table will move up as long as the memory key is pressed If you release this key before the saved position is...

Page 62: ...sting downwards D Key for adjusting upwards 8 6 1 Key assignments for the TOUCHbasic inlay keypad Button Function Adjusting downwards Adjusting upwards For carrying out the reset motion after a malfunction refer to 6 1 Press the key on the control keypad to raise or lower the table Keep pressing the key until the desired height of the table is reached D A ...

Page 63: ...sting downwards D Key for adjusting upwards 8 7 1 Key assignments for the TOUCHbasic down keypad Button Function Adjusting downwards Adjusting upwards For carrying out the reset motion after a malfunction refer to 6 1 Press the key on the control keypad to raise or lower the table Keep pressing the key until the desired height of the table is reached D A ...

Page 64: ...play J Memory key 8 8 1 Key assignments for the TOUCHfx keypad Key indicator Function Key in dicator Function Memory key 1 Memory key Memory key 2 Adjusting upwards Memory key 3 Adjusting downwards Memory key 4 The display on the TOUCHfx control keypad is a 4 character positional and information display Using the keys for upwards or downwards adjustments Press and hold the corresponding key un til...

Page 65: ...y 2 Press the desired memory key e g 2 5 2 S 2 is shown on the display 3 The set table position is now saved for the selected memory key A double click noise can then be heard After about 2 seconds the saved table position is displayed Adjusting the table to a saved height position This function allows you to set the table to a saved table position 1 Press and hold the memory key that corresponds ...

Page 66: ...ay J Memory key 8 9 1 Key assignments for the TOUCHdown keypad Key indicator Function Key in dicator Function Memory key 1 Memory key Memory key 2 Adjusting upwards Memory key 3 Adjusting downwards Memory key 4 The display on the TOUCHdown control keypad is a four character positional and information dis play Using the keys for upwards or downwards adjustments Press and hold the corresponding key ...

Page 67: ...a saved height position This function allows you to set the table to a saved table position 1 Press and hold the memory key that corresponds to the desired table posi tion e g position 2 The table will move as long as the memory key is pressed If you re lease this key before the saved position is reached the table will stop before it reaches this position 2 Release the key when the table has reach...

Page 68: ...Key for adjusting upwards E Memory key 1 F Memory key 2 I Display J Memory key 8 10 1 Key assignments for the TOUCHinlay keypad Key indicator Function Key in dicator Function Memory key 1 Memory key Memory key 2 Adjusting upwards Adjusting downwards The display on the TOUCHinlay control keypad is a four character positional and information dis play Using the keys for upwards or downwards adjustmen...

Page 69: ...y 3 Press the desired memory key e g 2 5 2 S 2 is shown on the display 4 The set table position is now saved for the selected memory key A double click noise can then be heard After about 2 seconds the saved table position is displayed Adjusting the table to a saved height position This function allows you to set the table to a saved table position 1 Press and hold the memory key that corresponds ...

Page 70: ... the power supply and the control key pad are properly and firmly con nected A control unit or a control keypad is defective Please contact your supplier or sales agent The drives are running in only one direction There was a power outage dur ing an adjustment movement or the power cable was discon nected during a movement Carry out the reset movement The control unit drive or control keypad is de...

Page 71: ...trol unit Find and correct the short circuit Reconnect the control unit and re sume operations Connect the correct lifting column to the correct socket Reconnect the control unit and re sume operations 13 Malfunction channel 2 SMART COMPACT 14 Defect on channel 3 COMPACT only 24 Excessive current at lifting column M1 SMART COMPACT Remove the jammed objects from the range of movement Table is overl...

Page 72: ... Please contact your supplier or sales agent 70 Changed drive configuration First option Disconnect the mains power cable from the power supply and wait at least five seconds Connect the mains power cable to the power supply Carry out the reset movement Second option Simultaneously press the Memory position 1 and 2 keys and the Ta bletop up key Hold the keys down for about ten seconds and then rel...

Page 73: ...letop up key until the tabletop has reached its upper position The COMPACT control unit clicks three times the sensor unit is now deactivated 81 Internal error Carry out the reset movement Disconnect the mains cable from the power supply Reconnect the power supply cable after a few seconds If this error is displayed multiple times Disconnect the mains cable from the power supply Please contact you...

Page 74: ...vement Disconnect the mains cable from the power supply Reconnect the power supply cable after a few seconds Disconnect the mains cable from the power supply Please contact your supplier or sales agent Control unit LED is illuminated A reset movement is required Carry out the reset movement Note This LED is also illuminated during the reset movement or after the reset was not executed to com pleti...

Page 75: ... mecha nisms Check the cables for pinching or shearing Also check the strain relief and kink protection mecha nisms in particular after any me chanical load At least every six months Check the resistance of the protective earth and check for leakage current The leakage current and the pro tective earth resistance should be checked by a trained electrician At least every six months Check the functi...

Page 76: ...30x30 3L DESKFRAME C ID A 40x40 DESKFRAME C ID A 40x40 3L Tabletop permissible dimensions for table with three lifting columns Length Width Height Load 1200 to 2000 mm 1200 to 1500 mm 800 to 1000 mm 19 to 30 mm Max 150 kg Table frame Length x width x height Depending on your model Table legs Length x width x height Depending on your model Ambient conditions for operation storage and transport Temp...

Page 77: ...ection class I II Protection degree IP20 Dimensions and weight Length x width x height in mm 186 x 100 x 30 218 x 84 5 x 36 5 Weight 305 g 317 g 320 g Ambient conditions for operation storage and transport Temperatures for transport and storage From 20 C to 50 C From 4 F to 122 F Operating temperature From 10 C to 40 C From 50 F to 104 F Relative humidity From 30 to 75 Air pressure From 800 hPa to...

Page 78: ...s I Protection degree IP20 Dimensions and weight Length x width x height in mm 264 x 103 x 37 Weight 523 g Ambient conditions for operation storage and transport Temperatures for transport and storage From 20 C to 50 C From 4 F to 122 F Operating temperature From 10 C to 40 C From 50 F to 104 F Relative humidity From 30 to 75 Air pressure From 800 hPa to 1060 hPa Height 2000 m 1 Mode of operation ...

Page 79: ... Technical specifications and product designation 78438 7 0 79 11 3 Dimensions of the SMARTeco control unit Figure 57 SMARTeco control unit top view in mm Figure 58 SMARTeco control unit side view in mm 186 100 30 ...

Page 80: ...ct designation System ID21 80 78438 7 0 11 4 Dimensions of the SMARTneo SMARTneo pro control unit Figure 59 SMARTneo SMARTneo pro control unit top view in mm Figure 60 SMARTneo SMARTneo pro control unit side view in mm 200 84 5 36 5 218 ...

Page 81: ...em ID21 Technical specifications and product designation 78438 7 0 81 11 5 Size of COMPACT control unit Figure 61 SMART control unit top view in mm Figure 62 COMPACT control unit side view in mm 264 103 37 ...

Page 82: ...520 mm x 80 mm x 62 mm Length 3 x width x height 1170 mm x 80 mm x 62 mm Size of columns Exterior 80 mm x 62 mm Middle 73 mm x 58 mm Interior 66 mm x 48 mm Weight Approx 7 8 kg Cable length 1200 mm Ambient conditions for operation storage and transport Transport storage temperature From 20 C to 50 C From 4 F to 122 F Operating temperature From 10 C to 40 C From 50 F to 104 F Relative humidity From...

Page 83: ...System ID21 Technical specifications and product designation 78438 7 0 83 11 7 Size of the ID21 lifting column Figure 63 ID21 lifting column in mm Figure 64 Top view head end 80 62 520 y ...

Page 84: ...he technical specifications valid for that particular control unit The following illustration shows where the specifications are located on the ratings plate of the con trol unit Ratings plate on the COMPACT control unit Figure 65 Ratings plate example COMPACT e 3 OK E EU Model name Revision xxx xx xx Software version Input 220 240V 50 60Hz 5A Input voltage frequency and current consumption Output...

Page 85: ...e Revision xxx xx xx Software version Input 220 240V 50 60Hz 2 5A Input voltage frequency and current consumption Output 240VA 30 V Power and output voltage Duty cycle 2 minutes on 18 minutes off 1 minute on 9 minutes off Intermittent operations 2 minutes 18 minutes 1 minute 9 minutes Ser No Serial number Use in dry rooms only Conformity mark Protection class II Read the manual ...

Page 86: ...ple SMARTeco e 2 OK G EU Model name Revision xxx xx xx Software version Input 220 230V 50 60Hz 2 5A Input voltage frequency and current consumption Output 216 VA 24 V Power and output voltage Duty cycle 2 min on 18 min off Intermittent operations 2 minutes 18 minutes Ser No Serial number Use in dry rooms only Conformity mark 82334 Article number ...

Page 87: ...ation 78438 7 0 87 SMARTeco SMARTneo SMARTneo pro and COMPACT control unit stickers Figure 68 Sticker an example Xxxxx Article number CONTROL UNIT yyyyy Type designation and ID of control unit SW zzzzz ID of software Follow all special disposal instructions ...

Page 88: ...plate example M Assist Type designation for the Motion Assist Xxxxxxx Article number Prod date 28 10 Calendar week year 11 8 3 Ratings plates for the control keypads Figure 70 Ratings plate example Position Designation example Explanation A HSF_MDF_4M4_LD Type designation abbreviation B RevX Revision C xxxxxxxxxxx Serial number Conformity mark A C B ...

Page 89: ...following illustration shows where the specifications are located on the ratings plate Figure 71 Ratings plate example ID21 Model name Xxxxx Article number 24V 29V Input voltage Max 7 0A Current consumption Duty cycle 2 minutes ON 18 minutes OFF Intermittent operations 2 minutes 18 minutes max Push Force Push force Prod date Production date Calendar week year Serial No Serial number IP20 Protectio...

Page 90: ...e DESKFRAME C ID A 40x40 Model name DESKFRAME C ID A 40x40 3L Model name Xxxxx Article number Max 120kg Maximum load DESKFRAME C ID A 30x30 DESKFRAME C ID A 40x40 max 150kg only 3L Maximum load DESKFRAME C ID A 30x30 3L DESKFRAME C ID A 40x40 3L Prod date Production date Calendar week year Serial No Serial number Use in dry rooms only Follow the special assembly instructions Follow all special dis...

Page 91: ...ive 2008 98 EC Waste Framework Directive WFD as of 12 12 2008 12 2 Drive components The ID21 system consists of electronic components cables and metal and plastic parts You should observe all corresponding national and regional environmental regulations when dis posing of the system The disposal of the product is regulated in Germany by Elektro G internationally by the EU Di rective 2012 19 EC WEE...

Page 92: ... 527 3 2003 You may only operate this incomplete machine after you have confirmed that the end product into which this machine will be installed complies with the Machinery Directive 2006 42 EC On request the manufacturer is obliged to send the special documentation accompanying the partially completed machinery in electronic form to the appropriate national institution The special technical docum...

Page 93: ...f the Council as regards the list of restricted substances Applied standards EN 60335 1 2012 A11 2014 EN 55014 1 2006 A1 2009 A2 2011 EN 55014 2 1997 A1 2001 A2 2008 EN 61000 3 2 2014 EN 61000 3 3 2013 EN 62233 2008 This declaration of conformity is no longer valid if constructional changes are made which significantly change this drive i e which influence the technical specifications found in the...

Page 94: ......

Page 95: ......

Page 96: ...DewertOkin GmbH Weststrasse 1 Kirchlengern 32278 Germany Tel 49 0 5223 979 0 Fax 49 0 5223 75182 http www dewertokin de Info dewertokin de ID No 78438 ...

Reviews: