background image

16

service menu

In order to access the SET MENU, Press the OK button until you

  e

 prompted to 

input a password. The default password is 

↓↓↓↓

1.

Settings

2.

CIS Calibration

3.

Time & Date

4.

Version

5.

Factory Reset

You can use the arrows to select a sub-menu. Press OK button to confirm your 

selection and press BATCH button to return to the previous page. 

1.

SETTINGS

You can use the arrows to scroll through the sub-

e

menu and  ress ok to 

confirm your selection. Press Batch if you want to return to the previous page.


e  

   g  

    e 

 d


g  

For each of the 

setting features, once adjusted, press the 


 to 

confirm 

your selection. Press 

 if you want to go back to Settings


g

Note any changes you make in the 

setting menu 

 auto-save 


 e  


e

 (

e e    

  e e     e de

  e

  e e   e 

e

). Please ensure you 

e  


prior to exit. 

CAUTION: Please do not change sub-settings which have the following mark [*] 

without reaching out to the support team for advice and guidance. 

1.1


ge   

  e   e

e


    ed   

e  e  eed    e e e 

ge 


e  e e


g   e e e e

g    e e 

  e 

  e


d  e 


  e 

e

All support provided from our North

American 24/7 Support Team

1-332-228-1098

[email protected]

Summary of Contents for Edge DT800

Page 1: ...of this product PLEASE TAKE NOTICE Should the equipment be altered in any way or used in a manner for which it was not in tended at the time of delivery the supplier of the equip ment accepts no resp...

Page 2: ...longed period of time please switch off the machine and disconnect the power cord from the machine Not following these ins tructions may result in fire electrical shock or damage to the machine Ensure...

Page 3: ...safety precautions 6 instructions before the operation 7 overview of the product 10 counterfeit detection fuGctions 11 technical parameters 12 operation 16 service menu 20 maintenance and troubleshoot...

Page 4: ...slots or openings Especially conductive objects such as paper clips pins coins etc Only use the type of cable provided with this machine and ensure it s plugged to a grounded wall outlet or ground pr...

Page 5: ...6 Turn the machine ON and verify if its functioning properly In case of any error msg please contact the service center for help NOTE WHEN REPLACING FUSES MAKE SURE TO USE THE SAME TYPE AND RA TING F...

Page 6: ...perate the machine COUNTING GUIDE Align notes UPPER BACK HANDLE Open to remove stuck notes and clean the machine RS232 Connect to printer Get the counted notes THI KNESS WHEEL Adjust notes feeding gap...

Page 7: ...iew of the product DATE AND TIME COUNTING MODE COUNTING CURRENCY SPEED SET Counting functions FACE ORIENTATION Sorting fuctions g fuctions TOTAL PIECES Notes counted TOTAL VALUE Notes counted B MAIN d...

Page 8: ...f notes When BATCH is on 200pcs is shown as default on the display Use the arrow keys Up and Down to adjust the batch number Press OK to confirm your selection and start the count You will get a notif...

Page 9: ...V light Magnetic Ink MG Detects iron oxide in ink used in real money Metallic Thread MT Identifies security threads woven into notes Double Dimension DD Note Size Length and Width Double Bill DB Doubl...

Page 10: ...vailable Currencies USD EUR CAD GBP and MXN Feed system Roller Friction System Front Loading Hopper Capacity Approx 500 notes Stacker Capacity 200 notes Reject Stacker Capacity Approx 50 notes Adjusta...

Page 11: ...ed for the same denomination You can select 2 different counting speeds 800 and 1000 notes min In this mode you can switch ADD or BATCH or ADD BATCH functions MDC mode Press button MODE to select MDC...

Page 12: ...he machine performance use the Thickness Wheel If MG or UV or DD errors messages are reported frequently proceed to verify the functions sensitivity and consider reduce them in case you confirm the cu...

Page 13: ...tes to increase the gap When the hopper is too loose please tighten it by toggling the wheel to It works for new thinner notes and Polymer notes to reduce the gap We advise to keep it to Neutral mode...

Page 14: ...note easily using your fingers then proceed to remove it carefully Otherwise if it is difficult to reach or stuck with the transport ing rollers then proceed to turn the machine OFF before any attemp...

Page 15: ...selection Press Batch if you want to return to the previous page e g e d d g For each of the setting features once adjusted press the to confirm d e your selection Press if you want to go back to Sett...

Page 16: ...f an Alarm Count Allow the user to count a ripped note as 1pcs or 0 pc Set 0 as default otherwise it will count 1pc 1 9 Start Sensor Threshold Allow the user to adjust the Start Sensor Sensitivity in...

Page 17: ...e e eed e e d e e ed E E e e e e e e e e e e e e g e d e d e e e e e e e e e e e g g e ded e e e e e e e e g e e g d e e e e d e e e ed ge e g e e e e e e e d e e e e g e d g e d e ge e g e e e e e e...

Page 18: ...rocess 6 logo update CAUTION Ensure the machine is switched OFF before following those steps The Logo file e e ed e e e e Use a formatted USB 2 0 or 3 0 to upload e g e Insert the USB key into the UPP...

Page 19: ...e dust from the note passages areas 4 Inspect the CIS sensors to verify if they are stained with ink and use a cloth slightly soaked in alcohol to clean the CIS sensor surface only in the case it has...

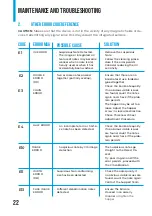
Page 20: ...ICATIONS Error Code Sensor problem CE01 UV SENSOR CE02 SPEED SENSOR CE03 RIGHT COUNTING SENSOR CE04 LEFT COUNTING SENSOR CE05 START HOPPER SENSOR CE06 MG SENSOR CE07 KEYBOARD CE08 STACKER SENSOR CE09...

Page 21: ...The Suspicious notes go straight to the Reject Po cket Try pass it again and If the error persists proceed with the CIS calibration E11 WIDTH ERROR DB Suspicious Non conforming size has been detected...

Page 22: ...he reject pocket E20 MT ERROR Incorporated in the center MG Consider adjusting the MG Sensitivity or contact the support team E21 MG ERROR Suspicious Note Detected Side MG E30 IR ERROR Suspicious Note...

Page 23: ...EF05 NOTES STUCK MOTOR ERROR HOPPER ERROR Remove the notes from the stacker EF06 BACK COVER ERROR Remove the notes from the reject pocket EF01 REJECT POCKET IS FULL Remove the notes from the reject po...

Page 24: ...he warranties of merchantability and fit ness for a particular purpose to the duration of this express limited warranty Some states do not allow limitations on how long an implied warranty lasts so th...

Page 25: ...h respect to any defective product during the Warranty Period we will in our sole discretion either a repair or b replace such product or the defective part free of charge Customer should allow the ma...

Reviews: