13
operation
C.
printing
Plug the Printer cable in the machine printing interface (RS-232C Serial Port). Once
connected, Turn On the machine, ensure the baud rate is correctly setup (check set-
tings 1.4 section) and start the count. Press Report Button once. Press the OK Button
to print the Total value and quantity of notes result. Press Report Button twice. Press
the OK Button to print the Serial Numbers of the notes counted.
D.
Miscounting errors
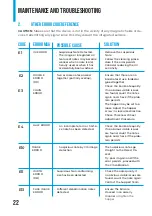
In case the machine is not having an accurate counting operation, proceed as follow:
•
Ensure that the notes are placed orderly in the hopper.
•
Check the counting sensors for dust or any other kind of malfunctioning source.
•
Verify the note thickness adjustment mechanism (feeding gap) in case it needs
to be re-adjusted for improving the machine performance (use the Thickness
Wheel).
•
If MG or UV or DD errors messages are reported frequently, proceed to verify the
functions sensitivity and consider reduce them in case you confirm the current
sensitivity value is too high. We highly advice to contact the support team prior to
adjusting the default factory sensitivity values.
E.
Thickness Wheel Adjustment Procedure (Feeding Gap)
When the notes are improperly fed into the machine, please adjust the notes thick-
ness in the hopper by turning the note adjustment Thickness Wheel located on the
top of the machine.
Proceed with this calibration when the notes are not fed smoothly through the
machine or several error messages are occurring too often like Double Bills, Chain or
miscounting errors.
Other reasons that might require to readjust the feeding gap are:
•
The counting of new or mint condition notes
•
The counting of poor or bad fitness condition notes
•
Polymer notes and Paper-made notes counted together


