Denon DHT-1000DV Operating Instructions Manual Download Page 9

9

ENGLISH

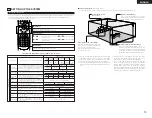
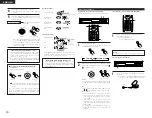
(6) Connecting to a TV or Monitor Equipped with Component Input Connectors

When making connections, also refer to the operating instructions of the other components.

The video signals input to the VIDEO input (yellow) and S-Video input jacks are not output to the color difference (component)
video jacks.

SPEAKER  SYSTEMS

6    16

R

L

IMPEDANCE

CENTER

SURROUND

R

L

FRONT

SUB

WOOFER

IN

V.AUX

OUT

IN

TV/DBS

DIGITAL(OPTICAL)

IN

OUT

IN

IN

TV/DBS

IN

V.AUX

VCR

MON.OUT

S VIDEO

IN

OUT

IN

IN

TV/DBS

IN

V.AUX

VCR

MON.OUT

VIDEO

R

L

IN

OUT

IN

IN

IN

OUT

V.AUX

TV/DBS

VCR

CDR/
TAPE

PRE OUT

SUB WOOFER

AM

FM COAX. 75

LOOP ANT.

AUDIO

Y

C

B

COMPONENT VIDEO OUT

C

R

COMPONENT VIDEO IN

C

B

C

R

Y

Color component output connectors (C

R

, C

B

and Y)

The red (C

R

), blue (C

B

) and brightness (Y) signals are output independently, achieving more faithful

reproduction of the colors.

• The color component input connectors may be marked differently on some TVs or monitors (P

R

, P

B

and Y/R-Y, B-Y and Y/C

R

, C

B

and Y, etc.).  For details, refer to the TV’s operating instructions.

Monitor TV

Connecting a monitor TV

• Connect the TV’s color difference

(component) video input jacks
(COMPONENT VIDEO INPUT) to the
COMPONENT VIDEO OUT jack using
75 

/ohms coaxial video pin-plug cords.

NOTES:

• Use the three commercially available video cords to connect the ADV-1000’s color component output connectors

to the TV or monitor.

• Set the “TV TYPE” in “VIDEO SETUP” in “DVD SETUP” to comply with your TV’s video format. When the TV is

PAL formated set to PAL.

2

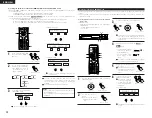
Selecting the type of disc for the type of connected TV

Both DVD discs and video CDs have the material recorded in the PAL and NTSC systems. Refer to the table below to select the
correct disc type for the type of connected TV.

Disc

TV Monitor

PAL

Played in the PAL system.

Played in the NTSC system.

NTSC

Connecting to the Multi-system TV

Disc

TV Monitor

PAL

No clear images are shown

on the screen.

Played in the NTSC system.

NTSC

Connecting to the NTSC TV

Disc

TV Monitor

PAL

Played in the PAL system.

No clear images are shown

on the screen.

NTSC

Connecting to the PAL TV

NOTE:

When a disc which does not comply with Video CD standard is
played, the bottom part of the picture may disappear.

(7) Sound output from this unit digital audio output connectors

2

When a disc is played on the ADV-1000

Settings

Refer to

page

Digital audio data output

Audio recording format

DVD video
DVD audio
(video part only)

Video CD

Music CD

MP3 CD

Dolby Digital

DTS

48 kHz

96 kHz

CP : ON

CP : OFF

MPEG 1

Linear PCM

MP 3

Digital out : Normal

43

43

Dolby Digital bitstream

2 channels PCM data (48 kHz/16 bit)

DTS bitstream

DTS bitstream

48 kHz/16 ~24 bit PCM

48 kHz/16 bit PCM

48 kHz/16 bit PCM

48 kHz/16 bit PCM (when copy-protected)

96 kHz PCM (when not copy-protected)

44.1 kHz/16 bit PCM

44.1 kHz/16 bit PCM

32 ~ 48 kHz/16 bit PCM

Digital out : PCM conversion

Digital out : Normal

Digital out : PCM conversion

LPCM conversion mode : OFF

LPCM conversion mode : ON

LPCM conversion mode : ON

LPCM conversion mode : OFF

LPCM conversion mode : OFF

Linear PCM

Linear PCM audio is the signal recording format used for music CDs.
While the signals are recorded at 44.1 kHz/16 bit for music CDs, for DVDs they are recorded at 48 kHz/16 bit to 96 kHz/24 bit,
providing higher sound quality than music CDs.

Protector circuit

• This unit is equipped with a high-speed protection circuit. The purpose of this circuit is to protect the

speakers under circumstances such as when the output of the power amplifier is inadvertently short-
circuited and a large current flows, when the temperature surrounding the unit becomes unusually high,
or when the unit is used at high output over a long period which results in an extreme temperature rise. 
When the protection circuit is activated, the speaker output is cut off and the power supply indicator LED
flashes. Should this occur, please follow these steps: be sure to switch off the power of this unit, check
whether there are any faults with the wiring of the speaker cables or input cables, and wait for the unit to
cool down if it is very hot. Improve the ventilation condition around the unit and switch the power back on.
If the protection circuit is activated again even though there are no problems with the wiring or the
ventilation around the unit, switch off the power and contact a DENON service center.

Note on speaker impedance

• The protector circuit may be activated if the set is played for long periods of time at high volumes when

speakers with an impedance lower than the specified impedance (for example speakers with an
impedance of lower than 4 

/ohms) are connected. If the protector circuit is activated, the speaker output

is cut off. Turn off the set’s power, wait for the set to cool down, improve the ventilation around the set,
then turn the power back on.

Cautions on connecting

• With this unit’s speaker outputs, signals with the reverse phase of the “+” side output terminal’s signals

are also output from the “-” side output terminal.
Do not connect to a device for switching between multiple speakers (a speaker selector or audio channel
selector) or connect in ways other than described in this manual. Doing so will result in damage.

Summary of Contents for DHT-1000DV

Page 1: ...SDB TONE MUTE SURR PARA SUB TITLE ANGLE AUDIO SHIFT CH SELECT CH T TONE TU PROG DIRECT REPEAT A B REPEAT RANDOM DVD TV VCR CH VOL SLEEP ON OFF REMOCON MODE 2 3 4 5 6 8 9 CLEAR CALL 0 10 7 1 STATUS CDR...

Page 2: ...mended to use this in a room of 5 C 41 F 35 C 95 F CLASS 1 LASER PRODUCT LUOKAN 1 LASERLAITE KLASS 1 LASERAPPARAT CLASS 1 LASER PRODUCT ADVARSEL USYNLIG LASERSTR LING VED BNING N R SIKKERHEDSAFBRYDERE...

Page 3: ...this happens take the following steps Install this unit as far as possible from the tuner or TV Set the antenna wires from the tuner or TV away from this unit s power cord and input output connection...

Page 4: ...VDs on which multiple angles are recorded 4 Playback disable function This function can be used to disable playback of DVDs you do not want children to watch 9 Stylish 5 1 channel surround AV speaker...

Page 5: ...6 CAUTIONS ON HANDLING DISCS Discs Only the discs including the marks shown on page 5 can be played on the ADV 1000 Note however that discs with special shapes heart shaped discs hexagonal discs etc c...

Page 6: ...is played for long periods of time at high volumes when speakers with an impedance lower than the specified impedance are connected Connection the speaker terminals 1 Push the lever 2 Insert the cord...

Page 7: ...sing an improper cable can result in a drop in video quality When making connections also refer to the operating instructions of the other components IN V AUX OUT IN TV DBS DIGITAL OPTICAL IN OUT IN I...

Page 8: ...the components audio inputs and outputs as described on page 7 Connecting the video decks Connect the video deck s S output jack S OUT to the VCR IN jack and the video deck s S input jack S IN to the...

Page 9: ...MPEG 1 Linear PCM MP 3 Digital out Normal 43 43 Dolby Digital bitstream 2 channels PCM data 48 kHz 16 bit DTS bitstream DTS bitstream 48 kHz 16 24 bit PCM 48 kHz 16 bit PCM 48 kHz 16 bit PCM 48 kHz 16...

Page 10: ...EMOTE CONTROL UNIT RC 902 VOLUME ENTER BAND MODE MENU FUNCTION DISPLAY RETURN INPUT MODE SURROUND TOP MENU SETUP SDB TONE MUTE SURR PARA SUB TITLE ANGLE AUDIO SHIFT CH SELECT CH T TONE TU PROG DIRECT...

Page 11: ...e remote sensor is exposed to direct sunlight or strong artificial light Do not press buttons on the main unit and remote control unit simultaneously Doing so may result in malfunction Neon signs or o...

Page 12: ...that some components however cannot be operated with this remote control unit Before operating the remote control unit Be sure to set the audio device mode using the remote control mode selector butto...

Page 13: ...ing position FRONT SP SMALL 2 7m 9 ft FRONT SP SMALL FRONT SW CENTER 2 4m 8 ft SURROUND 2 1m 7 ft 2 7m 9 ft FRONT L 0 dB DIALOG SUBTITLE DISC MENU ENGLISH WALL PAPER BLUE TV ASPECT 4 3 PS DIGITAL OUT...

Page 14: ...7 when using speaker systems other than the ones described below or if you wish to change the settings 3 Quick system settings to switch between the 2 and 5 1 channel modes 1 2 At the setup screen sel...

Page 15: ...ood sound can be achieved even when Small is set for the front center and surround speakers For the majority of speaker system configurations using the SMALL setting for all five main speakers and Sub...

Page 16: ...ontrol unit For details see page 23 1 2 To perform these operations from places other than the system setting change menu see page 15 At the SYSTEM SETUP MENU select CHANNEL LEVEL ENTER Remote control...

Page 17: ...CH 2 1 2 Refer to CONNECTIONS pages 6 to 9 and check that all connections are correct Turn on the power Press the POWER button ON STANDBY ON POWER Light green Main unit Remote control unit When press...

Page 18: ...ttons to select the desired item Remote control unit 7 Press the ENTER button The desired item is selected and playback starts You can return to the menu screen by pressing the TOP MENU button while t...

Page 19: ...main unit or press the FUNCTION button on the remote control unit to select the input function to played FUNCTION SELECT FUNCTION Main unit Remote control unit The function switches as shown below Th...

Page 20: ...s containing recordings of live concerts etc in the AUTO mode the sound may be slightly broken at the beginning If this happens switch to the PCM mode After starting playback 1 Adjusting the sound qua...

Page 21: ...to the adapter s operating instructions Please refer to the instruction manual of the adapter when making connection 2 To play in Dolby Digital Surround on the ADV 1000 set DVD setting change Audio s...

Page 22: ...r DVDs the DTS signals are recorded in a special way so this problem does not occur 2 The signals provided at the digital outputs of a CD or LD player may undergo some sort of internal signal processi...

Page 23: ...ield is clearer but the overall sound field image concentrates at the center and the relationship between the different channels seems weaker This parameter can be adjusted to improve the sense of sta...

Page 24: ...re displayed Remote control unit D COMP setting D COMP OFF OFF LOW MID HI This parameter is not displayed when playing DTS source 2 Setting the parameters in the PLII CINEMA PLII MUSIC and PRO LOGIC m...

Page 25: ...nd PRO LOGIC modes page 24 SURR PARA Remote control unit 6 LFE level setting LFE 0dB 10 5 0 The LFE level can be adjusted between 10 dB and 0 dB in steps of 1 dB DEFAULT setting DEFAULT Y N YES NO Whe...

Page 26: ...laying PCM signals with a sampling frequency of 96 kHz such as from DVD Video discs that contain 24 bit 96 kHz audio If such signals are input during playback in one of the other surround modes the mo...

Page 27: ...SURROUND TOP MENU SETUP SDB TONE MUTE SURR PARA SUB TITLE ANGLE AUDIO SHIFT CH SELECT CH T TONE TU PROG DIRECT REPEAT A B REPEAT RANDOM DVD TV VCR CH VOL SLEEP ON OFF REMOCON MODE 2 3 4 5 6 8 9 CLEAR...

Page 28: ...C C C C C C C C C C C C C C C C C C C C C C Multi ch Multi ch AUTO DECODE DOLBY DIGITAL DTS SURROUND DOLBY PL II AUTO STEREO 5CH STEREO MONO MOVIE ROCK ARENA JAZZ CLUB VIDEO GAME MATRIX VIRTUAL DIREC...

Page 29: ...he proper remote control mode selector button to set the remote control unit to the AV mode TUNER TV VCR 1 Press the remote control shift button and the channel CH button and select preset number P03...

Page 30: ...2 3 4 5 6 8 9 0 10 7 1 ON SCREEN DISPLAY 17 The ADV 1000 is equipped with an on screen display OSD function that displays various types of information on the surround functions and the disc on the scr...

Page 31: ...l unit ENTER Remote control unit 2 Use the and cursor buttons to select the item then press the ENTER button STANDARD The picture quality and functions are all reset to the standard values set upon sh...

Page 32: ...r video sections repeatedly VOLUME BAND MODE TOP MENU SETUP SDB TONE MUTE SURR PARA SUB TITLE ANGLE AUDIO SHIFT CH SELECT CH T TONE TU PROG DIRECT REPEAT A B REPEAT RANDOM DVD REMOCON MODE STATUS CDR...

Page 33: ...TUP SDB TONE MUTE SURR PARA SUB TITLE ANGLE AUDIO SHIFT CH SELECT CH T TONE TU PROG DIRECT REPEAT A B REPEAT RANDOM DVD TV VCR CH VOL SLEEP ON OFF 2 3 4 5 6 8 9 CLEAR CALL 0 10 7 1 STATUS CDR MD TAPE...

Page 34: ...consisting of up to 8 capital or numbers and recording the files on the CD R RW Do not apply stickers tape etc to either the label side or the signal side of CD R RW discs If adhesive gets on the surf...

Page 35: ...the new language to appear When a disc supporting the closed caption is played the subtitle and the closed caption may overlap each other on the TV monitor In this case turn the subtitle off 7 Using...

Page 36: ...starts Playback also starts if the PLAY 1 button is pressed ENTER Remote control unit Apple Orange Peach TOP MENU Banana Strawberry Pineapple Apple Orange Peach Banana Strawberry Pineapple 3 Switching...

Page 37: ...reappears The time can be displayed by pressing the TIMER SET button while the power is in the standby mode The power is now no longer in the energy saving standby mode When the TIMER SET button is pr...

Page 38: ...the same time Everyday timer The timer can be used to play DVDs CDs or TUNER Before setting the timer Set the current time Be careful to set the right time Checking the timer settings Use the same pro...

Page 39: ...If the SLEEP button is pressed while the sleep timer is operating the setting returns to 120 minutes Make the setting over If the sleep timer and everyday timer settings overlap the sleep timer has pr...

Page 40: ...rom the factory can be changed The setting contents are maintained until they are next changed even when the power is switched off VOLUME ENTER BAND MODE MENU FUNCTION TOP MENU SETUP SDB TONE MUTE SUR...

Page 41: ...ENGLISH Factory default Select this when you want to play the DVD with the subtitles in English FRENCH Select this when you want to play the DVD with the subtitles in French SPANISH Select this when...

Page 42: ...ER 2 3 4 2 3 4 1 Use the and cursor buttons to select the desired setting then press the ENTER button TV ASPECT Use this to set the shape of your TV s screen TV TYPE Use this to set your TV s video fo...

Page 43: ...ect the desired setting then press the ENTER button DIGITAL OUT Use this to select the digital output s signal format LPCM SELECT 96 kHz 48 kHz Use this to set the digital audio output when playing DV...

Page 44: ...CH CH 2 3 4 4 2 3 4 1 2 See page 40 3 Use the and cursor buttons to select the desired setting then press the ENTER button RATING LEVEL Use this to restrict playback of adult DVDs you do not want chi...

Page 45: ...ECT CH T TONE TU PROG DIRECT REPEAT A B REPEAT RANDOM DVD TV VCR SLEEP REMOCON MODE CALL 0 10 STATUS CDR MD TAPE TUNER TV VCR VCR POWER TV POWER TV POWER TV NTSC PAL MEMO POWER CH 2 3 4 2 3 4 1 1 2 Se...

Page 46: ...properly check the table below If this does not solve the problem this unit may be damaged Turn off the power unplug the power cord from the power outlet and contact your store of purchase or nearest...

Page 47: ...General Power supply AC 230 V 50 Hz Power consumption 70 W Standby 1 W Maximum external Dimensions 434 width x 80 height x 368 depth mm Mass 6 0 kg 2 Remote control unit RC 902 Type Infrared pulse Pow...

Page 48: ...16 11 YUSHIMA 3 CHOME BUNKYOU KU TOKYO 113 0034 JAPAN Telephone 03 3837 5321 Printed in China 511 3974 002 210...

Reviews: