


NO (power does not turn off automatically)
Setup
MULTI
Default settings
QUICK SETUP
13
ENGLISH
10
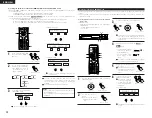
SETTING UP THE SYSTEM
•
Once all connections with other AV components have been completed as described in “CONNECTIONS” (see pages 6 to 9),
make the various settings described below on the monitor screen using the ADV-1000’s on-screen display function.
•
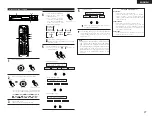
Use the following buttons to set up the system:
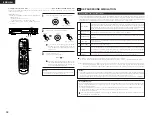
(1) System setup items
VOLUME
ENTER
BAND
MODE
MENU
DISPLAY
RETURN
INPUT MODE SURROUND
TOP MENU
SETUP
SDB/TONE
MUTE
SURR.PARA
SUB TITLE
ANGLE
AUDIO
SHIFT
CH.SELECT
CH
T.TONE
TU
PROG/DIRECT REPEAT A-B
REPEAT
RANDOM
DVD
REMOCON MODE
STATUS
CDR/MD/TAPE TUNER/TV/VCR
VCR POWER
TV POWER
NTSC/PAL
MEMO
POWER
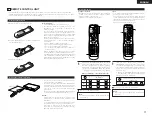
ENTER button
Press this to switch the display.
Also use this button to complete the setting.
CURSOR buttons
and
:
Use these to move the cursors (
and
) to the left and right
on the screen.
and
:
Use these to move the cursors (
and
) to the up and down
on the screen.
SETUP button
Press this to display the system setup menu.
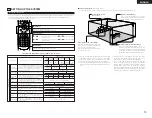
Setup items and default values (set upon shipment from the factory)
SPEAKER
CONFIGURATION
DELAY TIME
CHANNEL
LEVEL
DVD AUTO
POWER OFF
DISC SETUP
OSD SETUP
VIDEO SETUP
AUDIO SETUP
RATINGS
OTHER SETUP
Input the combination of speakers in your system and
their corresponding sizes (SMALL for regular speakers,
LARGE for full-size, full-range) to automatically set the
composition of the signals output from the speakers and
the frequency response.
This parameter is for optimizing the timing with which the
audio signals are produced from the speakers and
subwoofer according to the listening position.
At the listening position, listen to the test tones output
from the different speakers and set so that the playback
level from the different speakers is equal.
The power automatically switches to standby if no
operation is performed for 30 minutes while in the stop
mode with the function set to DVD.
Set the audio language, subtitle language and disc menu
language for when playing discs.
Set the wallpaper for the setup and operation screens.
Set the screen size and video system for the TV being
used.
Set the digital audio signal format and the linear PCM
sampling frequency and bit conversion.
Make the playback restriction setting for DVDs with
restricted viewing and set the password required for
changing the setting.
Set the size of the room and the listening position.
FRONT
SP.
SMALL
2.7m (9 ft)
FRONT SP.
SMALL
FRONT & SW
CENTER
2.4m (8 ft)
SURROUND
2.1m (7 ft)
2.7m (9 ft)
FRONT L
0 dB
DIALOG
SUBTITLE
DISC MENU
ENGLISH
WALL PAPER: BLUE
TV ASPECT
4 : 3 PS
DIGITAL OUT
NORMAL
RATING LEVEL
NO LIMIT
CLOSED CAPTION : OFF
TV TYPE
LPCM SELECT
OFF
PASS WORD CHANGE
0000 (Default)
ENGLISH
ENGLISH
CENTER
0 dB
FRONT R
0 dB
SURROUND L
0 dB
SURROUND R
0 dB
SUB WOOFER
0 dB
CENTER SP.
SMALL
SURROUND SP.
SMALL
SUB WOOFER
YES
SW FREQ. = 120 Hz / SW MODE = NONE
CENTER
SP.
SMALL
2.4m (8 ft)
SURROUND
SP.
SMALL
2.1m (7 ft)
SUB-
WOOFER
YES
2.7m (9 ft)
ADV
ANCED SETUP
SYSTEM SETUP
DVD SETUP
2
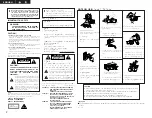
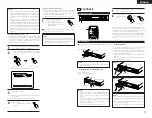
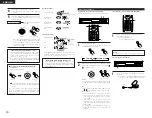
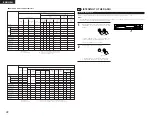
Speaker system layout
(basic system layout)
•
The following shows a basic example of layout for a system consisting of six speaker systems and a TV.
Center speaker system
(USC-C1000)
Super woofer (USW-1000)
Place so that the distance to the listening
position is the same as the distance between
the front speakers and the listening position.
Front speaker systems (USC-A1000)
Place the front speaker systems at the sides
of the TV or screen, with their front panels as
flush with the screen as possible.
Place the speaker systems symmetrically on
the sides of the screen.
Surround speaker systems (USC-A1000)
Place the surround speaker systems 60 cm to 1
meter behind the listening position and 60 cm to 1
meter above the height of the ears (symmetrically
on the sides). Point the surround speakers straight
ahead rather than towards the listening position.
Make the closed caption setting for DVDs. (A
commercially available decoder is required to display the
closed captions.)
ROOM
SPACE
MEDIUM
4.2m x 4.2m
(14 ft x 14 ft)
SEATING
POSITION
BACK
•
Place the front and center speakers with their fronts as flush
as possible with the TV or screen. Place the center speaker
between the left and right front speakers and no further
away from the listening position than the front speakers.
•
There are no particular limitations to where the super woofer
can be placed, but ideally it’s front should be flush with the
screen.
•
When placing the center speaker on top of the TV or when
suspending the surround speakers from the walls, secure
them in place so they do not fall during earthquakes.
•
If it is not possible to arrange the speakers as described
above due to space restrictions in the room, etc., and the
distance between the different speakers and the listening
position differs greatly, refer to “Delay time (distance
settings)” on page 16 to adjust the sound produced from the
different speakers according to their distance to the listening
position so as to achieve the optimal surround effect.


