background image

M81E-X Series User’s Manual

58

                       Figure 3

%

%

%

%

%

DELTA HardWare Doctor 3.60 For Win9X Installation

The system environment monitoring Utility with the onboard Winbond W83627HF-AW
system monitor chip allow you to monitor your system’s temperature, fan speed, CPU
and system voltage. Using this Utility, you can setup the upper and lower limits of these
monitored parameters. A per-warning message will pop up on the screen when the
monitored parameters is out of the preset range. This software have to installed under
Windows O/S.

%

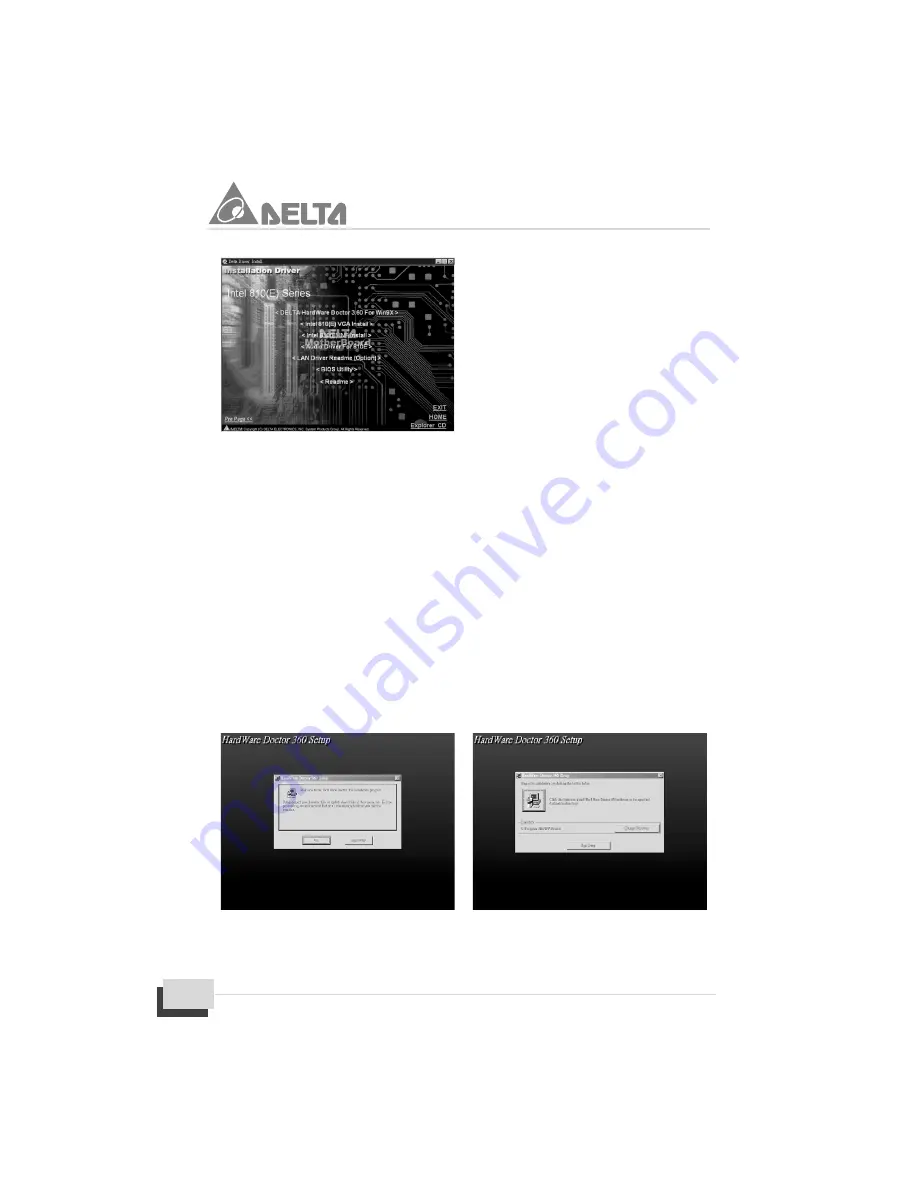
Click “

DELTA HardWare Doctor 3.60 

For Win9X

” on the Figure 3, the screen will

appear Figure 4. for HardWare Doctor 360 Setup.

%

Click on the [

OK

] button, the screen will appear Figure 5. Then type in “

C:\Program

Files\HWDoctor\

” (assuming that your CD-ROM drive is drive D:). The installation

program will now guide you through the rest of the installation process.


&&&&&&&&&&

 Figure 4                                                          Figure 5

%

When completed, you will be prompted to reboot. Select [

OK

] button to reboot and

complete the installation.

Summary of Contents for M81E-X Series

Page 1: ...Intel Pentium Pentium II Pentium III Celeron and Slot1 are registered trademarks of Intel Corporation All other product names mentioned herein are used for identification pur poses only and may be the trademarks of their respective companies Technical Support If you need technical assistance our technical support engineers will be glad to assist you with all technical difficulties you can reach th...

Page 2: ...CONTENTS 1 Checklist 2 2 Introduction 3 3 Specification 4 4 Layout Guide 6 5 Function Illustrations 8 6 BIOS Configuration 29 7 Software Installation 57 P N 5011503001 NOV 1999 REV1 1 ...

Page 3: ...ox M81E X series Motherboard Anti Static Bag EPE Sheet Serial AV Terminal S Terminal Cable Assembly with Bracket User s Manual IDE Ultra DMA33 66 Ribbon Cable Assembly Note The 80 Pin ribbon cable is designed with a 40 Pin connector Floppy Ribbon Cable Assembly Driver and Utility CD 1 Checklist Note You can ignore item 5 if your motherboard does not support TV OUT function 1 2 8 5 7 9 6 3 4 9 8 7 ...

Page 4: ...on of the small current required to refresh the system memory To resume from a suspend to RAM press the power button or use the hot key or password if you have enabled a hot key or password power on The system will resume in just a few seconds and it will appear in exactly the same state as it was before it was suspend to RAM Also integrated H W monitoring and 10 100Mbps Fast Ethernet LAN solution...

Page 5: ...r CPU Interface 33MHz PCI Bus for PCI Interface 66MHz AGP Bus for AGP Interface 100MHz SDRAM Bus for SDRAM Memory Interface Memory Support Two 168 Pin DIMM sockets for 3 3V unbuffered SDRAM module and PC 100 compliant Memory capacity from 8MB up to 512MB 4MB display cache memory onboard graphics and PC 100 100MHz PC 133 133MHz compliant Expansion Slots Support Four PCI v2 2 Slots One AMR Slot Onbo...

Page 6: ...ture Support Hardware monitor to Fan Speed Voltage and Thermal System power on by PS 2 Keyboard and Mouse Modem Ring On and Wake On LAN Function Power Harris HIP6021 PWM Power Controller ATX Power Supply Configuration BIOS Support Award Medallion Flash BIOS Plug and Play DMI and DPMS Function Compliancies DOC Compliant CE Certification Form Factor ATX 305 x 190 x 1 6mm 4 Layer PCB Design Environme...

Page 7: ...e Port K B MS PS 2 Keyboard Port USB1 LAN RJ 45 LAN Port USB1 LAN Two USB Ports LPT1 Parallel Port COM1 Serial Port VGA1 VGA Display Port GAME_AUDIO Game Port GAME_AUDIO Line Out Port GAME_AUDIO Line In Port 4 Layout Guide 3 2 1 4 5 6 7 8 9 10 15 1 21 18 13 3 4 5 7 8 11 12 14 16 17 19 20 23 22 24 25 26 29 31 10 9 6 2 33 27 28 30 32 ...

Page 8: ... Header PWR LED Power LED FDC1 FDD Device Port IDE1 2 IDE Device Port DIMM1 2 DIMM Socket ATX1 ATX Power Connector JP2 PS 2 Keyboard and Mouse Power On Header PWR FAN Power Fan Connector SLOT1 Slot1 CPU Slot JP3 TV System Format Header TV OUT TV Signal Output Header CPU FAN CPU Fan Connector J12 Wake On LAN Connector 4 Layout Guide Note You can ignore item 16 30 31 if your motherboard does not sup...

Page 9: ...nded or anti static surface component side up Inspect the motherboard and contact you retailer immediately if it is damaged 5 3 Pre Installation Procedure Before you install your motherboard into a chassis its convenient to install the memory modules and set all the jumpers to correct settings The examples and explain below shown the function and identify of the jumper setting to help you understa...

Page 10: ...a single lead connector with a clip on one side of the plastic housing There is only one way to plug the lead into the power connector ATX1 Press the lead connector down until the clip snaps into place and secures the lead on to the connector new battery to replace old one after it cannot work or BIOS does not keep its settings Replace only with the same or equivalent type recommended by the manuf...

Page 11: ...CMOS and password Turn off your system power then place a jumper cap to short Pin 2 3 of JP4 for 3 5 seconds Put the jumper cap back to Pin 1 2 of JP4 Turn on your system power then access BIOS setup please refer to BIOS Configuration explain 1 20 11 10 Assignment Pin Pin Assignment 3 3V 11 1 3 3V 12V 12 2 3 3V GND 13 3 GND PW ON OFF 14 4 5V GND 15 5 GND GND 16 6 5V GND 17 7 GND 5V 18 8 PW GOOD 5V...

Page 12: ...t Key or Left Key of mouse for wake up your system from sleep state Wake On LAN Connector J12 It is a 3 Pin 2 0mm connector that used for remote wake up system through a network If you have installed a network adapter LAN adapter you can use the cable provided with the card to plug into the J12 connector on the motherboard This is the Wake On LAN feature when your system is in a power saving mode ...

Page 13: ... down to eliminate audible noise and reduce power consumption You can monitor the fan speed by way of W83627HF LPC I O chip and the fan must come with a tachometer output The CPU and motherboard will overheat if there is no air flow across the CPU and onboard heat sink Damage may occur to the motherboard and the CPU fan if these pins are incorrectly used 1 3 Pin Assignment 1 5VSB 2 GND 3 Wake Up S...

Page 14: ...her J7 or J8 to connect your CD ROM or DVD drive audio output IrDA Infrared Header J10 Optional It is a 10 Pin Standard IR SIR and Consumer IR CIR headers That support an optional wireless transmitting and receiving infrared module This module mounts to a small opening on system case that support this feature This is an optional item and it must be connected to the CIR and SIR header Pin Assignmen...

Page 15: ...ard The COM2 header has the Pin 1 side clearly marked The Pin 1 side of the serial cable is always marked with a red stripe on the cable Note An IR and a second serial port use the same resources and they may use some of the resources required by a fax modem card If you have more than one of these items installed you may not be able to use them at the same time You can use the Integrated Periphera...

Page 16: ... this jumper to setting the TV format that is integrated on this motherboard Place a jumper cap to short Pin 1 2 of JP3 that supported for PAL format Remove the jumper cap from Pin1 2 and put the jumper cap back to Pin 1 of JP3 that supported for NTSC format TV OUT Header J9 The motherboard has a 8 Pin header for TV signal output by external video Encoder which provides a PC98 compliant solution f...

Page 17: ...nect to either Ethernet 10Base T or 100Base TX network The motherboard provides an RJ 45 port to connect Twisted Pair Ethernet TPE cable to Hub orient the connector so the key is aligned with the port then push the connector into port until you hear a click voice Note Make sure that connect S or AV terminal signal cable from system to TV set while you carrying out the TV OUT function installation ...

Page 18: ...t and receive functions of the jack will also be disabled Table shows all the status of the Link LED it is useful as a trouble shooting aid Match the activity of LED on the port with one of the status indicated in the table Off State On Description Normal data packet are received or link integrity pulse is detected When no twisted pair connected When link test is disabled No power source into Hub ...

Page 19: ... audio and video files and soon Currently the Pentium III processor ships with clock speeds of 450MHz 500MHz 550MHz 600MHz and 667MHz Pentium III s operate over a 100MHz 133MHz system bus The M81E X series motherboard provides a Universal Retention Module for Pentium II III and Celeron processor in SECC SECC2 and SEPP Please check URM well setup on the motherboard already Follow the steps mentione...

Page 20: ...e processor If you need to remove the processor from the motherboard the procedure will be as follows Disconnect the fan power cable from the motherboard Remove the sliders of the URM to OPEN position Push the latches on the processor toward the center of the processor until they click into place This step for Intel cartridge type processor only Lift one end of the processor until it is freed from...

Page 21: ...sors for your system Step3 Install the SDRAM Modules The motherboard has two DIMM Dual In line Memory Module sockets which support SDRAM modules installed with 3 3V unbuffered PC 100 100MHz SDRAM memory chips Each memory module can support a maximum capacity of 256MB so total maximum memory is 512MB Follow the steps mentioned below to install the SDRAM module On the motherboard locate DIMM sockets...

Page 22: ... power outlet while you are carrying out the installation procedure We will begin the installation of the motherboard Please follow the procedure step by step which designed to guide you to a complete and correct installation Step1 Install the Expansion Card This motherboard has three PCI and an AMR slot You can use the expansion slots to install expansions card that add new feature to your system...

Page 23: ...w the steps mentioned below to install the AMR interface card Please set jumper cap to the secondary position on the AMR interface card Locate the AMR slots on the motherboard In the chassis remove the blanking plate from the opening in the chassis adjacent to the slot you are going to use Hold the edge connector of the AMR card directly over the slot that you are going to use The metal bracket on...

Page 24: ...E1 and IDE2 box header on the motherboard IDE1 Connect one end of the IDE ribbon cable that comes with the drive to the HDD header and the other end of the cable to the IDE1 box header on the motherboard IDE2 Connect one end of the IDE ribbon cable that comes with the drive to the CD ROM header and the other end of the cable to the IDE2 box header on the motherboard Note Each header has the Pin 1 ...

Page 25: ...d of the cable to the FDC1 box header on the motherboard Note Each header has the Pin 1 side clearly marked The Pin 1 side of the each ribbon cable is always marked with a red stripe on the cable Master Slave Pin 1 FDC1 Rear of FDD Device Red Stripe Note You must be use an 80 Pin ribbon cable is designed with a 40 Pin connector for IDE Ultra DMA66 devices Primary IDE1 Secondary IDE2 Master Slave M...

Page 26: ...DD activity SPEAKER It is a 4 Pin header connects to the chassis mounted speaker When system has any abnormally state that you will hear warnings through speaker If you have a speaker on the chassis that we recommend not to use them because it will have buzzer noise when the system is booted PW LED It is a 3 Pin header connects to the chassis mounted power LED to indicate onboard power state KB LK...

Page 27: ...ntegrated on the motherboard for PC99 compliant Follow the instruction carefully for properly connection I O peripherals to your system K B MS is a stack of the two PS 2 mini DIN ports K B MS Green 6 Pin Mouse Port can be used by a PS 2 Mouse or Point ing device K B MS Purple 6 Pin Keyboard Port can be used by a PS 2 Keyboard USB1 LAN Black 8 Pin LAN Port allows you to connect to a Local Area Netw...

Page 28: ...use this port to connect game joysticks or game pad for playing games Connect Midi devices for play ing or editing professional audio The lower part of GAME_AUDIO is three 1 8 Audio Ports Line Out Lime 1 8 Audio Port Left can be connected to headphones or preferably powered speakers Line In Light Blue 1 8 Audio Port Middle allows tape players or other audio sources to be recorded by your system or...

Page 29: ...Series User s Manual 28 You are now ready to boot the system for the first time Please continue to the next section to configure your BIOS Basic Input Output System setting It must be configured after booting ...

Page 30: ... and you know that the new BIOS revision will solve your problems Unnecessary updating may result more problems for your motherboard When you start up the system the system provides the opportunity to run this program This appears during the Power On Self Test POST press DELETE key to call up Setup Utility If you are a little bit late pressing the mentioned key s POST will continue with its test r...

Page 31: ... When you are in an option that displays a table of items you can return to the main menu by pressing the Esc key For some items you can display a general help screen by pressing the F1 key Press the F5 key to discard any changes you have made and return all items to the value that they held when the setup Utility was started Press the F6 key to load the displayed item with a standard list of fail...

Page 32: ... 6 1 1 Date and Time Setting Date To set the date highlight the Date field and then press the PgUp PgDn or keys to set the current date Follow the month day and year format Valid values for month day and year are Month 1 to 12 Day 1 to 31 Year up to 2079 Time To set the time highlight the Time field and then press the PgUp PgDn or keys to set the current time Follow the hour minute and second form...

Page 33: ...ry Master screen Manually enter Access Mode number of Cylinder Head Precomp Landing Zone and Sector for your drive Refer to your drive documentation or look on the drive for this information If no drive is installed or you are removing a drive away select None mode The Access Mode entry is for IDE hard disks only and can be ignored for MFM and ESDI drive This entry provides four options Auto Norma...

Page 34: ...5 in The available options for Floppy 3 Mode Support are Disabled Drive A Drive B Both This is the Japanese standard floppy drive which stores 1 2MB in a 3 5 diskette 6 1 4 Video This item set the Video mode of the system This motherboard has a built in VGA graphics circuit so you must leave this item at the default value EGA VGA Enhanced Graphics Adapter Video Graphics Array For EGA VGA SVGA or P...

Page 35: ...ons for Halt On are All But Keyboard All But Diskette All But Disk Key All Errors No Errors 6 1 6 Base Memory Extended Memory Total Memory These item are display only which is determine by POST of the BIOS Base Memory Display the amount of conventional memory detected during boot up Extended Memory Display the amount of extended memory detected during boot up Total Memory Display the total memory ...

Page 36: ...e boot sector and partition table of your hard disk drive We recommend that you enabled virus warning as soon as you have installed your disk with an OS When enabled a warning message is displayed and a beep sound is produced whenever an at tempt is made to write on the hard disk s boot sector The available options for Virus Warning are Disabled Enabled 6 2 2 CPU Internal Cache External Cache Thes...

Page 37: ...ority and sequence the devices that your system will search for an operating device during bootup The available options for First Second Third Boot Device are Floppy LS ZIP HDD 0 HDD 1 HDD 2 HDD 3 SCSI CDROM LAN Disabled 6 2 7 Boot Other Device If you enable this item the system will search all other possible locations for an operating device it fails to find one in the devices specified under Fir...

Page 38: ...curity Option This item allows you to limit access to the system and setup or just to setup Setup The system will boot but access to setup will be denied if the correct password is not entered at the prompt System The system can not boot and can not access to setup page will be denied if the correct password not entered at the prompt Note Security takes effect only if a password is set See set Sup...

Page 39: ...r system Highlight this option on the main menu screen and press Enter key 6 3 1 SDRAM CAS Latency Time SDRAM RAS to CAS Delay SDRAM RAS Precharge Time These items set the timing of the Column Address Strobe and Row Address Strobe for SDRAM We recommend that you leave these items at the default Slower rate 3 may be required for slower SDRAMs or more than 2 banks of SDRAM DIMMs are installed The av...

Page 40: ...MB 32MB Disabled 6 3 6 Local Memory Frequency This item is used to set the onboard display cache memory frequency The available options for Local Memory Frequency are 100MHz 133MHz 6 3 7 Onboard Display Cache Setting CAS Latency Paging Mode Control RAS to CAS Override RAS Timing RAS Precharge Timing These items under this Onboard Display Cache Setting are used to set the pa rameters for display ca...

Page 41: ...ipherals screen highlight this option on the main menu screen and press Enter key 6 4 1 On Chip Primary PCI IDE IDE Primary Master Slave PIO IDE Primary Master Slave UDMA On Chip Secondary PCI IDE IDE Secondary Master Slave PIO IDE Secondary Master Slave UDMA On Chip Primary Secondary PCI IDE these items allows you to Enabled or Dis abled the Primary and Secondary PCI IDE channels that are integra...

Page 42: ...ailable options for IDE Primary Master Slave UDMA and IDE Secondary Master Slave UDMA are Auto Disabled 6 4 2 USB Controller USB Keyboard Support This setting allow you to enabled the USB ports that are integrated on the motherboard And if you are using a keyboard connected through the USB port The available options for USB Controller are Enabled Disabled The available options for USB Keyboard Sup...

Page 43: ...k on mouse s right button Hot KEY This function allows you power on the system by pressing function key Ctrl F1 through Ctrl F12 on keyboard The available options for POWER ON Function are BUTTON ONLY Keyboard 98 Password Hot KEY Mouse Left Mouse Right Any KEY The available options for KB Power ON Password are Enter The available options for Hot Key Power ON are Ctrl F1 Ctrl F12 6 4 6 Onboard FDC ...

Page 44: ...e options for RxD TxD Active are Hi Lo Lo Hi Lo Lo Hi Hi The available options for IR Transmission Delay are Enabled Disabled The available options for UR2 Duplex Mode are Full Half The available options for Use IR Pins are IR Rx2Tx2 RxD2 TxD2 6 4 9 Onboard Parallel Port This item controls the onboard parallel port address and Interrupt The available options for Onboard Parallel Port are 378 IRQ7 ...

Page 45: ... after AC power resume Former Sts If you select Former Sts the system will power on or power off based on the original state The available options for PWRON After PWR Fail are Off On Former Sts 6 4 12 Game Port Address This item let you disable the built in Game port or enabled it by assigning an I O address The available options for Game Port Address are 201 209 Disabled 6 4 13 Midi Port Address ...

Page 46: ...press Enter key 6 5 1 ACPI Function This item allows you to Enabled or Disabled the ACPI Advanced Configuration and Power management Interface function The available options for ACPI Function are Enabled Disabled 6 5 2 ACPI Suspend Type This item allows you to set how your system suspends S1 POS This suspend mode is equivalent to a software power down S3 STR This motherboard features the suspend t...

Page 47: ...item lets you set the IDE HDD idle time before the device enters the power down state The available options for Power Management are User Define Min Saving Max Saving The available options for Suspend Mode are Disabled Enabled The available options for HDD Power Down are Disabled Enabled 6 5 4 Video Off Method This item set the video off method in power saving mode V H SYNC Blank BIOS will blanks ...

Page 48: ...ontrolled by the normal power button on your system Instant Off When Instant Off is selected the power button causes a software power down Delay 4 sec When Delay 4 sec is selected the power button can be used to control power on Suspend and Off If the power button is pressed less than 4 sec during power on the system will go into suspend mode If the power button is pressed longer than 4 sec the sy...

Page 49: ...Alarm lets you select a day from 1 to 31 Time Alarm lets you select a time for the alarm in hours minutes and seconds The available options for Resume By Alarm are Disabled Enabled The available options for Date of Month Alarm are 0 31 The available options for Time hh mm ss Alarm are 0 23 0 59 0 59 6 5 13 Reload Global Timer Events Primary IDE 0 1 Secondary IDE 0 1 FDD COM LPT Port PCI PIRQ A D W...

Page 50: ... configuration of expansion cards The available options for PnP OS Installed are No Yes 6 6 2 Reset Configuration Data If you enabled this item and restart the system any PnP configuration data stored in the BIOS setup is cleared from memory New updated data is created The available options for Reset Configuration Data are Disabled Enabled 6 6 3 Resources Controlled By IRQ Resources Memory Resourc...

Page 51: ... CPU s tempera ture is higher than this presage fined value the CPU s speed will automatically slow down and there will be a warning from BIOS and system buzzer will beep The beep sound will not off unless you turn off system and change CPU s cooling condition This feature gives CPU overheat protection The available options for CPU Warning Temperature are 600 C 1400 F 630 C 1450 F 660 C 1510 F 700...

Page 52: ...omagnetic interference The available options for Spread Spectrum are Disabled Enabled 6 8 2 Host CPU PCI Clock The motherboard automatically detects and installs the CPU FSB on the system This item allows you to set Host CPU PCI Clock If your CPU Bus Frequency is support to 66MHz The available options for Host CPU PCI Clock are Auto 66 33MHz 68 34MHz 75 37MHz If your CPU Bus Frequency is support t...

Page 53: ...or example if you have a processor that is rated to run at 500MHz and the system is running a FSB frequency of 100MHz you should set a multiplier of 5 so that 5 Multiplier x 100MHz FSB 500MHz CPU Clock The available options for CPU Clock Ratio are x3 x3 5 x4 x4 5 x5 x5 5 x6 x6 5 x7 x7 5 x8 After you have made your selection in the Frequency Control press the Esc key to go back to the main program ...

Page 54: ... this menu When you pressing Y key to load the BIOS default values for the most stable minimal performance system operations 6 10 Load Optimized Defaults Selecting Load Optimized Defaults on the main program screen and press Enter key on this option You get a confirmation dialog box with a message display this menu When you pressing Y key to load the default values that are factory setting for opt...

Page 55: ...he differences be tween are Supervisor Password Can enter and change the options of the setup menus User Password Just can only enter but do not have the right to change the options of the setup menus When you select these function the following message will appear at the center of the screen to assist you in creating a password ...

Page 56: ...password is disabled the system will boot and you can enter setup freely When a password has been enabled you will be prompted to enter it every time you try to enter setup This prevents an unauthorized person from changing any part of your system configuration Additionally when a password is enabled you can also require the BIOS to request a password every time your system is rebooted This would ...

Page 57: ...tays on after you turn your system off The next time you boot your system the BIOS configures your system according to the setup selections stored in CMOS After saving the values the system is restarted again Selecting Exit Without Saving on the main program screen and press Enter key on this option You get a confirmation dialog box with a message display this menu This allow you to exit setup wit...

Page 58: ... 98 NT and so on Always make sure that you are installing the correct software for the operating system on your system Utility Folder Installation Program The CD ROM has an installation program that runs automatically when you place the CD ROM disk into your CD ROM drive If the program doesn t run double click the CD drive icon in My Computer to bring up the install screen will appear Figure 1 whe...

Page 59: ... up on the screen when the monitored parameters is out of the preset range This software have to installed under Windows O S Click DELTA HardWare Doctor 3 60 For Win9X on the Figure 3 the screen will appear Figure 4 for HardWare Doctor 360 Setup Click on the OK button the screen will appear Figure 5 Then type in C Program Files HWDoctor assuming that your CD ROM drive is drive D The installation p...

Page 60: ...he increase decrease buttons Figure 6 Figure 7 Intel 810 E VGA Installation This folder has the software and drivers for graphics system built into the 810E chipset Click Intel 810 E VGA Install on the Figure 3 the screen will appear Figure 8 Install the VGA driver from sub folders for Windows 95 98 NT4 0 and 2000 Click Intel 810 E VGA For Win98 on the Figure 8 the screen will appear Figure 9 The ...

Page 61: ...or enhance the following features Core PCI PnP Services AGP Support Bus Master IDE Ultra DMA 33 66 Storage Sup port USB Support Identification of Intel Chipset Components in Device Manager Click Intel 810 E INF Install on the Figure 3 the installation program will now guide you through the rest of installation process When completed you will be prompted to reboot Select Finish button to reboot and...

Page 62: ... For Win98 on the Figure 13 the screen will appear Figure 14 The installation program will now guide you through the rest of the installation process When completed the screen will back to Figure 13 Figure 13 Figure 14 View device through the Device Manager under Windows 98 Go to My Computer then double click on the Control Panel the screen will appear Figure 10 Double click on the System icon Sel...

Page 63: ... New Hardware icon The screen will appear Figure 16 The installation program will now guide you through the rest of the installation process When completed the screen will appear Figure 17 Then click on Finish button to complete theinstallation View device through the Device Manager under Windows 98 Go to My Computer then double click on the Control Panel the screen will appear Figure 10 Double cl...

Page 64: ...the option restart in DOS in the shut down dialog box If you are running Windows NT shut down your system and boot from a DOS diskette temporarily in order to run the flash memory utility You can easily flash a BIOS by following the step below After downloading the appropriate BIOS file from website extract it to a bootable DOS 6 X or Windows98diskette If you are using DOS 6 X reboot your system w...

Page 65: ...t BIOS We recommended that you save the current BIOS When prompted select Yes to program the BIOS After the update process has completed you will be prompted to power off or reset your system Once the system reboots verify that the new BIOS version appear on the screen Note After reprogramming the BIOS you may need to enter BOS setup and reset your settings ...

Page 66: ...ARKWAY FREMONT CA 94538 U S A Contact Person Title Executive Vice President Frank Hsiung Telephone 1 510 668 5100 Fax 1 510 668 0680 EUT Certification Summary Standard FCC Part 15 Subpart B Class B ANSI C63 4 1992 Product MOTHER BOARD Model No M81ENT X M81E X M81EN X M81ET X Tested by SPORTON INTERNATIONAL INC The Mother Board was tested to conform to the applicable FCC Rule and regulations The me...

Page 67: ...imens manufactured in accordance with the attached manufacturing drawings which form part of this declaration Assessment of compliance of the product with the requirements relating to electromag netic compatibility was based on the following standards EN 50081 1 1992 EN55022 EN 50082 1 1997 EN61000 4 2 3 8 EN 50204 Identificationofregulations standards This declaration is the responsibility of the...

Reviews: