background image

Re pl a c i n g Par t s

57

FILE LOCATION:

  S:\SYSTEMS\Tang\owner\EMF\A00\8P550c30.fm

DELL CONFIDENTIAL – PRELIMINARY  3/11/02

 NOTICE: 

Use firm and even pressure to slide the drive into place. If you force 

the hard drive into place using excessive force, you may damage the connector.

11

Slide the drive into the bay until it is fully seated in the bay. Press the 
hard-drive cover down until you hear a click.

12

Replace and tighten the screw you removed in step 7.

13

Use the 

Operating System

 CD to install the operating system for your 

computer (see page 47).

14

Use the 

Drivers, Utilities, and Applications

 CD to install the drivers 

and utilities for your computer (see page 41).

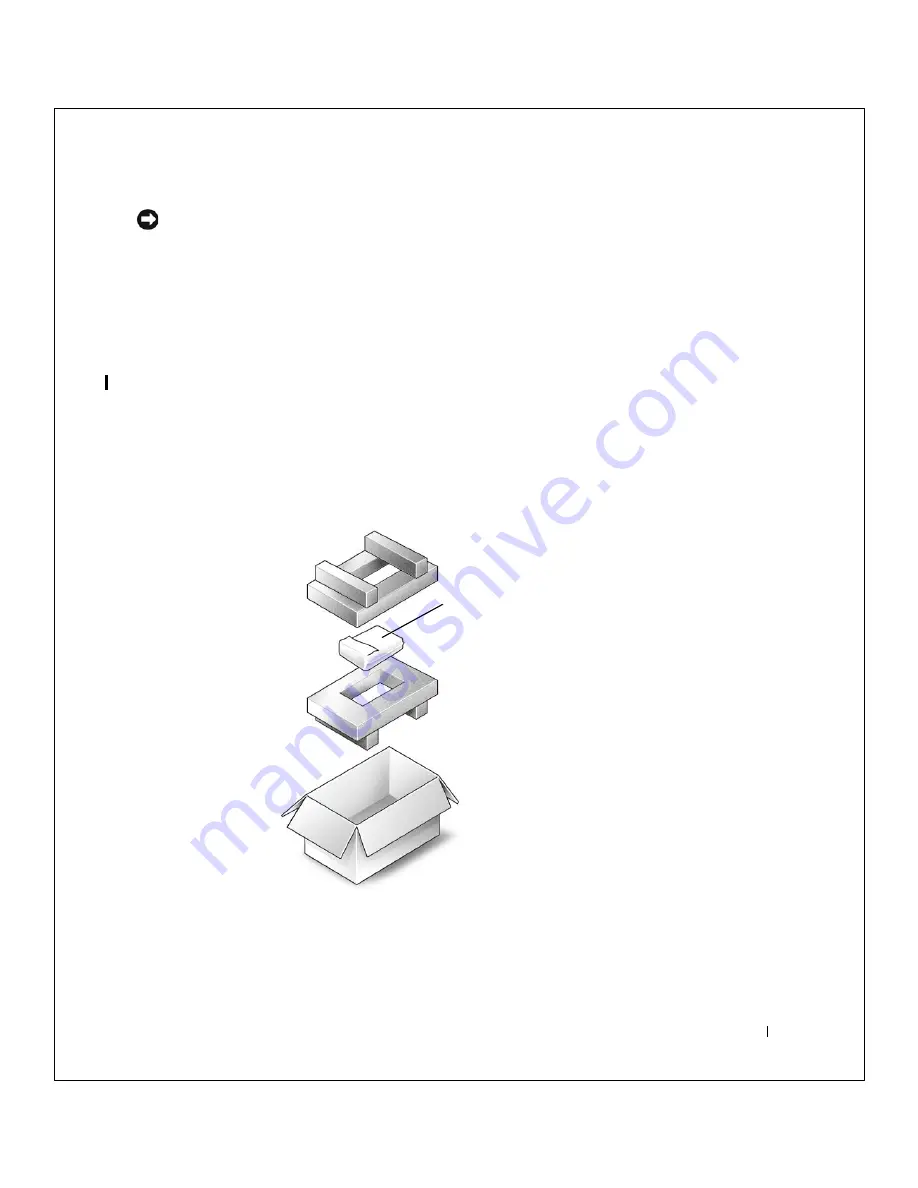
Returning a Hard Drive to Dell

Return your old hard drive to Dell in its original or comparable foam 
packaging. Otherwise, the hard drive may be damaged in transit.

hard drive

Summary of Contents for SmartPC 100N

Page 1: ...Thank you for purchasing this Factory Service Manual CD DVD from servicemanuals4u com Please check out our eBay auctions for more great deals on Factory Service Manuals servicemanuals4u ...

Page 2: ...FILE LOCATION S SYSTEMS Tang owner EMF A00 8P550tp0 fm DELL CONFIDENTIAL PRELIMINARY 3 11 02 w w w d e l l c o m s u p p o r t d e l l c o m Dell SmartPC 100N Owner s Manual ...

Page 3: ...thout notice 2002 Dell Computer Corporation All rights reserved Reproduction in any manner whatsoever without the written permission of Dell Computer Corporation is strictly forbidden Trademarks used in this text Dell the DELL logo DellNet TrueMobile DellPlus Inspiron Dell Precision Dimension OptiPlex Latitude and SmartPC are trademarks of Dell Computer Corporation Intel is a registered trademark ...

Page 4: ...tery Disposal 14 1 Setting Up Connecting a Printer 16 Parallel Printer 16 USB Printer 17 Installing the Printer Driver 18 Transferring Information to a New Computer Windows XP Only 19 Setting Up a Home and Office Network Windows XP Only 19 Turning Off the Computer 20 Power Protection Devices 20 Surge Protectors 20 Line Conditioners 21 Uninterruptible Power Supply Devices 21 2 Solving Problems Find...

Page 5: ...ection Problems 32 Scanner Problems 34 PC Card Problems 34 Touch Pad or Mouse Problems 35 External Keyboard Problems 35 Unexpected Characters 36 Drive Problems 36 If you cannot play a CD 36 If you cannot eject the CD drive tray 37 If you hear an unfamiliar scraping or grinding sound 37 If you have problems with a hard drive 37 General Program Problems 38 A program crashes 38 A program stops respon...

Page 6: ...ting a Restore Point 45 Restoring the Computer to an Earlier Operating State 46 Undoing the Last System Restore 47 Reinstalling Windows XP 47 Enabling Hibernate Mode 49 3 Replacing Parts Adding Memory 52 Replacing the Hard Drive 55 Returning a Hard Drive to Dell 57 Removing a Battery 58 Installing a Battery 58 Replacing a Daughter Card Modem 58 4 Appendix Specifications 62 Standard Settings 67 Vie...

Page 7: ...6 Contents Returning Items for Warranty Repair or Credit 69 Contacting Dell 69 Regulatory Notices 85 CE Notice European Union 86 CE Mark Notice 87 Index 89 ...

Page 8: ...ized service technician Always follow installation instructions closely If you use an extension power cable with your AC adapter ensure that the total ampere rating of the products plugged in to the extension power cable does not exceed the ampere rating of the extension cable Do not push objects into air vents or openings of your computer Doing so can cause fire or electric shock by shorting out ...

Page 9: ...optional PC Card modem disconnect the modem cable if an electrical storm is approaching to avoid the remote risk of electric shock from lightning via the telephone line To help avoid the potential hazard of electric shock do not connect or disconnect any cables or perform maintenance or reconfiguration of this product during an electrical storm Do not use your computer during an electrical storm u...

Page 10: ... sources These power cables may be equipped with three prong plugs to provide an earth grounding connection Do not use adapter plugs or remove the grounding prong from the power cable plug If you use a power extension cable use the appropriate type two prong or three prong to mate with the AC adapter power cable Be sure that nothing rests on your AC adapter s power cable and that the cable is not ...

Page 11: ...n hazard if you handle it improperly Do not disassemble it Handle a damaged or leaking battery pack with extreme care If the battery is damaged electrolyte may leak from the cells and may cause personal injury Keep the battery away from children Do not store or leave your computer or battery pack near a heat source such as a radiator fireplace stove electric heater or other heat generating applian...

Page 12: ...ut the drive through a metal detector Certain Federal Aviation Administration regulations and or airline specific restrictions may apply to the operation of your Dell computer while you are on board an aircraft For example such regulations restrictions may prohibit the use of any personal electronic device PED that has the capacity for intentional transmission of radio frequency or other electroma...

Page 13: ...relief loop not on the cable itself As you pull out the connector keep it evenly aligned to avoid bending any connector pins Also before you connect a cable make sure both connectors are correctly oriented and aligned Handle components with care Hold a component such as a memory module by its edges not its pins When preparing to remove a memory module from the system board or disconnect a peripher...

Page 14: ...f your computer and any attached peripherals 2 Disconnect your computer and peripherals from electrical outlets to reduce the potential for personal injury or shock Also disconnect any telephone or telecommunication lines from the computer 3 Remove the main battery from the battery compartment and if necessary the secondary battery from the module bay 4 Ground yourself by touching the unpainted me...

Page 15: ... use antistatic floor pads and workbench pads The following notice may appear throughout this document to remind you of these precautions NOTICE See Protecting Against Electrostatic Discharge in the safety instructions at the front of this guide Battery Disposal Your computer uses a lithium ion battery and a nickel metal hydride NiMH coin cell battery For instructions about replacing the lithium i...

Page 16: ...0 fm DELL CONFIDENTIAL PRELIMINARY 3 11 02 1 SE CTI O N 1 Setting Up Connecting a Printer Transferring Information to a New Computer Windows XP Only Setting Up a Home and Office Network Windows XP Only Turning Off the Computer Power Protection Devices ...

Page 17: ...connect it to the computer If no information is provided see the following sections HINT For complete printer driver installation instructions refer to your printer documentation Parallel Printer 1 Turn off the computer see page 20 NOTICE Use only a standard parallel cable measuring 3 m 10 ft or less to connect the printer to the computer Use of a nonstandard cable may prevent the printer from wor...

Page 18: ...l 4 Install the printer driver if necessary see page 18 USB Printer HINT You can connect USB devices while the computer is turned on 1 Install the printer driver if necessary see page 18 2 Attach the USB printer cable to the USB connector on the computer and the printer The USB connectors fit only one way parallel printer cable parallel connector on computer parallel connector on printer screws 2 ...

Page 19: ...re x is the letter of your CD drive usually drive D Then click OK and follow the prompts on your screen If your printer installation CD still does not run check the documentation that came with your printer for instructions on how to start the printer installation CD To determine whether your printer driver is installed on a computer running the Microsoft Windows XP operating system click the Star...

Page 20: ...er the data to the new computer over a network or you can store it on a removable medium such as a floppy disk or a writable CD 1 On the computer running Windows XP click the Start button point to All Programs Accessories System Tools and then click Files and Settings Transfer Wizard 2 On the welcome screen click Next 3 On the Which computer is this screen select New Computer and then click Next 4...

Page 21: ...off after the shutdown process finishes Power Protection Devices Several devices are available that protect against power fluctuations and failures Surge protectors Line conditioners Uninterruptible power supplies UPS Surge Protectors Surge protectors and power strips equipped with surge protection help to prevent damage to your computer from voltage spikes that can occur during electrical storms ...

Page 22: ...ions Line conditioners are designed to maintain AC voltage at a fairly constant level Line conditioners can cost up to several hundred dollars more than surge protectors Uninterruptible Power Supply Devices NOTICE Loss of power while data is being saved to the hard drive may result in data loss or file damage HINT To ensure maximum battery operating time connect only your computer to a UPS Connect...

Page 23: ...22 Setting Up w w w d e l l c o m s u p p o r t d e l l c o m FILE LOCATION S SYSTEMS Tang owner EMF A00 8P550c10 fm DELL CONFIDENTIAL PRELIMINARY 3 11 02 ...

Page 24: ...s Modem and Internet Connection Problems Scanner Problems PC Card Problems Touch Pad or Mouse Problems External Keyboard Problems Unexpected Characters Drive Problems General Program Problems E Mail Problems If Your Computer Gets Wet If You Drop or Damage Your Computer Resolving Other Technical Problems Reinstalling Drivers and Utilities Resolving Software and Hardware Incompatibilities Using Syst...

Page 25: ...cult to figure out where to go for answers Use this chart to quickly find the answers to your questions HINT If you have a problem with an external device see the device documentation or contact the manufacturer See page 26 See page 39 Get technical assistance from Dell See page 69 Press the power button to resume from standby mode See the Tell Me How help file for more information on standby mode...

Page 26: ...TEMS Tang owner EMF A00 8P550c20 fm DELL CONFIDENTIAL PRELIMINARY 3 11 02 See page 38 See page 29 See page 31 See page 31 See page 32 See page 34 See page 35 See page 38 See page 39 See page 39 See page 39 See page 36 See page 35 See page 36 ...

Page 27: ...and then click Help and Support 2 Type a word or phrase that describes your problem and then click the arrow icon 3 Click the topic that describes your problem and then click Display 4 Follow the instructions shown on the screen CHECK THE POWER LIGHT When the power light is lit or blinking orange the battery charge is low or depleted Charge the battery If the power light is off the computer is tur...

Page 28: ...e If the battery status light rapidly flashes orange the battery may be defective Contact Dell see page 69 TEST THE ELECTRICAL OUTLET Ensure that the electrical outlet is working by testing it with another device such as a lamp CHECK THE AC ADAPTER Check the AC adapter cable connections If the AC adapter has a light ensure that the light is on CONNECT THE COMPUTER DIRECTLY TO AN ELECTRICAL OUTLET ...

Page 29: ...MS AND TRY AGAIN You have too many programs open Close all windows and open the program that you want to use OPERATING S YSTEM NOT FOUND Contact Dell see page 69 A REQUIRED DLL FILE WAS NOT FOUND The program that you are trying to open is missing an essential file Remove and then reinstall the program 1 Click the Start button 2 Click Control Panel 3 Click Add or Remove Programs 4 Select the progra...

Page 30: ...ECK THE BATTERY If you are using a battery to power your computer the battery charge may be depleted Connect the computer to an electrical outlet using the AC adapter and turn on the computer TEST THE ELECTRICAL OUTLET Ensure that the electrical outlet is working by testing it with another device such as a lamp CHECK THE AC ADAPTER Check the AC adapter cable connections If the AC adapter has a lig...

Page 31: ... Turn off nearby fans fluorescent lights halogen lamps or other appliances ROTATE THE COMPUTER TO FACE A DIFFERENT DIRECTION Eliminate sunlight glare which can cause poor picture quality ADJUST THE WINDOWS DISPLAY SETTINGS 1 Click the Start button and then click Control Panel 2 Click Appearance and Themes 3 Click the area you want to change or click the Display icon 4 Try different settings for Co...

Page 32: ...the sound is not muted Adjust the volume bass or treble controls to eliminate distortion ADJUS T THE VOLUME USING KEYBOARD SHORTCUTS Press to disable mute or reenable the integrated speakers REINSTALL THE SOUND AUDIO DRIVER See page 41 CHECK THE PRINTER CABLE CONNECTIONS Ensure that the printer cable is properly connected to the computer see page 16 TEST THE ELECTRICAL OUTLET Ensure that the elect...

Page 33: ...inters If the printer model is listed right click the printer icon 5 Click Properties and then click the Ports tab 6 Ensure that the Print to the following port s setting is set for your printer type For a parallel printer LPT1 Printer Port For a USB printer USB REINSTALL THE PRINTER DRIVER See page 18 CHECK THE TELEPHONE WALL JACK Disconnect the telephone line from the modem and connect it to a t...

Page 34: ...onnection properties 1 Click the Start button and click Control Panel 2 Click Printers and Other Hardware click Phone and Modem Options click the Dialing Rules tab and then click Edit 3 In the Edit Location window ensure that To disable call waiting dial is checked and then select the proper code as listed in your telephone directory 4 Click Apply and click OK 5 Close the Phone and Modems Options ...

Page 35: ...ANNER CABLE CONNECTION Ensure that the scanner cable is firmly connected to the computer and to the scanner UNLOCK THE S CANNER Ensure that your scanner is unlocked if it has a locking tab or button REINSTALL THE SCANNER DRIVER See the scanner documentation for instructions CHECK THE PC CARD Ensure that the PC Card is properly inserted into the connector ENSURE THAT THE CARD IS RECOGNIZED BY WINDO...

Page 36: ... pins Firmly reconnect the cable If you are using a mouse extension cable disconnect it and connect the mouse directly to the computer TO VERIFY THAT THE PROBLEM IS WITH THE MOUSE CHECK THE TOUCH PAD 1 Turn off the computer 2 Disconnect the mouse 3 Turn on the computer 4 At the Windows desktop use the touch pad to move the cursor around select an icon and open it If the touch pad operates correctl...

Page 37: ...ing the boot routine 3 From the Windows desktop click the Start button point to Programs point to Accessories and click Notepad 4 Type some characters on the external keyboard and verify that they appear on the display If you cannot verify these steps you may have a defective external keyboard TO VERIFY THAT THE PROBLEM IS WITH THE EXTERNAL KEYBOARD CHECK THE INTEGRATED KEYBOARD 1 Turn off the com...

Page 38: ...the possibility that the original disc is defective ADJUS T THE WINDOWS VOLUME CONTROL Double click the speaker icon in the lower right corner of your screen Ensure that the volume is turned up and that the sound is not muted CLEAN THE DRIVE OR DISC See Cleaning Your Computer in the Tell Me How help file for instructions To access the help file see page 26 1 Ensure that the computer is turned off ...

Page 39: ...ck Check Now 5 Click Start SEE THE SOFTWARE DOCUMENTATION Many software manufacturers maintain websites with information that may help you solve the problem Ensure that you properly installed and configured the program Reinstall the program if necessary END THE PROGRAM 1 Simultaneously press 2 Click the Applications tab and then select the program that is no longer responding 3 Click the End Task ...

Page 40: ... 2 Turn off any attached external devices and disconnect them from their power sources and then from the computer 3 Ground yourself by touching one of the metal connectors on the back of the computer 4 Remove any installed PC Cards and put them in a safe place to dry 5 Remove the battery 6 Wipe off the battery and put it in a safe place to dry REVIEW ERROR MESSAGES Look up the message and take the...

Page 41: ...ourself by touching one of the metal connectors on the back of the computer 11 Replace the memory module the memory module cover and the screw 12 Replace the hard drive 13 Replace any PC Cards you removed 14 Replace the battery 15 Turn on the computer and verify that it is working properly If the computer does not start or if you cannot identify the damaged components contact Dell see page 69 If Y...

Page 42: ...uters If you install drivers from other sources your computer might not work correctly 1 Save and close any open files and exit any open programs 2 Insert the Drivers Utilities and Applications CD GO TO THE DELL SUPPORT WEBSITE Go to support dell com for help with general usage installation and troubleshooting questions See Dell Technical Support Policy U S Only on page 69 for a description of the...

Page 43: ...odel Operating System and Topic pull down menus A link or links appear s for the specific drivers and utilities used by your computer 5 Click the link of a specific driver or utility to display information about the driver or utility that you want to install 6 Click the Install button if present to begin installing the driver or utility At the welcome screen follow the screen prompts to complete t...

Page 44: ...r If you cannot reinstall your previous driver by using the Device Driver Rollback process then use System Restore see page 44 to return your operating system to its previous operating state before you installed the new device driver To use Device Driver Rollback 1 Click the Start button and right click My Computer 2 Click Properties 3 Click the Hardware tab and click Device Manager 4 In the Devic...

Page 45: ...he Properties window reports what other devices are sharing the device s IRQ 9 Resolve any IRQ conflicts You can also use the Windows XP Hardware Troubleshooter To use the troubleshooter click the Start button and click Help and Support Type hardware troubleshooter in the Search field and then click the arrow to start the search Click Hardware Troubleshooter in the Search Results list In the Hardw...

Page 46: ...overwritten or if it becomes inaccessible because of a hard disk malfunction use your backup files to recover the lost or damaged data System Restore is enabled on your new computer However if you reinstall Windows XP with less than 200 MB of free hard disk space available System Restore is automatically disabled Before you use System Restore confirm that it is enabled 1 Click the Start button and...

Page 47: ...storing the computer to an earlier operating state save and close all open files and exit all open programs Do not alter open or delete any files or programs until the system restoration is complete 1 Click the Start button point to All Programs Accessories System Tools and then click System Restore 2 Ensure that Restore my computer to an earlier time is selected and click Next 3 Click a calendar ...

Page 48: ...ll open files and exit all open programs Do not alter open or delete any files or programs until the system restoration is complete 3 Click Next 4 The System Restore screen appears and then the computer automatically restarts 5 After the computer restarts click OK Reinstalling Windows XP Before reinstalling the Microsoft Windows XP operating system to correct a problem try correcting the problem b...

Page 49: ...vice drivers The computer automatically restarts multiple times before it requires additional input 7 When the Welcome to Microsoft screen appears click the green arrow icon at the bottom of the screen to continue Then follow the instructions on the screen to finish the installation 8 When the Regional Settings screen appears select the settings for your locale and then click Next 9 Enter your nam...

Page 50: ...nstructions on the screen to complete the installation 14 Remove the CD from the drive 15 Reinstall the appropriate drivers see page 41 16 Reinstall your virus protection software Enabling Hibernate Mode 1 Click the Start button point to Settings and then click Control Panel 2 Double click the Power Management icon 3 Click the Hibernate tab 4 Ensure that Enable hibernate support is selected and cl...

Page 51: ...50 Solving Problems w w w d e l l c o m s u p p o r t d e l l c o m FILE LOCATION S SYSTEMS Tang owner EMF A00 8P550c20 fm DELL CONFIDENTIAL PRELIMINARY 3 11 02 ...

Page 52: ...SYSTEMS Tang owner EMF A00 8P550c30 fm DELL CONFIDENTIAL PRELIMINARY 3 11 02 3 SE CTI O N 3 Replacing Parts Adding Memory Replacing the Hard Drive Removing a Battery Installing a Battery Replacing a Daughter Card Modem ...

Page 53: ...e your computer read the Safety and Use Instructions on page 7 1 Save and close any open files exit any open programs and shut down the computer see page 20 2 Remove any installed PC Cards 3 Remove the installed battery and disconnect the AC adapter cable and any cables or external devices from the computer Wait 5 seconds before proceeding 4 Ground yourself by touching a metal connector on the bac...

Page 54: ...ly spread apart the securing clips on each end of the memory module connector The module should pop up b Remove the module from the connector DIVIDER DIVIDER CLOSE ART DIVIDER DIVIDER 8 Ground yourself and install the new memory module HINT If the memory module is not installed properly the computer does not boot No error message indicates this failure a Align the notch in the module with the slot...

Page 55: ...odule compartment so that the end of the cover with the screw hole is lined up with the lines and arrows as shown in the following figure b Press down on the center of the memory module cover and slide the memory module cover until it is secured NOTICE If the memor y module cover is difficult to close remove the module and reinstall it Forcing the cover to close may damage your computer 10 Replace...

Page 56: ...rive is hot do not touch the metal housing of the hard drive CAUTION Before working inside your computer read Safety and EMC Instructions Portable Computers on Safety and Use Instructions on page 7 HINT Dell does not guarantee compatibility or provide support for hard drives from sources other than Dell To replace the hard drive in the hard drive bay 1 Make sure that the work surface is flat and c...

Page 57: ...n the new hard drive 7 Turn the computer over Use a small screwdriver to remove the hard drive screw and place the screw in a safe location DIVIDER DIVIDER NOTICE When the hard drive is not in the computer store it in protective antistatic packaging See Protecting Against Electrostatic Discharge on page 13 8 Lift up the hard drive cover until you hear a click 9 Slide the hard drive out of the comp...

Page 58: ...lly seated in the bay Press the hard drive cover down until you hear a click 12 Replace and tighten the screw you removed in step 7 13 Use the Operating System CD to install the operating system for your computer see page 47 14 Use the Drivers Utilities and Applications CD to install the drivers and utilities for your computer see page 41 Returning a Hard Drive to Dell Return your old hard drive t...

Page 59: ...trical outlet 1 Unlock the battery as shown in the following graphic 2 Slide and hold the battery latch all the way up until the left edge of the battery pops up 3 Remove the battery Installing a Battery 1 Ensure that the battery lock is in the unlocked position 2 Slide the battery into the battery bay until the latch clicks 3 Lock the battery Replacing a Daughter Card Modem 1 Make sure that the w...

Page 60: ...round yourself periodically touch an unpainted metal surface on the back of the computer while you work 7 Handle components and cards by their edges and avoid touching pins and contacts 8 Turn the computer over and remove the screws from the modem cover 9 Place your finger under the cover at the indentation and lift and slide the cover open 10 Remove the existing modem a Remove the screws securing...

Page 61: ...11 02 11 Connect the modem cable to the modem NOTICE The cable connectors are keyed for correct insertion do not force the connections 12 Align the modem with the screw holes and press the modem into the connector on the system board 13 Install the screws to secure the modem to the system board 14 Replace the modem cover modem cable connector modem cable ...

Page 62: ...er EMF A00 8P550c40 fm DELL CONFIDENTIAL PRELIMINARY 3 11 02 4 SE CTI O N 4 Appendix Specifications Viewing the System Setup Screens System Setup Screens Returning Items for Warranty Repair or Credit Contacting Dell Regulatory Notices ...

Page 63: ...ntel 830MG Data bus width 64 bits DRAM bus width 64 bits Microprocessor address bus width 32 bits PC Card CardBus controller O2 Micro OZ6912 PC Card connector supports one Type II card Cards supported 3 3 V and 5 V PC Card connector size 68 pins Data width maximum PCMCIA 16 bits CardBus 32 bits Memory Architecture PC133 SDRAM Memory module socket one user accessible SODIMM sockets Memory module ca...

Page 64: ...ouse 6 pin mini DIN connector USB 2 4 pin USB compliant connector Modem RJ 11 connector Communications Modem Type v 92 56K MDC Controller softmodem Interface internal AC 97 bus Video Video type Intel integrated video graphics Data bus UMA Video controller Intel 830 MG Video memory UMA shared with system memory LCD interface SPWG Audio Audio type AC97 Soft Audio Audio controller Sigmatel 9700 Stere...

Page 65: ...lay Type active matrix TFT XGA Dimensions 14 1 inch Height 215 8 mm 8 5 inches Width 287 1 mm 11 3 inches Diagonal 359 16 mm 14 1 inches Maximum resolutions 1024 x 768 at 16 8 million colors Response time typical 20 ms rise maximum 30 ms fall maximum Operating angle 0 closed to 180 Viewing angles Horizontal 40 Vertical 10 30 Pixel pitch 0 28 x 0 28 mm Power consumption Panel with backlight typical...

Page 66: ...t 48 88 mm 1 92 inch rectangle Battery Type smart lithium ion Dimensions Depth 88 5 mm 3 48 inches Height 21 5 mm 0 83 inch Width 139 0 mm 5 47 inches Weight 0 40 kg 0 88 lb Voltage 14 8 VDC Charge time approximate Computer on 3 hours Computer off 2 hours Operating life approximately 2 to 4 hours Life span approximate 400 discharge charge cycles0 Temperature range Operating 0 to 35 C 32 to 95 F St...

Page 67: ... Dimensions Height 27 94 mm 1 1 inches Width 58 42 mm 2 3 inches Depth 133 85 mm 5 25 inches Weight with cables 0 4 kg 0 9 lb Temperature range Operating 0 to 35 C 32 to 95 F Storage 40 to 65 C 40 to 149 F Physical Height 328 mm 12 9 inches Width 274 mm 10 8 inches Depth 37 mm 1 45 inches Weight With CD drive and 8 cell battery 3276 3 g 7 2 lb Environmental Temperature range Operating 0 to 35 C 32...

Page 68: ...uter 2 When the Dell logo appears press immediately If you wait too long and the Windows logo appears continue to wait until you see the Windows desktop Then shut down your computer see page 20 and try again Depending on your computer you may also be able to enter the system setup program by pressing at any time while the computer is running Storage 5 to 95 noncondensing Maximum vibration Operatin...

Page 69: ... the upper right corner of the screen displays help information for the currently highlighted option a box in the lower right corner displays information about the computer System setup key functions are listed across the bottom of the screen The screens display such information as System configuration Boot start up configuration and docking device configuration settings Basic device configuration...

Page 70: ...nt packing materials You are responsible for paying shipping expenses You are also responsible for insuring any product returned and you assume the risk of loss during shipment to Dell Collect On Delivery C O D packages are not accepted Returns that are missing any of the preceding requirements will be refused at Dell s receiving dock and returned to you Contacting Dell HINT Toll free numbers are ...

Page 71: ...060 889 Customer Care toll free 1 800 819 339 Corporate Sales toll free 1 800 808 385 Transaction Sales toll free 1 800 808 312 Fax toll free 1 800 818 341 Austria Vienna International Access Code 900 Country Code 43 City Code 1 Home Small Business Sales 01 795 67602 Home Small Business Fax 01 795 67605 Home Small Business Customer Care 01 795 67603 Preferred Accounts Corporate Customer Care 0660 ...

Page 72: ... Brunei Country Code 673 Customer Technical Support Penang Malaysia 604 633 4966 Customer Service Penang Malaysia 604 633 4949 Transaction Sales Penang Malaysia 604 633 4955 Canada North York Ontario International Access Code 011 Automated Order Status System toll free 1 800 433 9014 AutoTech Automated technical support toll free 1 800 247 9362 Customer Care From outside Toronto toll free 1 800 38...

Page 73: ...e Corporate Accounts North toll free 800 858 2999 Large Corporate Accounts East toll free 800 858 2020 Large Corporate Accounts South toll free 800 858 2355 Large Corporate Accounts GCP toll free 800 858 2055 Large Corporate Accounts HK toll free 800 964108 Large Corporate Accounts GCP HK toll free 800 907308 Colombia General Support 980 9 15 3978 Costa Rica General Support 0800 012 0435 Czech Rep...

Page 74: ...upport for Servers Nordic_server_support dell com Dominican Republic General Support 1 800 148 0530 El Salvador General Support 01 899 753 0777 Finland Helsinki International Access Code 990 Country Code 358 City Code 9 Technical Support 09 253 313 60 Technical Support Fax 09 253 313 81 Relational Customer Care 09 253 313 38 Home Small Business Customer Care 09 693 791 94 Fax 09 253 313 99 Switchb...

Page 75: ...339 Switchboard 01 55 94 71 00 Sales 01 55 94 71 00 Fax 01 55 94 71 01 Website support euro dell com E mail support euro dell com fr fr emaildell Germany Langen International Access Code 00 Country Code 49 City Code 6103 Technical Support 06103 766 7200 Home Small Business Customer Care 0180 5 224400 Global Segment Customer Care 06103 766 9570 Preferred Accounts Customer Care 06103 766 9420 Large ...

Page 76: ...y Code 1 Ireland Technical Support 1850 543 543 UK Technical Support dial number within UK only 0870 908 0800 Home User Customer Care 01 204 4095 Small Business Customer Care 01 204 4444 UK Customer Care dial number within UK only 0870 906 0010 Corporate Customer Care 01 204 4003 Ireland Sales 01 204 4444 UK Sales dial number within UK only 0870 907 4000 SalesFax 01 204 0144 Fax 01 204 5960 Switch...

Page 77: ... Fax 02 696 821 13 Switchboard 02 696 821 12 Website support euro dell com E mail support euro dell com it it zdell Corporate Technical Support 02 577 826 90 Customer Care 02 577 825 55 Fax 02 575 035 30 Switchboard 02 577 821 Website support euro dell com E mail support euro dell com it it emaildell Jamaica General Support 1 800 682 3639 Country City International Access Code Country Code City Co...

Page 78: ...ness Sales Division Up to 400 employees 044 556 3494 Preferred Accounts Division Sales Over 400 employees 044 556 3433 Large Corporate Accounts Sales Over 3500 employees 044 556 3440 Public Sales Government agencies educational institutions and medical institutions 044 556 3440 Global Segment Japan 044 556 3469 Individual User 044 556 1657 Faxbox Service 044 556 3490 Switchboard 044 556 4300 Websi...

Page 79: ... Belgium toll free 080016884 Corporate Sales Brussels Belgium 02 481 91 00 Customer Care Brussels Belgium 02 481 91 19 Fax Brussels Belgium 02 481 92 99 Switchboard Brussels Belgium 02 481 91 00 Website support euro dell com E mail tech_be dell com Macau Country Code 853 Technical Support toll free 0800 582 Customer Service Penang Malaysia 604 633 4949 Transaction Sales toll free 0800 581 Malaysia...

Page 80: ...Technical Support 020 581 8838 Customer Care 020 581 8740 Home Small Business Sales toll free 0800 0663 Home Small Business Sales Fax 020 682 7171 Corporate Sales 020 581 8818 Corporate Sales Fax 020 686 8003 Fax 020 686 8003 Switchboard 020 581 8818 Website support euro dell com E mail tech_nl dell com New Zealand International Access Code 00 Country Code 64 Home and Small Business 0800 446 255 G...

Page 81: ...ort 0800 50 669 Poland Warsaw International Access Code 011 Country Code 48 City Code 22 Customer Service Phone 57 95 700 Customer Care 57 95 999 Sales 57 95 999 Customer Service Fax 57 95 806 Reception Desk Fax 57 95 998 Switchboard 57 95 999 Website support euro dell com E mail pl_support dell com Portugal International Access Code 00 Country Code 35 Technical Support 800 834 077 Customer Care 8...

Page 82: ...l dell_za_support dell com Southeast Asian and Pacific Countries Customer Technical Support Customer Service and Sales Penang Malaysia 604 633 4810 Spain Madrid International Access Code 00 Country Code 34 City Code 91 Home and Small Business Technical Support 902 100 130 Customer Care 902 118 540 Sales 902 118 541 Switchboard 902 118 541 Fax 902 118 539 Website support euro dell com E mail suppor...

Page 83: ...mall Business 0844 811 411 Technical Support Corporate 0844 822 844 Customer Care Home and Small Business 0848 802 202 Customer Care Corporate 0848 821 721 Fax 022 799 01 90 Switchboard 022 799 01 01 Website support euro dell com E mail swisstech dell com E mail for French Speaking HSB and Corporate Customers support euro dell com ch fr emaildell Taiwan International Access Code 002 Country Code 8...

Page 84: ...Care 01344 373 186 Home and Small Business Customer Care 0870 906 0010 Corporate Customer Care 0870 908 0500 Preferred Accounts 500 5000 employees Customer Care 01344 373 196 Central Government Customer Care 01344 373 193 Local Government Customer Care 01344 373 199 Home and Small Business Sales 0870 907 4000 Corporate Public Sector Sales 01344 860 456 Website support euro dell com E mail dell_dir...

Page 85: ...al Support Return Material Authorization Numbers toll free 1 800 822 8965 Public Americas Computers purchased by governmental agencies local state or federal medical institutions or educational institutions Customer Service and Technical Support Return Material Authorization Numbers toll free 1 800 234 1490 Dell Sales toll free 1 800 289 3355 or toll free 1 800 879 3355 Spare Parts Sales toll free...

Page 86: ...ile this computer has been designed and determined to be compliant with regulatory agency limits for EMI there is no guarantee that interference will not occur in a particular installation If this equipment does cause interference with radio communications services which can be determined by turning the equipment off and on you are encouraged to try to correct the interference by one or more of th...

Page 87: ...n options can change the rating of some configurations to Class A To determine the electromagnetic classification for your computer or device refer to the following sections specific for each regulatory agency Each section provides country specific EMC EMI or product safety information CE Notice European Union Marking by the symbol indicates compliance of this Dell computer to the EMC Directive an...

Page 88: ...ssions requirements provide for two classifications Class A is for typical commercial areas Class B is for typical domestic areas This Dell device is classified for use in a typical Class B domestic environment CE Mark Notice This equipment complies with the essential requirements of the European Union Directive 1999 5 EC ...

Page 89: ...88 Appendix w w w d e l l c o m s u p p o r t d e l l c o m FILE LOCATION S SYSTEMS Tang owner EMF A00 8P550c40 fm DELL CONFIDENTIAL PRELIMINARY 3 11 02 ...

Page 90: ...ESD 13 F finding solutions 24 H hard drive preventing damage 56 replacing 55 help file accessing 26 hibernate file enable support 49 I IRQ conflicts 43 K keyboard fixing problems 35 36 unexpected characters 36 M memory adding 52 removing 53 modem adding 58 P PC Cards fixing problems 34 power fixing problems 26 turning off 20 printer connecting 16 reinstalling driver 18 setting up 16 programs crash...

Page 91: ...ile accessing 26 troubleshooting about 24 blue screen 38 dropped or damaged computer 40 e mail problems 39 external keyboard problems 35 PC Card problems 34 power problems 26 program crash 38 program stopped responding 38 scanner problems 34 unexpected characters 36 wet computer 39 turning off the computer 20 W wet computer 39 Windows XP device driver rollback 43 Help 26 printer 32 reinstalling 47...

Page 92: ..._ Word _X_ Quark Other__________________ ___ Frame ___ Word ___ Quark Other_____________________ FILE TYPE _X_Postscript Other__________________ ___Postscript Other_____________________ PS DRIVER USED _X_Scitex Dolev400 PSM L2 Other______________________________________ ___Scitex Dolev400 PSM L2 Other_________________________________________ COLORS SEPARATIONS COVER__Black White___________________...

Page 93: ...L PAGE COUNT 106 SPECIAL INSTRUCTIONS Add blank pages needed to complete signatures Any document 3 pages or more please add blank pages at the end of book to equal mul tiples of 4 8 16 or 32 Each new language begins on an odd numbered page and ends on an even numbered page If this document contains Hebrew add blank pages at the end of the Hebrew document This would resemble the beginning of the do...

Reviews: