120
Adding and Replacing Parts
www
.dell.com | support.dell.com
4
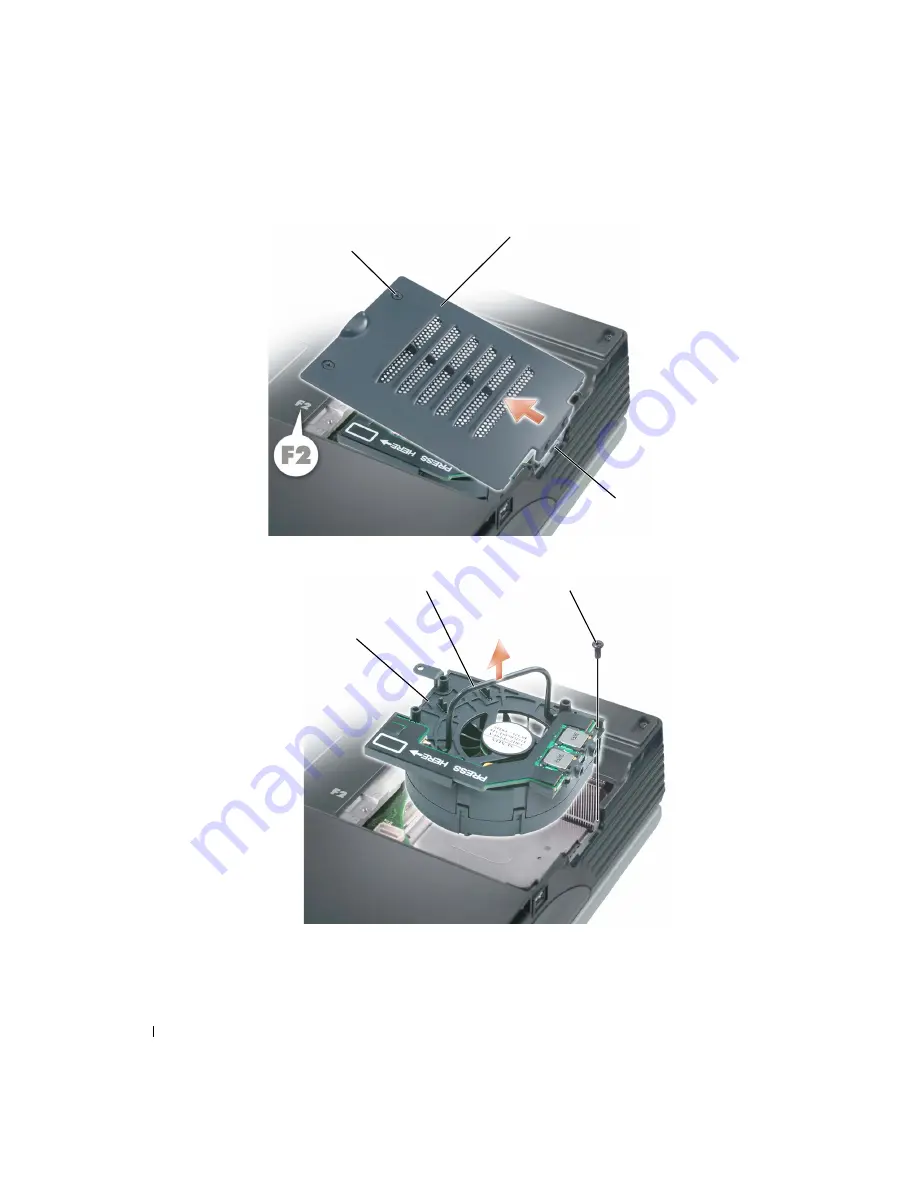
Remove the screw on the fan and lift up the fan release lever.
5
Use the fan release lever to lift the fan out of the computer.
When replacing fan 2, press down on the fan surface labeled "Press here" to securely seat the fan in
place.
fan cover
captive screws (2)
audio connectors
fan
fan release lever
screw
Summary of Contents for Inspiron XPS
Page 1: ...w w w d e l l c o m s u p p o r t d e l l c o m Dell Inspiron XPS Owner s Manual Model PP09L ...
Page 10: ...10 Contents ...
Page 16: ...16 Safety Instructions w w w d e l l c o m s u p p o r t d e l l c o m ...
Page 20: ...20 Finding Information w w w d e l l c o m s u p p o r t d e l l c o m ...
Page 32: ...32 A Tour of Your Computer w w w d e l l c o m s u p p o r t d e l l c o m ...
Page 48: ...48 Optimizing Performance w w w d e l l c o m s u p p o r t d e l l c o m ...
Page 54: ...54 Using a Battery w w w d e l l c o m s u p p o r t d e l l c o m ...
Page 58: ...58 Using the Module Bay w w w d e l l c o m s u p p o r t d e l l c o m ...
Page 64: ...64 Using the Keyboard and Touch Pad w w w d e l l c o m s u p p o r t d e l l c o m ...
Page 74: ...74 Setting Up a Home and Office Network w w w d e l l c o m s u p p o r t d e l l c o m ...
Page 102: ...102 Solving Problems w w w d e l l c o m s u p p o r t d e l l c o m ...
Page 182: ...182 Appendix w w w d e l l c o m s u p p o r t d e l l c o m ...


