


CAUTION: To avoid damaging the computer, ensure that the work surface is
flat and clean.
CAUTION: To avoid damaging the components and cards, handle them by
their edges, and avoid touching pins and contacts.
CAUTION: You should only perform troubleshooting and repairs as
authorized or directed by the Dell technical assistance team. Damage due to
servicing that is not authorized by Dell is not covered by your warranty. See
the safety instructions that shipped with the product or at
.
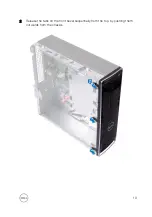
CAUTION: Before touching anything inside your computer, ground yourself
by touching an unpainted metal surface, such as the metal at the back of
the computer. While you work, periodically touch an unpainted metal surface
to dissipate static electricity, which could harm internal components.
CAUTION: When you disconnect a cable, pull on its connector or on its pull
tab, not on the cable itself. Some cables have connectors with locking tabs
or thumb-screws that you must disengage before disconnecting the cable.
When disconnecting cables, keep them evenly aligned to avoid bending any
connector pins. When connecting cables, ensure that the ports and
connectors are correctly oriented and aligned.
CAUTION: Press and eject any installed card from the media-card reader.
Recommended tools
The procedures in this document may require the following tools:
•
Phillips screwdriver #1
•
Plastic scribe
9
Summary of Contents for Inspiron 3472
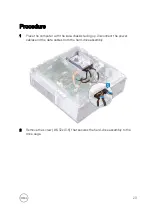
Page 14: ...System board components 1 power button cable connector 2 coin cell battery 14 ...
Page 28: ...2 Remove the two screws 6 32xL6 35 that secure the hard drive assembly to the drive cage 28 ...
Page 30: ...5 Slide the hard drive out of the hard drive bracket 30 ...
Page 41: ...2 Remove the coin cell battery from the socket 41 ...
Page 45: ...5 Slide and remove the wireless card from the wireless card slot 45 ...
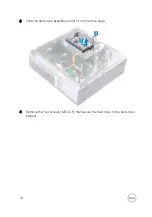
Page 49: ...3 Remove the antenna modules along with the cables off the chassis 49 ...
Page 53: ...5 Remove the power button module along with its cable through the slot on the front panel 53 ...
Page 56: ...3 Lift the thermal cooling assembly off the system board 56 ...
Page 61: ...8 Slide and lift the system board off the chassis 61 ...