background image

122

DIP Switch Settings and Connectors

Server Module Board DIP Switch


CAUTION: 

Many repairs may only be done by a certified service technician. You should only perform 

troubleshooting and simple repairs as authorized in your product documentation, or as directed by the online or 
telephone service and support team. Damage due to servicing that is not authorized by Dell is not covered by your 
warranty. Read and follow the safety instructions that came with the product. 

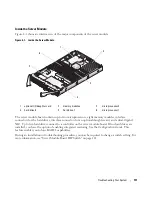
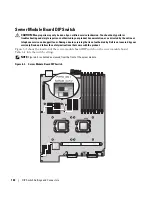
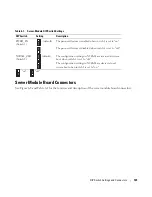
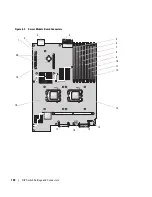
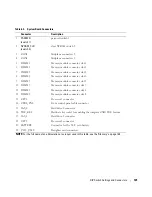
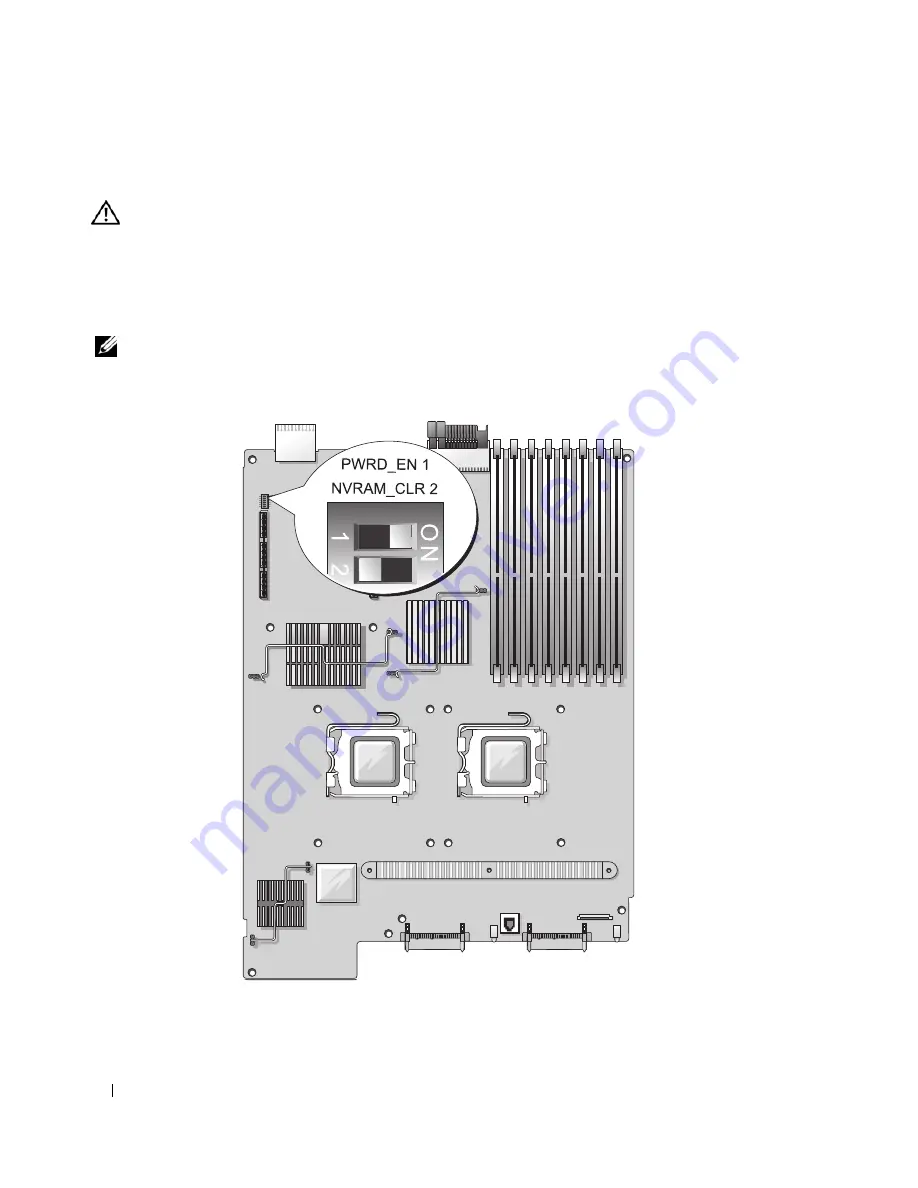
Figure 6-2 shows the location of the server-module board DIP switch on the server module board. 
Table 6-1 lists the switch settings.


NOTE: 

Figure 6-2 is oriented as viewed from the front of the server module. 

Figure 6-2.

Server Module Board DIP Switch

Summary of Contents for 1955

Page 1: ...w w w d e l l c o m s u p p o r t d e l l c o m Dell PowerEdge 1955 Systems Hardware Owners Manual ...

Page 2: ...ny manner whatsoever without the written permission of Dell Inc is strictly forbidden Trademarks used in this text Dell the DELL logo Inspiron Dell Precision Dimension OptiPlex Latitude PowerEdge PowerVault PowerApp and Dell OpenManage are trademarks of Dell Inc Intel Pentium Xeon and Celeron are registered trademarks of Intel Corporation Microsoft and Windows are registered trademarks of Microsof...

Page 3: ...nalog KVM Switch Module 22 Avocent Digital Access KVM Switch Module 24 DRAC MC Module 26 Important I O Configuration Considerations 27 DRAC MC Firmware Requirements 28 I O Connectivity 28 Guidelines for Installing Connectivity Modules 28 PowerConnect 5316M Ethernet Switch Module 29 Fibre Channel Pass Through Module 31 Fibre Channel Switch Module 32 Infiniband Pass through Module 32 Gb Ethernet Pas...

Page 4: ...the System Password 51 Using the Setup Password 53 Disabling a Forgotten Password 54 Acquiring the asset com Utility 54 Baseboard Management Controller Configuration 54 Entering the BMC Setup Module 55 BMC Setup Module Options 55 3 Installing System Options 57 Power Supply Modules 58 System Power Guidelines 58 Removing a Power Supply Module 58 Installing a Power Supply Module 59 Fan Modules 59 Rem...

Page 5: ...ng and Installing Server Module Components 77 Memory 77 General Memory Module Installation Guidelines 78 Memory Sparing 78 Memory Mirroring 79 Sample Memory Configurations 80 I O Module Daughter Card 82 Activating the Integrated NIC TOE 84 Processors 84 Server Module Battery 88 Hard Drives 89 Removing a Hard Drive 90 Configuring the Boot Drive 91 Removing a Hard Drive From a Hard Drive Carrier 91 ...

Page 6: ...hooting the Keyboard 103 Troubleshooting the Mouse 104 Troubleshooting USB Devices 105 Responding to a Systems Management Alert Message 105 Troubleshooting a Wet System 106 Troubleshooting a Damaged System 107 Troubleshooting System Components 107 Troubleshooting Power Supply Modules 107 Troubleshooting Fan Modules 108 Troubleshooting the DRAC MC Module 109 Troubleshooting a Network Switch Module ...

Page 7: ...9 Error Messages 120 6 DIP Switch Settings and Connectors 121 DIP Switch Settings A General Explanation 121 DIP Switches 121 Server Module Board DIP Switch 122 Server Module Board Connectors 123 Disabling a Forgotten Password 126 7 Getting Help 127 Technical Assistance 127 Online Services 127 AutoTech Service 128 Automated Order Status Service 128 Technical Support Service 128 Dell Enterprise Trai...

Page 8: ...8 Contents Before You Call 129 Contacting Dell 132 Glossary 149 Index 157 ...

Page 9: ... Modular Chassis User s Guide provides detailed information on using the remote management features of the system CDs included with your system provide documentation and tools for configuring and managing your system Systems management software documentation describes the features requirements installation and basic operation of the software Operating system documentation describes how to install ...

Page 10: ... drive which you can use to set up and configure the server modules NOTE To ensure proper operation and cooling all bays must be populated at all times with either a server module or with a blank Figure 1 1 Server Modules This section describes the major hardware and software features of your system and provides information about the indicators on the system s front and back panels It also provide...

Page 11: ...ns the system on and off Press to turn on the system Press and hold 10 seconds to turn off the system NOTE The system power button controls power to all of the server modules and I O modules in the chassis System power indicator Off System does not have power Green System power is on Amber System is plugged in but is not turned on Identification button N A None Turns on the identification indicato...

Page 12: ...es for example USB diskette drive USB CD drive USB mouse and to video NOTE The USB devices can only be connected by using the custom cable supplied with the system Identification indicator Off Chassis is not being identified This is the default Amber slow blinking Chassis is being identified Either the front or back identification button has been pressed This indicator can be turned off by pressin...

Page 13: ...e Indicators 1 server module power indicator 2 server module power button 3 KVM selection indicator 4 KVM selection button 5 daughter card status indicator 6 Ethernet network indicator 7 custom port with custom cable USB 2 and video 1 2 3 4 6 5 7 ...

Page 14: ... DRAC MC Amber The module power is off but the system power is on Amber blinking slowly The module power is off and the server module is being remotely identified via the DRAC MC Amber blinking fast The module power is off and there is a fault with the server module Server module power button N A None Turns server module power off and on If you turn off the module using the power button and the mo...

Page 15: ...band daughter card is installed but no traffic is detected Green blinking Infiniband daughter card is present and data transfers are occurring Daughter card status indicator Fibre channel daughter card installed I O Off Daughter card is not installed Green A link exists Green blinking Fibre channel daughter card data transfers are occurring Daughter card status indicator Gb Ethernet daughter card ...

Page 16: ...ayed as drive events occur in the system NOTICE Each server module must have a hard drive or a hard drive blank installed in each hard drive bay NOTICE You cannot install a SAS drive and a SATA drive within a given server module blade However you can install server modules blades with SAS drives and server modules with SATA drives in the same server enclosure Network indicators Off Indicates that ...

Page 17: ...ve Status Indicator Patterns RAID Configurations Only Status Indicator State Indicator Code Off Drive is ready for removal Drive bay is empty Power is off to the server module Green Drive is online Green blinking slowly Drive is rebuilding Green blinking quickly Drive is being identified Amber Drive has failed or has an error See Troubleshooting Hard Drives on page 113 Amber blinking slowly green ...

Page 18: ...n and the numbering for the bays Table 1 4 provides information about the back panel features Figure 1 5 Back Panel Features 1 I O bay 2 2 fan modules 2 3 PowerConnect 5316M Ethernet switch module 4 I O bay 1 5 Fibre Channel pass through module 6 I O bay 3 7 KVM module 8 DRAC MC module 9 power supply modules 4 10 blanks 2 11 I O bay 4 12 blanks 2 9 2 3 6 10 7 8 4 1 5 12 11 3 4 1 2 ...

Page 19: ...s of the system fans see Fan Module Indicators on page 21 KVM module Provides information about the KVM module see KVM Modules on page 22 DRAC MC module Provides information about system status system management status and port status see DRAC MC Module on page 26 PowerConnect 5316M Ethernet switch module Provides information about the 10 100 1000 BASE T network status see PowerConnect 5316M Ether...

Page 20: ...icator Code DC power indicator Green The power supply is operational Fault indicator Amber The power supply is in a fault condition The fault condition can result from either a failed power supply or a failed fan within the power supply See Power Supply Modules on page 58 AC power present indicator Green AC power is present at the power supply and the system is connected to an AC power source 2 1 ...

Page 21: ...an 1 present indicator 3 fan 2 present indicator 4 fan 2 fault indicator Table 1 6 Fan Module Indicator Codes Indicator Activity Indicator Indicator Code Fan 1 present indicator Off Fan 1 is not installed Green Fan 1 is installed Fan 1 fault indicator Off Fan 1 is operating normally Amber Fan 1 has failed See Fan Modules on page 59 Fan 2 present indicator Off Fan 2 is not installed Green Fan 2 is ...

Page 22: ...d that you keep these custom cables available The switch module also provides an Analog Console Interface ACI port which allows you to connect a server module via Cat5 cabling to an external device such as the Dell 2161DS Digital console switch or Dell 180AS 2160AS analog console switches without the need for a Server Interface Pod SIP NOTE Although the ACI port is an RJ 45 connector and uses Cat5...

Page 23: ...cation indicator 4 power indicator Table 1 7 Avocent Analog KVM Switch Module Indicators and Features Feature Activity Indicator Indicator Code Identification indicator Off Chassis is not being identified Amber blinking Chassis is being identified Power indicator Off KVM switch does not have power Green KVM switch has power Custom connector None Allows two PS 2 and one video device to be connected...

Page 24: ...igital Access KVM switch to an external KVM switch using Cat5 connectors ACI ports that switch s dongle PS2 video to Cat5 is required NOTE The Avocent Digital Access KVM module differs from the Avocent Analog KVM module in that the Digital Access KVM switch module does not have an ACI port it has an Ethernet network interface Remote control of Virtual Media and virtual KVM After connecting to your...

Page 25: ...1 9 shows the external features of the Avocent Digital Access KVM switch module Figure 1 9 Avocent Digital Access KVM Switch Module 1 RJ 45 connector Ethernet interface 2 custom connector for custom KVM cable PS 2 2 and video 1 2 ...

Page 26: ...rver modules and switches Table 1 8 provides information about the status indicators Figure 1 10 DRAC MC Module Features 1 link indicator 2 activity indicator 3 primary secondary indicator 4 fault indicator 5 network interface controller 6 serial connector 5 4 3 2 1 6 Table 1 8 DRAC MC Module Indicators Indicator Type Icon Activity Indicator Indicator Code Network interface controller link indicat...

Page 27: ...ming any of these actions will power off and stop traffic on the bay 2 or bay 4 I O module resulting in data loss When initiated the DRAC MC firmware algorithm must find a module in bay 1 before bay 2 and a module in bay 3 before bay 4 Otherwise the module in bay 2 or bay 4 will be powered off if you perform a firmware upgrade procedure on the DRAC MC cause a DRAC MC failover or reset the DRAC MC ...

Page 28: ...in the rear of the chassis An I O module s green system diagnostic indicator is off when the module is properly operating or is off and blinks when the module is not properly operating Guidelines for Installing Connectivity Modules The following guidelines must be used when populating I O modules See Figure 1 5 for I O bay locations Insert a connectivity module into I O bay 1 before installing a c...

Page 29: ...ay The switch module has an internal serial port that communicates with the DRAC MC module Table 1 10 lists the indicators on each switch module For additional information about the PowerConnect 5316M Ethernet switch module see the documentation that shipped with the module Table 1 9 Valid I O Module Configurations Network Controller Bay IO 1 Bay IO 2 Bay IO 3 Bay IO 4 Server Module Embedded NIC 1...

Page 30: ... link partner on the network Green blinking Network data is being sent or received at 1 Gb Amber The port is connected to a valid link partner on the network Amber blinking Network data is being sent or received at 10 Mb or 100 Mb Duplex mode indicator Green The port is operating at full duplex mode Off The port is operating at half duplex mode System diagnostic indicator Green blinking Module is ...

Page 31: ...I O bay 4 connects to port 2 on the optional Fibre Channel daughter card installed in a server module To provide redundancy both I O bay 3 and I O bay 4 must have Fibre Channel pass through modules installed Table 1 11 lists the functionality of the Fibre Channel pass through module indicators For additional information on installing this module see Chassis I O Module on page 70 NOTE The Fibre Cha...

Page 32: ...annel Adapter HCA daughter card in the server module and 4x Infiniband Transceivers for direct connection to an Infiniband switch The Infiniband pass through modules are hot pluggable To provide redundancy both I O bay 3 and I O bay 4 must have Infiniband pass through modules installed In this configuration the module in I O bay 3 connects to port 1 on the Infiniband HCA daughter card the Infiniba...

Page 33: ...Ethernet daughter card installed in a server module The Gb Ethernet pass through module in I O bay 4 connects to port 2 on the optional Gb Ethernet daughter card installed in a server module Table 1 12 lists the functionality of the Gb Ethernet pass through module indicators For additional information on installing this module see Chassis I O Module on page 70 NOTE Only connect the Gb Ethernet mod...

Page 34: ...entation for the application that is running when the message appears or the operating system s documentation for an explanation of the message and recommended action Table 1 12 Gb Pass through Module Indicators Indicator Type Activity Indicator Indicator Code Link indicator activity indicator Green amber blinking The Gb Ethernet connector is linked to the server module and there is network activi...

Page 35: ...ported by the system See General Memory Module Installation Guidelines on page 78 Caution NVRAM_CLR jumper is installed on system board NVRAM_CLR switch is set to on Set the NVRAM_CLR switch to off See Figure 6 2 for the jumper location CPUs with different cache sizes detected Mismatched processors are installed Install a correct version of the microprocessor so that both microprocessors have the ...

Page 36: ...diskette or optical drive to the custom cable Replace the diskette Ensure that the diskette drive and optical drive cables are properly connected See Troubleshooting USB Devices on page 105 Diskette read failure Faulty or improperly inserted diskette Replace the diskette Diskette subsystem reset failed Faulty diskette drive or optical drive controller Ensure that the diskette drive and optical dri...

Page 37: ...o ensure compatibility Gate A20 failure Faulty keyboard controller faulty server module board See Getting Help on page 127 General failure Operating system corrupted or improperly installed Reinstall the operating system Keyboard controller failure Faulty keyboard controller faulty server module board See Getting Help on page 127 Keyboard data line failure Keyboard failure Keyboard stuck key failu...

Page 38: ...skette drive optical drive or hard drive Check the Integrated Devices configuration settings in the System Setup program and ensure that the controller for the boot device is enabled See Using the System Setup Program on page 43 Ensure that the controller for the boot device is enabled If the problem persists replace the drive See Hard Drives on page 89 No boot sector on hard disk drive An operati...

Page 39: ...ed in your system Shutdown failure Shutdown test failure Ensure that all memory modules are properly installed See Troubleshooting Server Module Memory on page 112 If the problem persists see Getting Help on page 127 Spare bank enabled Memory sparing enabled Information only The amount of system memory has changed Faulty memory module See Troubleshooting Server Module Memory on page 112 If the pro...

Page 40: ...oprocessors match See Processors on page 84 Check for a BIOS update using the Dell Support website at support dell com Unsupported CPU stepping detected Processor is not supported by the server module Check for a BIOS update using the Dell Support website at support dell com If the problem persists install a supported processor See Processors on page 84 Warning No microcode update loaded for proce...

Page 41: ...nagement software generates alert messages for your system Alert messages include information status warning and failure messages for drive temperature fan and power conditions For more information see the systems management software documentation ...

Page 42: ...42 About Your System ...

Page 43: ...e server module and features such as password protection Entering the System Setup Program 1 Turn on or restart your system 2 Press F2 immediately after you see the following message F2 Setup If your operating system begins to load before you press F2 allow the system to finish booting and then restart your system and try again NOTE To ensure an orderly system shutdown see the documentation that a...

Page 44: ...Options Main Screen When you enter the System Setup program the main System Setup program screen appears see Figure 2 1 Table 2 1 System Setup Program Navigation Keys Keys Action Up arrow or Shift Tab Moves to the previous field Down arrow or Tab Moves to the next field Spacebar left and right arrows Cycles through the settings in a field In some fields you can also type the appropriate value Esc ...

Page 45: ...spective options where applicable Table 2 2 System Setup Program Options Option Description Asset Tag Displays the customer programmable asset tag number for the system if an asset tag number has been assigned To enter an asset tag number of up to 10 characters into NVRAM see Acquiring the asset com Utility on page 54 System Time Resets the time on the system s internal clock System Date Resets th...

Page 46: ...Screen on page 48 PCI IRQ Assignment Displays a screen to change the IRQ assigned to each of the integrated devices on the PCI bus and any installed expansion cards that require an IRQ Serial Communication See Serial Communication Screen on page 49 System Security Displays a screen to configure the system password and setup password features See Using the System Password on page 51 and Using the S...

Page 47: ...isplays the amount of video memory This field does not have user selectable settings System Memory Testing Enabled default Determines if memory is being tested during POST Setting this value to Enabled will affect the duration of system POST Redundant Memory If a valid memory configuration is installed you can enable memory mirroring or spare memory Options are Mirror Mode Spare Mode and Disabled ...

Page 48: ...ssor s Table 2 5 Integrated Devices Screen Options Option Description Embedded SAS Controller Enabled default Enables the integrated SAS controller User Accessible USB Ports All Ports On default Enables or disables the system s USB ports Options are All Ports On or All Ports Off Disabling the USB ports makes system resources available for other devices Embedded Gb NIC1 Enabled without PXE default ...

Page 49: ...cation Off default Options are On with Console Redirection via COM2 and Off Failsafe Baud Rate 115200 default Displays the failsafe baud rate used for console redirection when the baud rate cannot be negotiated automatically with the remote terminal This rate should not be adjusted Remote Terminal Type VT 100 VT 220 default Select either VT 100 VT 220 or ANSI Redirection After Boot Enabled default...

Page 50: ...the system password enter the setup password in the Setup Password field and then change the Password Status option to Unlocked In this state you can disable the system password at start up by pressing Ctrl Enter and then change the password using the System Password option Power Button Enables or disables the server module s power button If you turn off the server module using the power button an...

Page 51: ...ord After a system password is assigned only those who know the password have full use of the system When the System Password option is set to Enabled the system prompts you for the system password after the system starts Assigning a System Password Before you assign a system password enter the System Setup program and check the System Password option When a system password is assigned the setting...

Page 52: ...e the password security To leave the password security enabled 1 Turn on or reboot your system by pressing Ctrl Alt Del 2 Press Enter 3 Type your password and press Enter To disable the password security 1 Turn on or reboot your system by pressing Ctrl Alt Del 2 Press Ctrl Enter When the Password Status option is set to Locked whenever you turn on your system or reboot your system by pressing Ctrl...

Page 53: ...press the or key The system prompts you to enter and verify the password NOTE The setup password can be the same as the system password If the two passwords are different the setup password can be used as an alternate system password However the system password cannot be used in place of the setup password You can use up to 32 characters in your password As you press each character key or the spac...

Page 54: ... on page 53 Disabling a Forgotten Password See Disabling a Forgotten Password on page 126 Acquiring the asset com Utility The asset com utility is not located in the Service Mode section of the Dell OpenManage Server Assistant CD To acquire this utility use the Server Assistant CD to create a bootable diskette the utility is then automatically created on that diskette The asset com utility will be...

Page 55: ...le 1 Turn on or restart your system 2 Press Ctrl E when prompted after POST If your operating system begins to load before you press Crtl E allow the system to finish booting and then restart your system and try again BMC Setup Module Options For information about the BMC Setup Module options and how to configure the emergency management port EMP see the BMC User s Guide ...

Page 56: ...56 Using the System Setup Program ...

Page 57: ...Remote Access Controller Modular Chassis DRAC MC module KVM modules Network switch modules Server modules Server module components Memory modules Daughter cards TOE NIC Processors Server module battery Hard drives Back panel module cage assembly service only procedure Chassis control panel assembly service only procedure Server module control panel assembly service only procedure System board serv...

Page 58: ...d drives installed in a server module and the number of server modules installed in the chassis The number of installed power supply modules determine if your system is redundant Your system has one of the following configurations Two 2100 W power supply modules which do not provide redundancy if one power supply module fails Four 2100 W power supply modules which provide redundancy if one power s...

Page 59: ...ee Figure 3 1 2 Rotate the power supply module handle upward until its release tab snaps securely into place 3 Plug a power cable into the power supply module Fan Modules Your system contains up to four system fans two sets of redundant fans contained in two hot pluggable fan modules Each fan module has system fan indicators on its back panel that identify the status of each of its system fans See...

Page 60: ...hassis midplane Fan 2 is the fan closest to the fan module handle 2 Remove the fan module a Press down on the fan module release tab See Figure 3 2 b Rotate the fan module handle down to eject the fan module c Slide the fan module out of the chassis Figure 3 2 Removing and Installing a Fan Module 3 Remove the failed fan a Pull up the fan release tab See Figure 3 3 b Lift up the fan lever c Pull ou...

Page 61: ... upward until its release tab snaps securely into place DRAC MC Module Among other controlling features the DRAC MC controls power to the system When a functional DRAC MC module is not installed newly installed server modules cannot be powered on and presently installed servers modules cannot have their power cycled Removing a DRAC MC Module 1 Disconnect any cables attached to the DRAC MC module 2...

Page 62: ...ions CAUTION Data loss can result if you perform certain actions on a system in which the I O bays have not been configured correctly Specifically bay 2 should have an I O module installed only if a module of the same fabric type is present in bay 1 and bay 4 should have an I O module installed only if a module of the same fabric type is present in bay 3 Except in these cases or in a case where yo...

Page 63: ...ysinfo See the latest Dell Remote Access Controller Modular Chassis User s Guide at support dell com for more information about firmware updates and installing redundant DRAC MC modules This guide also provides complete instructions on how to set up and operate that version of the module KVM Module Your system includes one hot pluggable KVM module One of two types of KVM modules may be installed a...

Page 64: ...module and connect the keyboard monitor and mouse to the custom cable Figure 3 5 Removing and Installing a KVM Module Figure 3 6 shows the basic cabling configuration for a KVM module For information on configuring the KVM module see the Configuration Guide provided with your system 1 release lever 2 securing screw 3 KVM module 1 3 2 ...

Page 65: ...Access KVM Switch From a Analog KVM Switch Both Avocent KVM switches can be tiered from analog KVM switches such as the Dell180ES and 2160ES as well as other products that support the On Screen Configuration and Activity Reporting OSCAR interface 1 monitor 2 custom KVM cable 3 KVM module 4 system 5 mouse 6 keyboard 1 6 5 3 4 2 ...

Page 66: ... the key sequences before that time has elapsed OSCAR will not display To configure the analog switch 1 Press Print Screen to open the OSCAR Main dialog box 2 Click Setup Devices Device Modify 3 Select the 10 port option to match the number of slots in your system If the 10 port option is not available select the 16 port option 4 Click OK to exit OSCAR 5 Press Print Screen to verify that the setti...

Page 67: ...p before the system it may result in only one server module displaying in the analog switch OSCAR instead of 10 NOTE In addition to the steps outlined above some analog switches may require you to perform additional steps to ensure that the KVM switch server modules appear in the analog switch OSCAR See the analog switch documentation for additional information 1 analog switch 2 keyboard video and...

Page 68: ...as a network hub Doing so may result in equipment damage Figure 3 8 Tiering an Avocent Analog KVM Switch from a Dell Console Switch Once the KVM switch is connected the server modules appear in OSCAR The Dell console switch will automatically configure the slots in the KVM menu NOTE Once the local system is set up you must also resynchronize the server list from the Remote Console Switch software ...

Page 69: ...witch and then to the SIP 4 Once the KVM switch is connected the server modules appear in OSCAR Figure 3 9 Tiering a Avocent Digital Access KVM Switch from a Dell Console Switch Once connected the Dell console switch will automatically configure the slots in the KVM menu NOTE Once the local system is set up you must also resynchronize the server list from the Remote Console Switch software in orde...

Page 70: ... appears with a progress bar indicating that the switch information is being retrieved 4 If no changes were detected in the appliance a completion dialog box appears with this information If server changes were detected then the Detected Changes dialog box will be displayed Click Next to update the database 5 If a cascade switch was detected the Enter Cascade Switch Information dialog box appears ...

Page 71: ...ly one type of I O module is installed it must be installed in the primary bay Removing an I O Module 1 Disconnect any cables attached to the I O module 2 Press in the bottom of the release tab and pull out the release lever See Figure 3 10 3 Pull out the release lever and slide the I O module out of the chassis 4 If you are removing the I O module permanently a If the I O module uses a supporting...

Page 72: ...ss through module for redundancy a Ensure that the I O module release lever is fully extended See Figure 3 10 b Slide the module into the chassis until it is fully seated c Close the release lever until it snaps securely into place 3 If a daughter card s was included with the new I O module install the daughter card s See I O Module Daughter Card on page 82 NOTE The daughter card enables a server ...

Page 73: ...module is powered off its front panel power indicator is amber See Figure 1 3 2 Press in the release latch on the inside of the upper handle See Figure 3 11 3 Pull out both the upper and the lower handles to eject the server module from the chassis 4 Slide the server module out of the chassis NOTICE If you are permanently removing the server module install a server module blank Operating the syste...

Page 74: ...e has the DELL logo on it extends farther out than the lower handle and has a release latch on its inside See Figure 3 12 b The upper edge of the server module has TOP SIDE engraved in it See Figure 3 12 Figure 3 12 Proper Server Module Installation Orientation 2 Slide the server module into the chassis until the open handles touch the front panel of the chassis 3 Rotate both handles inward until ...

Page 75: ...ystem See your Product Information Guide for complete information about safety precautions working inside the computer and protecting against electrostatic discharge 1 Remove the server module See Removing a Server Module 2 Orient the server module as shown in Figure 3 13 so that the two cover release buttons are facing up 3 Press down on both cover release buttons and slide the cover toward the b...

Page 76: ...ion about safety precautions working inside the computer and protecting against electrostatic discharge 1 Ensure that no tools or parts are left inside the system 2 Align the cover with the cover alignment pins on the sides of the chassis and slide the cover forward See Figure 3 15 3 Install the server module See Installing a Server Module 1 optional daughter card 2 memory modules 3 heat sink and ...

Page 77: ...rd drives Memory You can add system memory to a maximum capacity of 32 GB dual ranked memory modules or 16 GB single ranked memory modules by installing 533 MHz or 677 Mhz when available fully buffered DIMM FBD DDR II memory modules 256 MB 512 MB 1 GB 2 GB and 4 GB memory modules are supported You can purchase memory upgrade kits from Dell NOTICE Use only 533 MHz or 677 MHz when available DDR II F...

Page 78: ...stem supports both single ranked and dual ranked memory modules Memory modules marked with a 1R are single ranked and modules marked with a 2R are dual ranked If you install both single ranked and dual ranked memory modules the dual ranked memory modules must be installed in Branch 1 regardless of capacity NOTE Dual rank memory modules with less capacity take precedence over single ranked memory m...

Page 79: ... memory module fails the data in the mirrored data set is still available and the system can operate normally until the memory module is replaced The following guidelines apply to memory mirroring The system only supports memory mirroring if eight identical memory modules are installed Mirroring is not supported if sparing is enabled You can enable memory mirroring through the System Setup program...

Page 80: ...le on page 73 2 Open the server module See Opening the Server Module on page 75 3 Locate the memory module sockets See Figure 6 3 4 Press the ejectors on the memory module socket down and out as shown in Figure 3 16 to allow the memory module to be inserted into the socket I If a memory module blank is installed in the socket remove it See Figure 3 16 Table 3 2 Sample Memory Configurations Channel...

Page 81: ... through step 6 of this procedure to install the remaining memory modules See Table 3 2 for sample memory configurations 8 Close the server module See Closing the Server Module on page 76 9 Install the server module See Installing a Server Module on page 74 10 Optional Press F2 to enter the System Setup program and check the System Memory setting on the main System Setup screen The system should h...

Page 82: ...l channel I O module daughter cards including a TCP IP Offload Engine TOE NIC daughtercard If installed the daughter card must be used in conjunction with its appropriate back panel I O module and connector number For example server module number 5 must have a Fibre Channel daughter card installed to communicate with the Fibre Channel pass through module connector number 5 primary and secondary ba...

Page 83: ... page 74 Figure 3 17 Installing and Removing a Daughter Card Removing a Daughter Card CAUTION Only trained service technicians are authorized to remove the system cover and access any of the components inside the system See your Product Information Guide for complete information about safety precautions working inside the computer and protecting against electrostatic discharge 1 Remove the server ...

Page 84: ...peed and functionality Each processor and its associated internal cache memory are contained in a land grid array LGA package that is installed in a ZIF socket on the system board Removing a Processor CAUTION Only trained service technicians are authorized to remove the system cover and access any of the components inside the system See your Product Information Guide for complete information about...

Page 85: ...cessor is still warm 4 Remove the heat sink a Slightly rotate the heat sink to loosen it from the processor b If the processor is removed from the socket with the heat sink twist or slide the processor off of the heat sink Do not pry the processor off of the heat sink c Set the heat sink on its top so as not to contaminate the thermal grease 5 Pull the socket release lever straight up until the pr...

Page 86: ... the computer and protecting against electrostatic discharge 1 Prior to upgrading your system download the latest system BIOS version on support dell com 2 Unpack the new processor 3 If you are adding a second processor remove the processor blank by loosening the two screws securing the blank to the system board 4 Align the pin 1 corner of the processor with the pin 1 corner of the ZIF socket See ...

Page 87: ...to remove the existing thermal grease from the heat sink If you are reinstalling a processor also clean any remnants of thermal grease from the processor b Apply thermal grease evenly to the top of the processor c Place the heat sink onto the processor See Figure 3 18 d Tighten the four screws to secure the heat sink to the server module board See Figure 3 18 7 Close the server module See Closing ...

Page 88: ... type recommended by the manufacturer Discard used batteries according to the manufacturer s instructions See your Product Information Guide for additional information 1 Remove the server module See Removing a Server Module on page 73 2 Open the server module See Opening the Server Module on page 75 3 If a daughter card is installed on the server module board remove the daughter card See Removing ...

Page 89: ...y and status information NOTICE You cannot install a SAS drive and a SATA drive within a given server module blade However you can install server modules blades with SAS drives and server modules with SATA drives in the same server enclosure Integrated Mirroring of Hard Drives The controller on the server module board supports integrated mirroring if two drives are installed After installing the d...

Page 90: ...stem 1 Open the hard drive carrier handle See Figure 3 21 Figure 3 21 Installing a Hard Drive 2 Insert the hard drive carrier into the drive bay 3 Close the hard drive carrier handle to lock it in place Removing a Hard Drive NOTICE Not all operating systems support hot plug drive installation See the documentation supplied with your operating system 1 Take the hard drive offline and wait until the...

Page 91: ...d drive Otherwise the hard drive may not be recognized after the hard drive is reinstalled and the server module is powered on again Configuring the Boot Drive The drive or device from which the system boots is determined by the boot order specified in the System Setup program see Using the System Setup Program on page 43 Removing a Hard Drive From a Hard Drive Carrier Remove the four screws from ...

Page 92: ... Guide for complete information about safety precautions working inside the computer and protecting against electrostatic discharge 1 Press the system power switch to turn off the system See System Status Features on page 10 2 Remove all of the server modules See Removing a Server Module on page 73 3 Remove the power supply modules See Removing a Power Supply Module on page 58 4 Remove the fan mod...

Page 93: ...cians are authorized to remove the system cover and access any of the components inside the system See your Product Information Guide for complete information about safety precautions working inside the computer and protecting against electrostatic discharge 1 Insert the module cage assembly into the back of the chassis and push the assembly in until the back rails are flush against the chassis ba...

Page 94: ...king inside the computer and protecting against electrostatic discharge 1 Press the system power switch to turn off the system See System Status Features on page 10 2 Remove the server modules nearest the system control panel See Removing a Server Module on page 73 3 Remove the chassis control panel a From the front of the chassis slightly lift up the securing tab on the back of the control panel ...

Page 95: ...taining clips See Figure 3 24 2 Install the control panel midplane receptacle a Ensure that the securing arm on the control panel midplane receptacle is open b Place the control panel midplane receptacle into its bay and push it forward until it is fully seated c Lower the securing arm on the control panel midplane receptacle until it locks in place 3 Install the chassis control panel assembly a P...

Page 96: ...witch is not operational power down the server using its remote power down capability See the Dell Remote Access Controller Modular Chassis User s Guide for information on using the remote management features of the system 2 Remove the server module from the system chassis See Removing a Server Module on page 73 3 Open the server module See Opening the Server Module on page 75 4 Remove the two scr...

Page 97: ...er module board connector a Pull up the retaining clip on top of the connector b Slip the cable between the retaining clip and the connector and press down on the clip to secure the cable NOTE The cable attaches to the connector on the control panel in the same manner 4 Close the server module See Closing the Server Module on page 76 5 Install the server module See Installing a Server Module on pa...

Page 98: ...r some time after the system has been powered down Allow time for the memory modules to cool before handling them Handle the memory modules by the card edges and avoid touching the components NOTICE If you are removing two hard drive label them so you can replace them in their original locations 3 Remove the hard drives See Removing a Hard Drive on page 90 4 Disconnect the control panel cable from...

Page 99: ...nal screws Use the center screw near the back edge of the board to reinstall the chipset cooling shroud 3 Replace the processor s See Installing a Processor on page 86 4 Replace the memory modules and memory module blanks See Installing Memory Modules on page 80 5 If applicable replace the daughter card See Installing a Daughter Card on page 82 6 Reconnect the control panel cable to the system boa...

Page 100: ...100 Installing System Options ...

Page 101: ...dications described in Table 4 1 Checking the Equipment This section provides troubleshooting procedures for external devices attached to the system such as the monitor keyboard or mouse Before you perform any of the procedures see Troubleshooting External Connections on page 102 Table 4 1 Start Up Routine Indications Look listen for Action An error message displayed on the monitor See Server Modu...

Page 102: ...r cable Keyboard video mouse KVM custom cable KVM module Server module Action 1 Ensure that the server module s is turned on 2 Check the monitor connection to the custom cable Try swapping monitor cables if another monitor cable is available 3 Check the custom cable connection to either the front panel custom cable connector on the server module or the back panel KVM module 4 If the monitor does n...

Page 103: ...ng Help on page 127 If the monitor works in the front panel custom cable and not the back panel custom cable the KVM module or the back panel custom cable may be faulty See Getting Help on page 127 Troubleshooting the Keyboard NOTE USB keyboard devices can be connected only to the front panel custom cable and PS 2 keyboard devices can be connected only to the back panel custom cable Problem A symp...

Page 104: ...d only to the front panel custom cable and PS 2 mouse devices can be connected only to the back panel custom cable Problem A symptom of a mouse problem is indicated by a system message Mouse or mouse cable Keyboard Video Mouse KVM custom cable Server module Action 1 Ensure that the server module s is turned on 2 Check the mouse connection to the custom cable 3 Check the custom cable connection to ...

Page 105: ... the front panel custom cable Total length of a USB cable should not exceed 3 m 9 8 ft Problem A symptom of a USB problem is indicated by a system message USB device or USB device cable Keyboard Video Mouse KVM custom cable Server module Action 1 Ensure that the server module s is turned on 2 Check the USB device connection to the front panel custom cable 3 Check the custom cable connection to the...

Page 106: ...s See Removing a Server Module on page 73 4 Remove the DRAC MC module See Removing a DRAC MC Module on page 61 5 Remove all I O modules installed in the system See Removing an I O Module on page 71 6 Remove all the fan modules See Installing a Fan on page 61 7 Remove all the power supply modules See Removing a Power Supply Module on page 58 8 Let the system dry thoroughly for at least 24 hours 9 I...

Page 107: ...O modules Power supply modules Fan modules Server modules 2 Ensure that all cables are properly connected 3 Ensure that all components are properly installed and free from damage 4 Run the online diagnostics See Running System Diagnostics on page 117 If the tests fail see Getting Help on page 127 Troubleshooting System Components The following procedures describe how to troubleshoot the following ...

Page 108: ...module 2 Install a new power supply See Installing a Power Supply Module on page 59 NOTE After installing a new power supply allow several seconds for the system to recognize the power supply and determine whether it is working properly The power supply DC power indicator turns green if the power supply is functioning properly See Figure 1 6 3 If the problem is not resolved see Getting Help on pag...

Page 109: ...cted to the serial port is not properly operating go to step 4 If the fault indicator is off but the network management device connected to the network interface connector port is not properly operating go to step 8 4 Ensure that the serial cable is a null modem cable 5 Reseat the serial cable to the serial connector on the DRAC MC module and to the serial device 6 Connect a known working null mod...

Page 110: ...k all cable connections See I O Connectivity on page 28 for the link indicator error conditions for your particular network switch module Try another connector on the external switch or hub If the activity indicator does not light replace the network switch module See Chassis I O Module on page 70 2 If the server module requires a daughter card for a particular network switch module ensure that th...

Page 111: ... dual Gigabit NIC Up to two hard drives connect to a controller on the server module board If two hard drives are installed you have the option of enabling integrated mirroring See the Configuration Guide This feature enables you to have RAID 1 capabilities During an installation or troubleshooting procedure you may be required to change a switch setting For more information see Server Module Boar...

Page 112: ... 78 1 Restart the server module a Press the power button once to turn off the server module b Press the power button again to apply power to the server module If no error messages appear go to step 8 2 Enter the System Setup program and check the system memory setting See Using the System Setup Program on page 43 If the amount of memory installed matches the system memory setting go to step 8 3 Re...

Page 113: ...e and wait until the hard drive indicator codes on the drive carrier signal that the drive may be removed safely then remove and reseat the drive carrier in the server module See Hard Drives on page 89 3 Restart your server module enter the System Setup program and confirm that the integrated drive controller is enabled See Integrated Devices Screen on page 48 4 Ensure that any required device dri...

Page 114: ...essor installed ensure that it is installed in socket PROC_1 See Figure 6 3 4 Close the server module See Closing the Server Module on page 76 5 Install the server module See Installing a Server Module on page 74 6 Run Quick Tests in the system diagnostics See Running System Diagnostics on page 117 If the tests fail or the problem persists see Getting Help on page 127 Troubleshooting the Server Mo...

Page 115: ...n your product documentation or as directed by the online or telephone service and support team Damage due to servicing that is not authorized by Dell is not covered by your warranty Read and follow the safety instructions that came with the product 1 Re enter the time and date through the System Setup program See Using the System Setup Program on page 43 2 Remove the server module for at least on...

Page 116: ...116 Troubleshooting Your System ...

Page 117: ...nostics log into the Server Administrator home page and then click the Diagnostics tab For information about using diagnostics see the online help For additional information see the Server Administrator User s Guide System Diagnostics Features The system diagnostics provides a series of menus and options for particular device groups or devices on a server module The system diagnostics menus and op...

Page 118: ...le only through the front panel custom cable 1 Format the USB flash drive to emulate a hard drive See the documentation that came with your USB flash drive for instructions 2 Configure the USB flash drive to be a bootable device See the documentation that came with your USB flash drive for instructions Dell also provides a USB memory key boot utility for download at support dell com 3 Install DKMS...

Page 119: ...evice Groups lists the diagnostic device groups in the order that they are tested if you select All under the Run Tests submenu Press the up or down arrow keys to highlight a particular device group Press the left or right arrow keys to select the options on the menu As you move from one menu option to another a brief explanation of the highlighted option appears at the bottom of the screen Table ...

Page 120: ...ey to highlight an option The second line provides information about the highlighted option For more information about a device group or device highlight the Help option and press Enter Press Esc to return to the previous screen Error Messages When you run a system diagnostics test you may receive an error message during testing Record the message on a copy of the Diagnostics Checklist For a copy ...

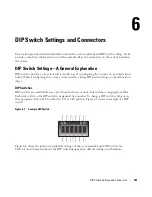
Page 121: ...econfiguring the system you may need to change DIP switch settings on circuit boards or drives DIP Switches DIP switches are small blocks on a circuit board with one or more slide switches emerging from them Each slide switch on the DIP switch is designated by a number To change a DIP switch setting move the appropriate slide switch to either the on or off position Figure 6 1 shows an example of a...

Page 122: ...cted by the online or telephone service and support team Damage due to servicing that is not authorized by Dell is not covered by your warranty Read and follow the safety instructions that came with the product Figure 6 2 shows the location of the server module board DIP switch on the server module board Table 6 1 lists the switch settings NOTE Figure 6 2 is oriented as viewed from the front of th...

Page 123: ... Settings DIP Switch Setting Description PWRD_EN Switch 1 default The password feature is enabled when switch 1 is set to on The password feature is disabled when switch 1 is set to off NVRAM_CLR Switch 2 default The configuration settings in NVRAM are retained at system boot when switch 2 is set to off The configuration settings in NVRAM are cleared at next system boot when switch 2 is set to on ...

Page 124: ...124 DIP Switch Settings and Connectors Figure 6 3 Server Module Board Connectors 13 18 19 12 3 2 14 15 17 1 4 7 8 9 10 11 20 5 6 16 ...

Page 125: ...IMM 3 Memory module connector slot 3 10 DIMM 7 Memory module connector slot 7 11 DIMM 4 Memory module connector slot 4 12 DIMM 8 Memory module connector slot 8 13 CPU1 Processor 1 connector 14 CTRL_PNL Front control panel cable connector 15 SAS_0 Hard drive 0 connector 16 TOE_KEY Hardware key socket for enabling the integrated NIC TOE feature 17 SAS_1 Hard drive 1 connector 18 CPU2 Processor 2 con...

Page 126: ...ver module board reinstall it See Installing a Daughter Card on page 82 6 Close the server module See Closing the Server Module on page 76 7 Install the server module See Installing a Server Module on page 74 When the server module is on the power on indicator is solid green Allow the server module to finish booting The existing passwords are not disabled erased until the system boots with the pas...

Page 127: ...em may not be available in all countries When prompted by Dell s automated telephone system enter your Express Service Code to route the call directly to the proper support personnel If you do not have an Express Service Code open the Dell Accessories folder double click the Express Service Code icon and follow the directions For instructions on using the technical support service see Technical Su...

Page 128: ...ur touch tone telephone to select the subjects that correspond to your questions The AutoTech service is available 24 hours a day 7 days a week You can also access this service through the technical support service See the contact information for your region Automated Order Status Service To check on the status of any Dell products that you have ordered you can go to support dell com or you can ca...

Page 129: ...rite it clearly and prominently on the outside of the box For the telephone number to call see the contact information for your region 2 Include a copy of the invoice and a letter describing the reason for the return 3 Include a copy of any diagnostic information including the Diagnostics Checklist indicating the tests you have run and any error messages reported by the system diagnostics 4 Includ...

Page 130: ...near the computer You may be asked to type some commands at the keyboard relay detailed information during operations or try other troubleshooting steps possible only at the computer system itself Ensure that the system documentation is available CAUTION Before servicing any components inside your computer see your Product Information Guide for important safety information ...

Page 131: ...system and version Peripherals Expansion cards Are you connected to a network Yes No Network version and network card Programs and versions See your operating system documentation to determine the contents of the system s start up files If possible print each file Otherwise record the contents of each file before calling Dell Error message or diagnostic code Description of problem and troubleshoot...

Page 132: ...isted and your call will be routed appropriately When you need to contact Dell use the electronic addresses telephone numbers and codes provided in the following table If you need assistance in determining which codes to use contact a local or an international operator Country City International Access Code Country Code City Code Department Name or Service Area Website and E Mail Address Area Code...

Page 133: ...rt for all other Dell computers 0820 240 530 14 Preferred Accounts Corporate Support 0660 8779 Switchboard 0820 240 530 00 Bahamas General Support toll free 1 866 278 6818 Barbados General Support 1 800 534 3066 Belgium Brussels International Access Code 00 Country Code 32 City Code 2 Website support euro dell com Tech Support for XPS portable computers only 02 481 92 96 Tech Support for all other...

Page 134: ...e med large business government toll free 1 800 326 9463 Customer Service printers projectors televisions handhelds digital jukebox and wireless toll free 1 800 847 4096 Hardware Warranty Support Home Sales Small Business toll free 1 800 906 3355 Hardware Warranty Support med large bus government toll free 1 800 387 5757 Hardware Warranty Support printers projectors televisions handhelds digital j...

Page 135: ...ed Accounts Division toll free 800 858 2557 Large Corporate Accounts GCP toll free 800 858 2055 Large Corporate Accounts Key Accounts toll free 800 858 2628 Large Corporate Accounts North toll free 800 858 2999 Large Corporate Accounts North Government and Education toll free 800 858 2955 Large Corporate Accounts East toll free 800 858 2020 Large Corporate Accounts East Government and Education to...

Page 136: ...Care 3287 5505 Switchboard Relational 3287 1200 Switchboard Fax Relational 3287 1201 Switchboard Home Small Business 3287 5000 Switchboard Fax Home Small Business 3287 5001 Dominica General Support toll free 1 866 278 6821 Dominican Republic General Support 1 800 148 0530 Ecuador General Support toll free 999 119 El Salvador General Support 01 899 753 0777 Finland Helsinki International Access Cod...

Page 137: ...1 55 94 71 00 Sales 01 55 94 71 00 Fax 01 55 94 71 01 Germany Langen International Access Code 00 Country Code 49 City Code 6103 Website support euro dell com E mail tech_support_central_europe dell com Technical Support for XPS portable computers only 06103 766 7222 Technical Support for all other Dell computers 06103 766 7200 Home Small Business Customer Care 0180 5 224400 Global Segment Custome...

Page 138: ...upport Dimension and Inspiron 2969 3188 Technical Support OptiPlex Latitude and Dell Precision 2969 3191 Technical Support PowerApp PowerEdge PowerConnect and PowerVault 2969 3196 Customer Care 3416 0910 Large Corporate Accounts 3416 0907 Global Customer Programs 3416 0908 Medium Business Division 3416 0912 Home and Small Business Division 2969 3105 India E mail india_support_desktop dell com indi...

Page 139: ... dial within U K only 0870 907 4499 Ireland Sales 01 204 4444 U K Sales dial within U K only 0870 907 4000 Fax Sales Fax 01 204 0103 Switchboard 01 204 4444 Italy Milan International Access Code 00 Country Code 39 City Code 02 Website support euro dell com Home and Small Business Technical Support 02 577 826 90 Customer Care 02 696 821 14 Fax 02 696 821 13 Switchboard 02 696 821 12 Corporate Techn...

Page 140: ...ervice 044 556 3490 24 Hour Automated Order Service 044 556 3801 Customer Care 044 556 4240 Business Sales Division up to 400 employees 044 556 1465 Preferred Accounts Division Sales over 400 employees 044 556 3433 Large Corporate Accounts Sales over 3500 employees 044 556 3430 Public Sales government agencies educational institutions and medical institutions 044 556 1469 Global Segment Japan 044 ...

Page 141: ...l Support toll free 0800 105 Customer Service Xiamen China 34 160 910 Transaction Sales Xiamen China 29 693 115 Malaysia Penang International Access Code 00 Country Code 60 City Code 4 Website support ap dell com Technical Support Dell Precision OptiPlex and Latitude toll free 1 800 880 193 Technical Support Dimension Inspiron and Electronics and Accessories toll free 1 800 881 306 Technical Suppo...

Page 142: ...ical Support for all other Dell computers 020 674 45 00 Technical Support Fax 020 674 47 66 Home Small Business Customer Care 020 674 42 00 Relational Customer Care 020 674 4325 Home Small Business Sales 020 674 55 00 Relational Sales 020 674 50 00 Home Small Business Sales Fax 020 674 47 75 Relational Sales Fax 020 674 47 50 Switchboard 020 674 50 00 Switchboard Fax 020 674 47 50 New Zealand Inte...

Page 143: ...m Customer Service Phone 57 95 700 Customer Care 57 95 999 Sales 57 95 999 Customer Service Fax 57 95 806 Reception Desk Fax 57 95 998 Switchboard 57 95 999 Portugal International Access Code 00 Country Code 351 Website support euro dell com Technical Support 707200149 Customer Care 800 300 413 Sales 800 300 410 or 800 300 411 or 800 300 412 or 21 422 07 10 Fax 21 424 01 12 Puerto Rico General Sup...

Page 144: ...421 Website support euro dell com E mail czech_dell dell com Technical Support 02 5441 5727 Customer Care 420 22537 2707 Fax 02 5441 8328 Tech Fax 02 5441 8328 Switchboard Sales 02 5441 7585 South Africa Johannesburg International Access Code 09 091 Country Code 27 City Code 11 Website support euro dell com E mail dell_za_support dell com Gold Queue 011 709 7713 Technical Support 011 709 7710 Cust...

Page 145: ...er Care 08 590 05 642 Home Small Business Customer Care 08 587 70 527 Employee Purchase Program EPP Support 20 140 14 44 Technical Support Fax 08 590 05 594 Sales 08 590 05 185 Switzerland Geneva International Access Code 00 Country Code 41 City Code 22 Website support euro dell com E mail Tech_support_central_Europe dell com Technical Support for XPS portable computers only 0848 33 88 57 Technica...

Page 146: ... Thailand International Access Code 001 Country Code 66 Website support ap dell com Technical Support OptiPlex Latitude and Dell Precision toll free 1800 0060 07 Technical Support PowerApp PowerEdge PowerConnect and PowerVault toll free 1800 0600 09 Customer Care toll free 1800 006 007 option 7 Corporate Sales toll free 1800 006 009 Transaction Sales toll free 1800 006 006 Trinidad Tobago General ...

Page 147: ...tomer Care 01344 373 186 Home and Small Business Customer Care 0870 906 0010 Corporate Customer Care 01344 373 185 Preferred Accounts 500 5000 employees Customer Care 0870 906 0010 Central Government Customer Care 01344 373 193 Local Government Education Customer Care 01344 373 199 Health Customer Care 01344 373 194 Home and Small Business Sales 0870 907 4000 Corporate Public Sector Sales 01344 86...

Page 148: ... Employee Purchase Program EPP Customers toll free 1 800 695 8133 Printers and Projectors Support toll free 1 877 459 7298 Public government education and healthcare Customer Service and Support toll free 1 800 456 3355 Employee Purchase Program EPP Customers toll free 1 800 695 8133 Dell Sales toll free 1 800 289 3355 or toll free 1 800 879 3355 Dell Outlet Store Dell refurbished computers toll f...

Page 149: ... following Communications between the processor and peripheral devices Miscellaneous functions such as system messages bit The smallest unit of information interpreted by your system blade A module that contains a processor memory and a hard drive The modules are mounted into a chassis that includes power supplies and fans BMC Baseboard management controller boot routine A program that clears all ...

Page 150: ...cs A comprehensive set of tests for your system DIMM Dual in line memory module See also memory module DIN Deutsche Industrie Norm directory Directories help keep related files organized on a disk in a hierarchical inverted tree structure Each disk has a root directory Additional directories that branch off the root directory are called subdirectories Subdirectories may contain additional director...

Page 151: ...nd I O memory addresses for devices In text hexadecimal numbers are often followed by h headless system A system or device that functions without having a keyboard mouse or monitor attached Normally headless systems are managed over a network using an Internet browser host adapter A host adapter implements communication between the system s bus and the controller for a peripheral device Hard drive...

Page 152: ...ss Media Access Control address Your system s unique hardware number on a network mAh Milliampere hour s Mb Megabit s 1 048 576 bits MB Megabyte s 1 048 576 bytes However when referring to hard drive capacity the term is often rounded to mean 1 000 000 bytes Mbps Megabits per second MBps Megabytes per second MBR Master boot record memory address A specific location usually expressed as a hexadecim...

Page 153: ...tware written for one processor must usually be revised to run on another processor CPU is a synonym for processor protected mode An operating mode that allows operating systems to implement A memory address space of 16 MB to 4 GB Multitasking Virtual memory a method for increasing addressable memory by using the hard drive The Windows 2000 and UNIX 32 bit operating systems run in protected mode M...

Page 154: ...The amount of space used by a stripe is the same on each disk used A virtual disk may use several stripes on the same set of disks in an array See also guarding mirroring and RAID SVGA Super video graphics array VGA and SVGA are video standards for video adapters with greater resolution and color display capabilities than previous standards system board As the main circuit board the system board u...

Page 155: ...nclude memory chips in addition to your system s RAM The amount of video memory installed primarily influences the number of colors that a program can display with the appropriate video drivers and monitor capabilities video resolution Video resolution 800 x 600 for example is expressed as the number of pixels across by the number of pixels up and down To display a program at a specific graphics r...

Page 156: ...156 Glossary ...
Page 157: ...ning from the utility partition 118 see system diagnostics and Server Administrator diagnostics testing options 119 DIP switches about 121 DRAC MC module 26 61 fault indicator 27 installing 62 link activity indicator 26 link indicator 26 master slave indicator 27 removing 61 troubleshooting 109 drive carrier SATA hard drive SATA 91 E error messages 43 F fan module indicators 21 fan present indicat...

Page 158: ...ink 26 DRAC MC link activity 26 DRAC MC master slave 27 fan fault 21 fan module 21 fan present 21 Fibre Channel pass through module 32 identification 12 KVM selection 15 power supply 19 power supply fault 20 PowerConnect 5316M Ethernet switch diagnostic 30 PowerConnect 5316M Ethernet switch duplex mode 30 PowerConnect 5316M Ethernet switch speed link 30 server module power selection 14 indicators ...

Page 159: ...h diagnostic indicator 30 duplex mode indicator 30 speed link indicator 30 PowerConnect 5316M Ethernet switch module 29 R removing battery 88 DRAC MC module 61 fans 60 hard drive 90 hard drive from a drive carrier 91 KVM module 63 memory 82 network switch module 71 power supplies 58 removing continued server module components 77 server modules 73 system components 57 S safety 101 securing your sys...

Page 160: ...8 main 44 system security 49 system status features 10 T technical assistance obtaining 127 troubleshooting battery 115 damaged system 107 DRAC MC module 109 external connections 102 fans 108 hard drive 113 keyboard 103 memory 112 microprocessors 114 mouse 104 network switch module 110 power supplies 107 server module board 114 server module components 110 start up routine 101 USB devices 105 vide...

Reviews: