background image

22

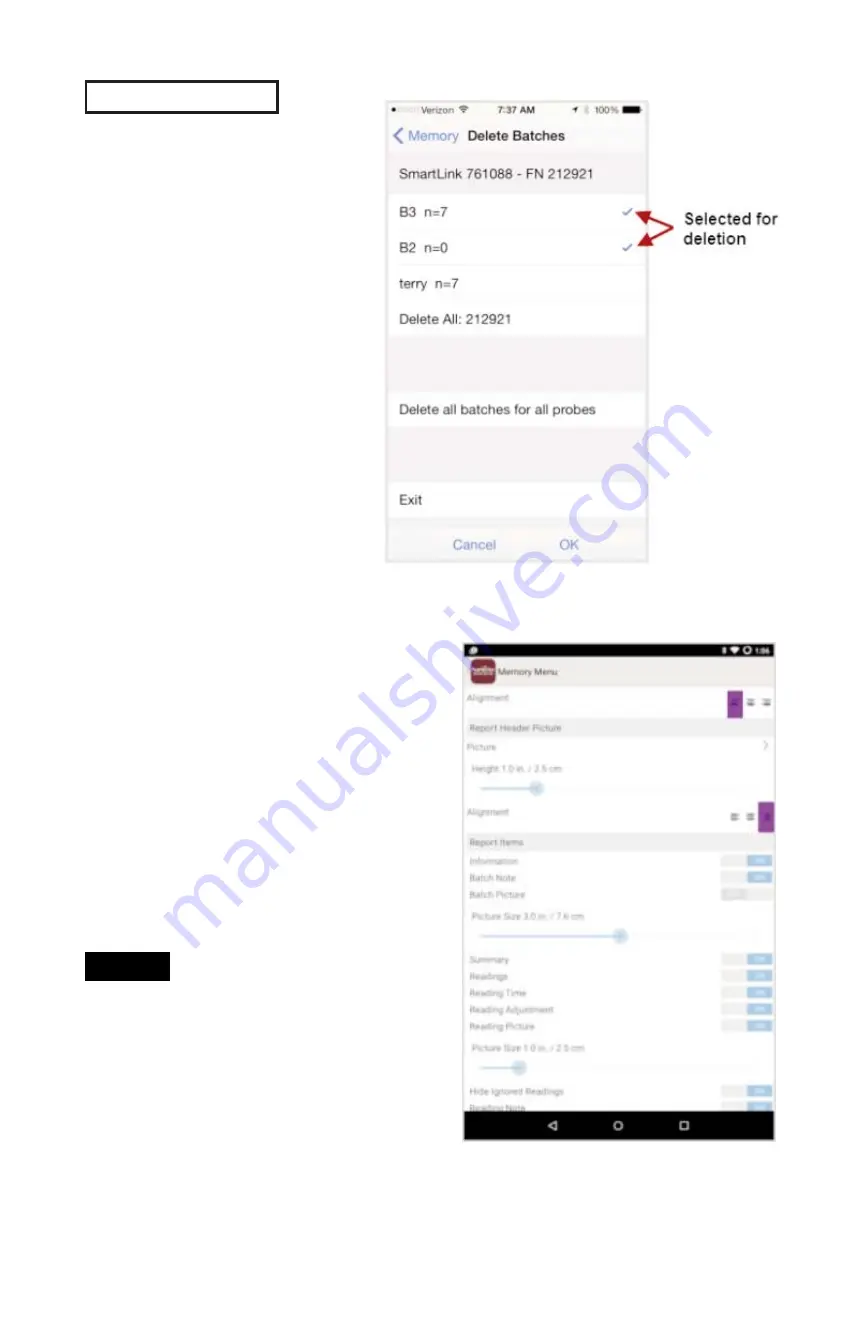
Delete

Permanently 

remove a

batch from the PosiTector
App. 

Select batches for
deletion, then select 

OK

Or select 

Delete all

batches for all probes

to

permanently 

delete all

measurement data from
the smart device
(phone/tablet).

Batch Report Configuration

Customize reports using the

Batch Report Configuration

to

include/exclude notes, images,
logo, company/report name, fonts,
alignment, image sizes and more.

Select 

Preview Report

to review

your changes.

The 

Preview Report

displays

sample batch data (not your
actual batch data).

NOTE:

Summary of Contents for POSITECTOR SMARTLINK

Page 1: ...Instruction Manual v 1 0 AndroidTM with PosiTector RTR H probe ...

Page 2: ... LED Button 8 PosiTector RTR H Probe 8 Factory Calibration 8 Certification 9 How To Measure 9 Prepare the test surface 9 Burnish the replica tape 9 Prepare the probe 10 Measure 10 Calibration and Verification of Accuracy 11 Menu Operation 12 Cal Settings Menu 13 Zero 13 Reset Current Cal 13 Tape Grade 13 Linearize mode 14 Memory Menu 15 New Batch 15 Batch Summary View 16 Tool Bar 16 Delete Ignore ...

Page 3: ...ngs View 20 Batch Chart View 20 Open 21 Close 21 Delete 22 Batch Report Configuration 22 Batch Report 23 Statistics Menu 23 Clear 23 Setup Menu 24 SmartLink Info 24 Change Units 24 SmartLink Lock 24 Reset Menu Reset LED Button Reset 25 Warranty 26 ...

Page 4: ...lection of PosiTector probes to your smart device Take full advantage of your device s keyboard microphone camera internet data connection etc to simplify and enhance your measurement inspection process PosiTector SmartLink with PosiTector 6000 probe shown The PosiTector SmartLink measurement solution consists of a PosiTector App PosiTector SmartLink device and compatible PosiTector probe In addit...

Page 5: ...ed to a 50 8 um 2 mil incompressible polyester film When compressed against a roughened surface the foam collapses and acquires an accurate impression or reverse replica of the surface It is available in a number of grades to accommodate measurements in different profile ranges Placing the compressed tape replica into the PosiTector RTR H probe gives a measure of the average maximum peak to valley...

Page 6: ...The PosiTector App connects a PosiTector SmartLink to your Smart device enabling you to use PosiTector 6000 DPM SPG or RTR H probes on your device without the need for a conventional gage body Screen fonts brightness and displayed language are inherited from your smart device settings Currently the PosiTector App has language support for English Spanish French German Chinese and Korean Screen orie...

Page 7: ...nate solid blue when successfully connected The probe model and serial number is engraved on the backside of the plastic probe connector i e RTR H 236323 4 The user interface was designed to combine the proven simplicity of PosiTector gages and the advanced functionality of a smart device s features including touch swipe keyboard camera and more The interface will be instantly recognizable to thos...

Page 8: ...out the connected PosiTector SmartLink and associated probe The example above indicates that the PosiTector SmartLink battery status is full and connected to a PosiTector RTR H probe serial number 236623 Measurement Area Displays measurement related information In the measurement screen below a reading of 70 microns has been taken in Linearize mode HL using X Coarse replica tape The probe was Zero...

Page 9: ...images notes is stored within the PosiTector App on your smart device PosiTector PosiTector SmartLink SmartLink NOTE Modes Icons and Units Displays icons for active modes such as the disk icon X for Memory mode pg 15 current calibration adjustment type X Factory and measurement units microns Carousel The carousel is displayed when more than a single view screen is present The number of dots repres...

Page 10: ...nterchanged without the need to go back to the Search screen Simply swap probes PosiTector SmartLink will power down and then power up the PosiTector SmartLink The PosiTector App will automatically recognize the probe and be ready to measure NOTE When powered up the PosiTector SmartLink automatically determines what type of probe is attached and does a self check The probe type model and serial nu...

Page 11: ...shuts off approximately 5 seconds All probe settings and calibration adjustments are retained stored measurement data is retained within the smart device Tri Color LED Button The LED visually provides connection and measurement status LED Color Status Blue Blink Not Connected to PosiTector App Blue Solid Connected to PosiTector App Green Blink Successful Reading Factory Calibration Every PosiTecto...

Page 12: ... htm How to Measure How to Measure Prepare the test surface pg 9 1 Burnish the replica tape pg 9 2 Prepare the probe pg 10 3 Measure pg 10 4 Prepare the test surface Locate a representative site for measurement Clean the surface to be tested DeFelsko recommends the use of the included putty to remove dust debris or residual blast media from the surface Firmly press the putty onto the surface using...

Page 13: ...uttons firmly until the arrows point outward Do not place anything in the measurement opening during this procedure Firmly compress replica film using the rounded end of the included stainless steel burnishing tool Apply sufficient pressure in a circular and x y rubbing motion to produce a replica with a uniform pebble grain appearance It normally takes 30 to 60 seconds to fully compress all parts...

Page 14: ...evel controlled and documented process of measuring traceable calibration standards over the full operating range of the probe and verifying that the results are within the stated accuracy of the probe Calibrations are performed by the manufacturer their authorized agent or by an accredited calibration laboratory in a controlled environment using a documented process PosiTector RTR probes ship wit...

Page 15: ...that the probe has been zeroed Place the check shim into the measurement opening The average of several readings should be within the combined tolerance of both the probe and the shim If not the probe may need to be returned to your dealer for service The check shim is specifically intended for the PosiTector RTR H The probe is designed to measure burnished replica tape within a limited measuring ...

Page 16: ...s ON Coarse X Coarse default Coarse Minus and X Coarse Plus grades are not supported in Linearize mode since the only function of these two grades is to improve upon the accuracy of Coarse tape at its low end and X Coarse tape at its high end something the PosiTector RTR H probe will automatically do when measuring HL When Linearize mode is OFF the PosiTector RTR H probe will measure all four grad...

Page 17: ...sonably accurate readings over the primary range This method is a compromise between accuracy and ease of use When the Linearize box is NOT ticked the PosiTector RTR H displays a height value of H comparable to the value an analog spring micrometer would display after the 50 8 um 2 mil of incompressible polyester substrate has been subtracted In other words it is the average of the maximum peak to...

Page 18: ...tch name using the lowest available number For example if only Batch 1 and Batch 3 exist then Batch 2 would be created and made the current batch The X icon appears and basic statistics are displayed Each measurement will be displayed and stored into this new batch On screen statistics are immediately updated with each measurement New batch names are date stamped at the time they are created When ...

Page 19: ...ool bar icons to add notes and change the batch name pg 19 add new batch pg 17 and add an image pg 18 Batch Summary View In the PosiTector RTR H memory example below the batch name is B9 and contains 5 measurements ...

Page 20: ...lso pg 20 By default Ignored Readings are not included on reports For inclusion toggle the Hide Ignored Readings within the Batch Report Configuration pg 22 Ignored Readings will display has highlighted within the readings section of the report but are excluded from the statistical summary and chart Delete Reading permanently removes the selected measurement from the current batch Cancel exits the...

Page 21: ...dataset Batch Photo Reading Photos and Image Annotations can be included in reports The photo can be resized or hidden from reports within the Memory Batch Report Configuration menu pg 22 This drawing tool is ideal for identifying a specific location or area within an image Choose from three paint brush colors Red Green or Blue Use finger or stylus to draw over the displayed image ...

Page 22: ...ch reports can be customized within the Batch Report Configuration menu pg 22 Add Notes to currently opened batch or dataset Change the batch name and add batch notes using your smart device s keyboard or dictation tools Batch names notes appear on reports Export Email CSV comma delimited comma separated text files which can easily be imported into supporting applications such as spreadsheets and ...

Page 23: ... they are taken A note and or photo can be added to each individual reading Notes and photos can be displayed in batch reports Batch Chart View Display an x y chart of measurements contained in the current batch The chart is instantly updated as measurements are taken Pinch the active region of the chart to zoom the view ...

Page 24: ... is attached to the PosiTector SmartLink Opening a batch that was not created with the currently attached probe will disconnect the PosiTector SmartLink from the PosiTector App You will still be able to add notes photos etc to the batch NOTE Close Closes the current batch and turns Memory OFF Batch measurement data is retained when a batch is closed ...

Page 25: ...y delete all measurement data from the smart device phone tablet Batch Report Configuration Customize reports using the Batch Report Configuration to include exclude notes images logo company report name fonts alignment image sizes and more Select Preview Report to review your changes The Preview Report displays sample batch data not your actual batch data NOTE ...

Page 26: ...press OK Share the report instantly via email Dropbox or other applications on your device When toggled ON the icon appears and a statistical summary is displayed Statistics Menu Statistics Menu Statistics x Deletes the last reading Press Clear or the LED button on the PosiTector SmartLink to clear statistics Clear Clears all on screen tabulations ...

Page 27: ...and close Memory SmartLink Lock Locks the PosiTector SmartLink to a smart device This prevents other PosiTector App users within range 10 m 30 ft from inadvertently connecting to a SmartLink Toggle the SmartLink Lock X within the Setup menu pg 24 to lock the PosiTector SmartLink to a smart device You will have to unlock it if you want to wirelessly connect to another smart device Setup Menu Setup ...

Page 28: ...vided PosiTector SmartLink is ON and connected to App To keep calibration settings power off the PosiTector SmartLink prior to performing this Menu Reset Settings are returned to the following Memory OFF Statistics OFF Units Microns Tape Grade X Coarse Linearize ON Report Configuration Settings restored to default With the PosiTector SmartLink powered down press and hold the LED button until it fl...

Page 29: ...mited Warranty Sole Remedy and Limited Liability and Limited Liability DeFelsko s sole warranty remedy and liability are the express limited warranty remedy and limited liability that are set forth on its website www defelsko com terms ...

Page 30: ...oration registered Other brand or product names are trademarks or registered trademarks of their respective holders Every effort has been made to ensure that the information in this manual is accurate DeFelsko is not responsible for printing or clerical errors This device complies with part 15 of the FCC Rules Operation is subject to the following two conditions 1 This device may not cause harmful...

Reviews: