- 25 - 115.6031.0
6)
Connect a source of Chlorine, Sulfur Dioxide or Ammonia gas to the Vaporizer supply piping.
DO NOT use liquid Chlorine, Sulfur Dioxide or Ammonia for leak testing since one volume of
liquid Chlorine expands to roughly 450 volumes of gas.
7)
Leave the first in-line valve closed. Quickly open and close the gas valve on the chemical
container to pressurize the first piping section.
8)
Using a half-filled nozzle bottle, check for leaks by spraying the fumes only of 26° Baume
Aqueous Ammonia (Ammonium Hydroxide), household Ammonia is not strong enough, on all
fittings of Chlorine or Sulfur Dioxide systems. Ammonia systems can be checked for leaks by
using either sulfur tapers or moist litmus test papers. Sulfur tapers, litmus papers, and
instructions for their use are available from the Ammonia supplier.
9)
A Chlorine or Sulfur Dioxide leak will produce a dense white smoke. If a leak appears, open
the isolating valve (the one in-line valve that is closed) and turn on water to the ejector. The
vacuum created will evacuate the gas from the system so that the leak can be corrected
safely. Leaks around valve stems may usually be eliminated by tightening the packing
nut(s). Leaks at non-permanent (flanged or coupling) joints may usually be eliminated
by retightening. Leaks at permanent (threaded) joints can only be eliminated by disassembly
and reassembly.
10) Test the entire piping system in sections by repeating the same procedure. Close the next
in line valve downstream, open the upstream valve. Quickly open and close the gas
valve on the chemical container to pressurize the section and test all fittings with the
appropriate method.
11) Allow the system to remain pressurized overnight after it has been tested to determine if any
additional leaks have developed. Retest all pipe joints. If no new leaks have developed,
evacuate the system using the ejector. Chemical leaks become worse with time as the
chemical attacks the metal at the leak.
3.5
Optional Water Level Control
The water level control pressure switch must be adjusted in the field prior to use. To properly set the level
switch, the water jacket must be at least 155° F as indicated on the temperature controller. The switch
should be set to close the water supply solenoid when the water level reaches the overflow vent connection
on the rear of the water jacket (midpoint on the water level indicator). The indicator switch should be set to
activate the solenoid when the water level drops to the bottom of the water level indicator.
If the purgemeter is provided, set the purgemeter to allow a dripping overflow from the overflow vent
connection with the water jacket at operating temperature.
3.6
Controller Operation (LOVE Controller)
This section provides fundamental operating procedures for the Evaporator's Temperature Controller
(Controller location on the Vaporizer is shown in Figure 1).
For a more detailed presentation of Temperature Controller operation and features, the Series 16C
Microprocessor Based Temperature Process Control Instruction Manual is provided separately as a reference
only to supplement the information provided in this instruction bulletin.
The 16C Temperature Controller is a full-function controller and has been pre-configured at the factory for
the intended operation of the Vaporizer. The temperature and alarm parameters have been arbitrarily set
and MUST be changed in accordance with the procedure described in the start-up section of this chapter.
Individual process parameter values may be set by stepping through the 16C's setup menus using the
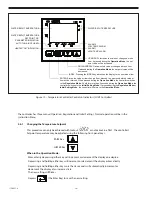
front-panel push-buttons as explained in the next section. The controller's front panel controls and
indicators are shown in Figure 10.
CAUTION
The sequences shown are the default sequences at the time of Vaporizer shipment.
Should the sequences not appear as shown, the program has become
compromised and must be corrected prior to placing the Vaporizer into service.
Summary of Contents for Capital Controls 71V3B Series
Page 1: ... 1 115 6031 0 Instruction Manual Series 71V3B Electrically Heated Vaporizer CAPITAL CONTROLS ...
Page 9: ... 9 115 6031 0 Figure 1 Sectional Diagram ...
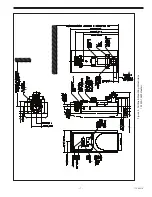
Page 17: ... 17 115 6031 0 Figure 4 Outline Mounting Dimensions 12 kW 15 kW Heaters ...
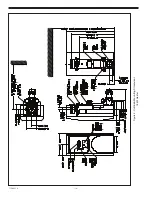
Page 18: ...115 6031 0 18 Figure 5 Outline Mounting Dimensions 18 kW Heater ...

