39
Temporarily shut down the anti-virus software or firewall.
Make sure no other devices are connected to the LAN (wired or wireless) because this may
result in IP conflicts.
3.
After trying all methods and if the problem is still not solved, the iCast 10NDI’s video streaming
server offers the fixed IP feature that allows you to establish point-to-point connection to gain
access to the device without a DHCP server. Please note that the iCast 10NDI’s default IP address
is 192.168.1.201. Follow the steps outlined below.
Restore the iCast 10NDI’s default network settings.
-
Turn off the device.
-
Push the Record and Stream buttons simultaneously while turning on the device’s
power.
-
Wait for about five seconds then release the buttons as soon as you see the RECORD
and STREAM button LEDs light up.
Connect your PC to iCast 10NDI directly using an Ethernet cable (not necessarily a crossover
cable).
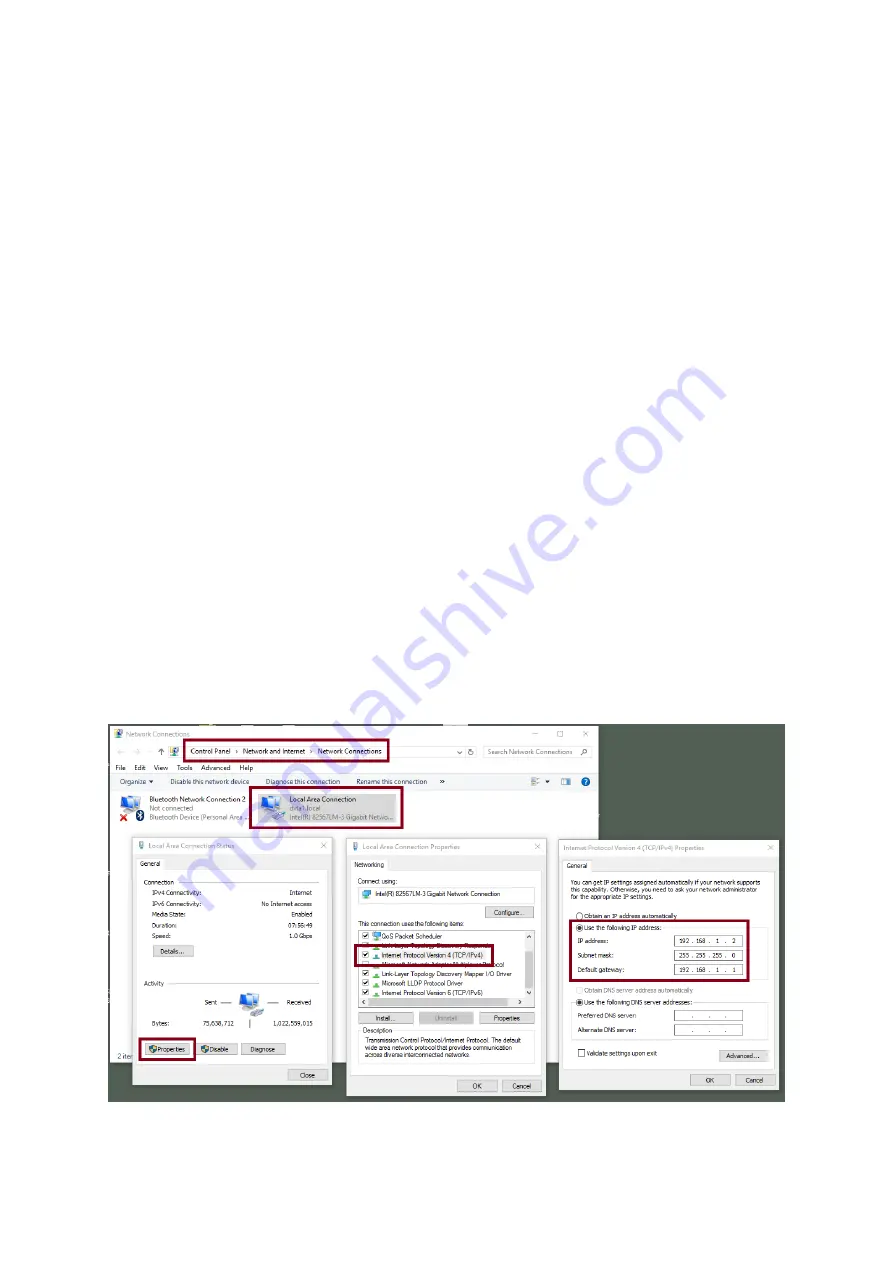
Click START located at the bottom left corner of your PC screen.
On the text bar, enter Network Connections then click the icon that appears.
Double click the network adapter that connects your PC or laptop to the iCast 10NDI.
Click the “Properties” button.
Select “Internet Protocol Version 4 (TCP/IPv4)” and click the “Properties” button.
Check “Obtain an IP address automatically”.
Enter IPv4 settings:
-
IP Address: 192.168.1.2
-
Subnet Mask: 255.255.255.0 (System default is 255.255.255.0)
-
Default Gateway: Not required for point-to-point connection.
The iCast 10NDI should now be connected with an IP address of 192.168.1.201.
Summary of Contents for iCast 10NDI
Page 1: ...1 STREAMING SWITCHER 5 CHANNEL ALL IN ONE iCast 10NDI Instruction Manual...
Page 10: ...10 1 2 System Diagram...
Page 11: ...11...
Page 73: ...73...
Page 91: ...91 Appendix 4 Dimensions All measurements in millimeters mm...
Page 94: ...94 Notes...
Page 95: ...95 Notes...


