background image

22

Control Panel

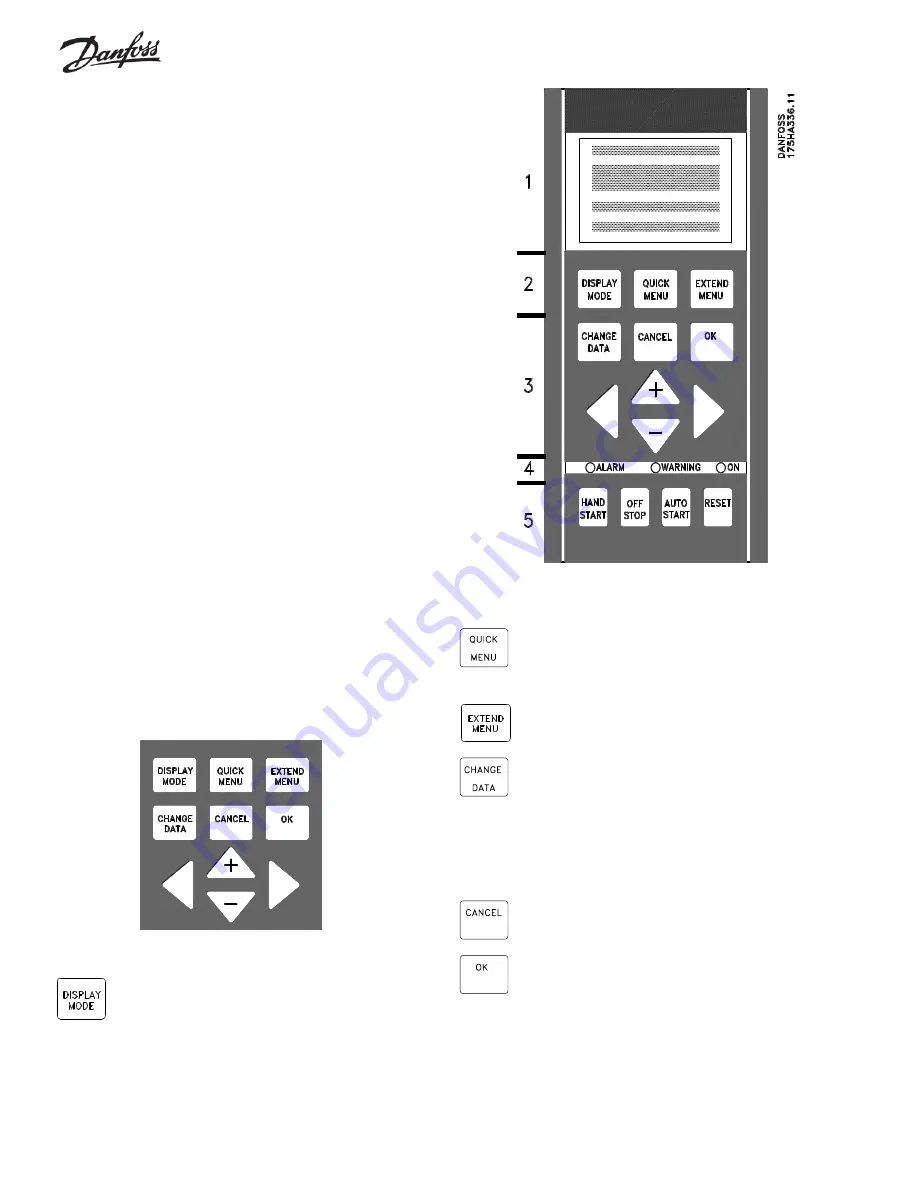
The Local Control Panel (LCP), normally mounted on the front of the
drive, is a complete interface for programming and operating the drive.
The control panel can be removed from the drive and installed up to 10
feet (3 meters) from the drive by using a remote mounting kit.

The control panel has five functions:

1.

Display

2.

Keys for changing the display

3.

Keys for changing programming parameters

4.

Keys for controlling drive operation

5.

Indicator lamps

The LCP uses a four-line, alpha-numeric, back-lit, LCD display. The
display can show four operating data values and three operating
condition values continuously. During programming, all the information
required for quick, effective parameter setup of the drive will be
displayed. As a supplement to the display, there are three indicator
lamps for power on (ON), warning (WARNING) and alarm (ALARM).

All drive parameters can be changed from the control panel, unless this
ability has been locked out by setting parameter 016, Lock for Data
Change
, to Locked, or by a digital input to terminals 16 through 33. See
the related parameters for more information.

Keys for Parameter Changes

The keys are divided into groups by function. The keys between the
display and indicator lamps are used for parameter setup, selecting the
display indication during normal operation and controlling the drive
speed during local speed control operation. The keys below the
indicator lamps are used for Start/Stop control and selection of the
operating site.

The DISPLAY MODE key is used to select the mode of
the display or to return to the Display Mode from either
the Quick Menu or the Extend Menu mode.

The QUICK MENU key gives access to the parameters
available for the Quick Menu setup. Parameters in this
menu are the 12 most important setup parameters for
the drive.

The EXTEND MENU key gives access to all parameters.

The CHANGE DATA key is used for changing the value
of a parameter selected either in the Extend Menu or
the Quick Menu mode. The desired parameter is first
selected. Then the CHANGE DATA key is pressed to
enable the editing of the parameter. The underline in the
display will move under the parameter’s value to show
that it is being edited.

The CANCEL key is used if a change of the selected
parameter is not to be carried out.

The OK key is used for confirming a change of the
parameter selected.

Summary of Contents for VLT 6002-6011

Page 1: ...1 Installation Operation and Maintenance Manual VLT 6000 Series Adjustable Frequency Drive 03 00 23 6108 00 Revision G...

Page 2: ...anel of the drive does not disconnect the equipment from the AC line and is not to be used as asafetyswitch 3 Correct protective grounding of the equipment must be estab lished The user must be protec...

Page 3: ...16 High Voltage Form C Relay 16 Control Connections 17 Electrical Installations Control Terminals 17 Typical Control Connections 18 ElectricalInstallation ControlWiring 19 DIP Switches 1 through 4 19...

Page 4: ...ck Signals in Open Loop 63 PID for Process Regulation 64 Feedback 64 Reference Set Point 64 Inverse Regulation 64 Anti Windup 64 Start upConditions 64 DifferentiatorGainLimit 65 Lowpass Filter 65 Opti...

Page 5: ...d for plenum mounting If the drive is to be mounted in the plenum allow sufficient access for servicing All normal clearance temperature and humidity limitations apply Grounding Plate VLT Type 6002 60...

Page 6: ...2 7 VLT6000J3 9 6016 3 3 9 VLT6000J6 1 6016 5 6 1 VLT6000J9 0 6016 7 9 VLT6000J11 6016 10 11 VLT6000J17 6016 15 17 VLT6000J22 6022 20 22 VLT6000J27 6027 25 27 VLT6000J32 6032 30 32 VLT6000J41 6042 40...

Page 7: ...FWH VLT6000C143 6052 200 FWX or FWH VLT6000C169 6062 250 FWX or FWH Model Number VLT Type Maximum Fuse Rating Bussman Type VLT6000H2 1 6002 6 KTS R or JJS VLT6000H3 0 6002 6 KTS R or JJS VLT6000H3 4...

Page 8: ...8 Locations of Conduit Entry Terminal Blocks and Switches NEMA 1 VLT 6002 6032 200 to 240 V VLT 6002 6062 380 to 575 V VLT 6042 6062 200 to 240 V VLT 6075 6125 380 to 460 V VLT 6150 6275 380 to 460 V...

Page 9: ...6002 6011 380 to 460 V VLT 6006 6032 200 to 240 V VLT 6016 6032 380 to 460 V VLT 6042 6062 200 to 240 V VLT 6075 6125 380 to 460 V VLT 6150 6275 380 to 460 V Locations of Conduit Entry Terminal Block...

Page 10: ...10 NEMA 1 and NEMA 12 VLT 6350 6550 380 to 460 V Locations of Conduit Entry Terminal Blocks and Switches continued...

Page 11: ...ds to the terminals identified as U V and W WARNING Connecting input power to motor terminals will result in drive failure when the power is ap plied NEMA 1 VLT 6006 6032 200 240 V VLT 6016 6062 380 5...

Page 12: ...062 380 460 V NEMA 12 VLT 6042 6062 200 240 V VLT 6075 6125 380 460 V NEMA 12 VLT 6150 6275 380 460 V Location of Input Power Mains and Output Power Motor Terminal Blocks continued Connect input power...

Page 13: ...Motor Terminal Blocks continued Connect input power to the terminals identified as L1 L2 and L3 NEMA 1 and NEMA 12 VLT 6350 6550 380 460 V withoutdisconnectorandmainsfuses NEMA 1 and NEMA 12 VLT 6350...

Page 14: ...3 4 10 H3 4 4 8 10 H4 8 8 3 10 H8 2 10 6 10 H11 14 10 H14 21 6 H21 27 6 6 H27 34 6 H34 41 6 H40 53 2 H52 64 2 H65 77 2 H77 103 1 0 H106 145 2 0 H130 174 3 0 H160 206 2x1 0 H190 256 2x1 0 H240 317 2x3...

Page 15: ...3 32 17 1 8 260 100 11 3 37 5 17 1 8 315 100 11 3 44 28 3 0 368 100 11 3 61 28 3 0 487 372 42 0 73 28 3 0 594 372 42 0 90 28 3 0 649 372 42 0 106 100 11 3 746 372 42 0 Terminal Tightening Torque Tight...

Page 16: ...12 pulse input rectifier DANGER Terminals 88 and 89 will be at approximately 150 of line voltage and remain at high volt age for up to 14 minutes after power has been removed from the drive WARNING D...

Page 17: ...the control card must be closed position on Themaximumoutputcurrentis200mA 16 33 Digital inputs R 2 kohm 5 V logical 0 10 V logical 1 See parameters 300 through 307 Digital Inputs 20 Commonfordigital...

Page 18: ...Connection Output Speed Indication 4 20 mA Switch Mode Power Supply 24 V DC 200 mA P RS 485 68 N RS 485 69 COM RS 485 61 RS 485 SW2 SW3 5 V 10 V DC 17 mA 50 10 V OUT 60 A IN 10 V DC 0 10 V DC Ref Inpu...

Page 19: ...ey are used for serial communication and the common of digital inputs 16 through 33 The switch positions shown are the factory settings Switch 1 is not used Switches 2 and 3 are used for terminating s...

Page 20: ...dance at higher frequencies which reduces the shield s effect and increases the noise produced It is generally easier and less complicated to use unshielded motor wires than shielded cables If unshiel...

Page 21: ...e will apply power to the damper motor and wait until it receives permission via the switchthatisconnectedto terminal 16 Set Parameter 300 to Run Permissive Set Parameter 302 to Start Set Parameter 30...

Page 22: ...ted parameters for more information Keys for Parameter Changes The keys are divided into groups by function The keys between the display and indicator lamps are used for parameter setup selecting the...

Page 23: ...n pressed DANGER A start signal via digital inputs may cause drive to start at any time Remove power to drive be fore working on output wiring motor or any driven equipment The RESET key is used for m...

Page 24: ...UP 1 80 0 5 08A 2 15kW AUTO REMOTE RUN 40 0Hz HAND OFF STOP RAMPING JOGGING STAND BY LOCAL SETUP 1 FREQUENCY AUTO REMOTE RUN 40 0Hz 50 0HzSETUP 1 100 7 8A 5 9kW AUTO REMOTE RUN Line 4 is the status li...

Page 25: ...he Display Mode key is pressed and held In the first line a description of the three top meters in Display Mode II is shown The other lines are unchanged When the key is released Display Mode II is ag...

Page 26: ...requency set in Quick Menu Item 4 10 207 Ramp Down Time Sets time to decelerate motor from nominal motor frequency set in Quick Menu Item 4 to 0 Hz 11 323 Relay 1 Function Sets function of high voltag...

Page 27: ...l Initialization of Parameters Itispossibletoresetnearlyallparametersbacktotheiroriginaldefault values at once To reset the drive parameters to their read only memory default values remove power from...

Page 28: ...k input and output power wiring for correct location Setting Up Drive for Motor Start Enter motor nameplate data into drive through Quick Menu 1 Parameter 101 If one motor is connected to drive set to...

Page 29: ...all parameter values to the control panel installed in the drive Insert this panel into the next drive Download all parameter values from the control unit to the second drive Repeat this procedure to...

Page 30: ...o store a backup copy of all parameters in the LCP or to copy all setups from one drive to another Description of choice Select Upload all parameters if all parameter values are to be copied from the...

Page 31: ...The value and the unit are shown in display mode whenever User Defined Readout has been selected in one of parameters 007 through 010 Display Readout Indicates default parameter Depending upon the app...

Page 32: ...nal applied to Terminal 53 The unit is selected in parameter 415 ProcessUnits Feedback 2 unit is the value of the feedback signal applied to Terminal 54 The unit is selected in parameter 415 ProcessUn...

Page 33: ...NABLE 1 Function This parameter allows disabling the Off Stop key on the keypad Description of choice If Disable is selected in this parameter the Off Stop key will be disabled CAUTION If Disable is s...

Page 34: ...ntrol is changed directly by the speed reference signal Any feedback signal applied to the drive will have no effect on the drive s speed If Closed loop is selected the internal process regulator is a...

Page 35: ...RVOLTAGE Value 200 V 200 208 V 208 220 V 220 230 V 230 240 V 240 380 V 380 400 V 400 415 V 415 440 V 440 460 V 460 480 V 480 500 V 500 575 V 575 Depends on the unit Function Set the rated motor voltag...

Page 36: ...drive and the motor select the Automatic Adaptation with LC Filter If the complete AMA procedure is desired remove the LC filter run Automatic Adaptation RUN AMA and reinstall the filter NOTE Some mot...

Page 37: ...torque is available for up to 0 5 seconds The current level is limited by the protective circuits of the drive OFF corresponds to 0 0 sec Description of choice Set the time for which high starting to...

Page 38: ...on the rated motor current Function This parameter is used for setting the DC braking current that is applied 1 When the DC brake frequency set in parameter 116 DC Brake Cut in Frequency has been rea...

Page 39: ...setup is used for each different motor CAUTION If multiple setups are used be sure to program complete motor data parameters 102 through 106 and parameter 117 in each setup This can be done manually...

Page 40: ...FREQUENCY Value 0 0 to parameter 202 0 0 HZ Function Set the minimum speed at which the motor is to run Description of choice A value from 0 0 Hz to the Output Frequency High Limit frequency set in pa...

Page 41: ...nge from Minimum Reference to Maximum Reference Select External Reference in parameters 007 through 010 Display Readout if a readout is required It is possible to have both internal preset references...

Page 42: ...ference sets the minimum value of the sum of all references If Closed loop has been selected in parameter 100 Configuration the minimum reference is limited by parameter 413 Minimum Feedback Minimum r...

Page 43: ...m the desired decel time Too long of a ramp down time can cause sluggish operation Too short of a ramp down time can cause the drive to trip off due to high DC bus voltage or cause unacceptable torque...

Page 44: ...for calculating the resulting reference is given under Calculation of Resulting Reference See the drawing under Reference Handling Example The following parameters have been set Parameter 204 Minimum...

Page 45: ...output current of the drive the drive can only handle current greater than its rated output intermittently After the load has been higher than rated output current limit it must be reduced to a level...

Page 46: ...er 221 to rated current Rated current Function If the motor current is above the limit programmed in this parameter the display shows a flashing CURRENT HIGH Description of choice The upper signal lim...

Page 47: ...he unit for the reference is Hz while in Closed Loop the unit is programmed in parameter 415 Process Units Description of choice The high reference warning must be programmed within the normal working...

Page 48: ...ht of the group of DIP switches located on the lower right of the control card just above the controlterminals When Switch 4 is in the OFF position the external 24 VDC supply is galvanically isolated...

Page 49: ...ode Reversing and Start is used for Start Stop and reversing using the same signal A start signal through terminal 18 starts the drive in the forward directrion If both terminal 18 and a reversing and...

Page 50: ...iven through the keypad or terminal 27 Data change lock is selected if changes to parameters are not to be made via the control panel It is be possible to change parameters through the serial bus Puls...

Page 51: ...ACK 2 2 2 Thermistor THERMISTOR 3 3 308 Terminal 53 Analog InputVoltage A1 V 53 FUNCT Function This parameter is used to select the required function to be linked to terminal 53 Description of choice...

Page 52: ...f accuracy voltage losses in long signal lines should be compensatedfor 312 Terminal 54 Minimum Scaling AI 54 SCALE LOW Value 0 0 to 10 0 V 0 0 V Function This parameter is used to set the signal valu...

Page 53: ...time the function selected in parameter 318 Function After Time Out will be activated This function will only be active if in parameter 309 or 312 a value has been selected for Terminals 53 and 54 Mi...

Page 54: ...11 Safety interlock SAFETY INTERLOCK 12 12 Start command active START SIGNAL APPLIED 13 13 Reversing RUNNING IN REVERSE 14 14 Thermal warning THERMAL WARNING 15 15 Hand mode active DRIVE IN HAND MODE...

Page 55: ...frequency warning level The output frequency is lower than the value set in parameter 223 Warning Low Frequency Output frequency higher than high frequency warning level The output frequency is higher...

Page 56: ...sired value for the maximum pulse frequency Indicates default parameter Depending upon the application the drive may be delivered with other parameters selected 321 Terminal 45 Output AO45FUNCTION Val...

Page 57: ...RANGE WARN 21 21 Output current lower than low current parameter 221 I OUT I LOW 22 22 Output current higher than high current parameter 222 I OUT I HIGH 23 23 Out of current range CURRENT RANGE WARN...

Page 58: ...elay 1 Function Relay 2 is a form A relay that can be used for status indications and warnings The relay is activated when the programmed condition occurs Description of choice See data choice and con...

Page 59: ...turn forward and reverse a few revolutions even with motor stopped In highly dynamic pumping processes it is recommended to disable Flying Start function 402 Flying Start FLYINGSTART Value Disable DIS...

Page 60: ...ameter 100 Configuration 403 Sleep ModeTimer SLEEP MODETIMER Value 0 to 300 seconds OFF OFF Function This parameter enables the drive to stop the motor if the load on the system is minimal The timer s...

Page 61: ...avoid possible problems at high load when using a high switching frequency it may be desirable to select Automatic Switching Frequency Modulation in parameter 408 below CAUTION Switching frequencies...

Page 62: ...t be powered To avoid overheating ex ternal power supply can be connected Contact Danfoss Graham for further information 411 Function at Drive Overtemperature FUNCT OVERTEMP Value Trip TRIP 0 Autodera...

Page 63: ...to 999 999 999 100 000 Function See the description of parameter 413 Minimum Feedback Description of choice Set the value to be shown on the display when the feedback signal is at itsmaximum 415 Units...

Page 64: ...et for the feedback signals The type of process unit for the signals is selected in parameter 415 Process Units Reference Set Point In parameter 205 Maximum Reference the maximum value of the sum of a...

Page 65: ...5 to 50 4 Parameter 425 PID Differentiation Time is only used in very fast acting systems and should be left off for most HVAC applica tions When it is used the typical value is 1 4th the value set in...

Page 66: ...r 418 Setpoint 1 will be added to the remote reference if a remote reference is used Depending on the feedback function selected in parameter 417 Feedback Function the two feedback signals will be com...

Page 67: ...d the drive will compare Feedback 1 with Feed back 2and regulate on the basis of the lower feedback value Feedback 1 Sum of parameter 537 Bus Feedback 1 and the feedback signal value of terminal 53 Fe...

Page 68: ...ases select Inverse 421 PID Anti windup PID ANTIWINDUP Value Off DISABLE 0 On ENABLE 1 Function It is possible to choose whether the PID controller integrator is to continue to sum the error signal wh...

Page 69: ...or changes the greater the response from the differentiator Used in Closed Loop parameter 100 Description of choice Fast regulation can be obtained by means of a long differentiation time If this time...

Page 70: ...on Control and Reply Packets The packet communication in a master slave system is controlled by the master The drives are the slaves A maximum of 31 VLT 6000 drives can be connected to one master unle...

Page 71: ...r themasterhascompletedthepacket theresponsetimeoftheslavebackto themasterisamaximum20 msec withaminimumpauseoftwocharacters Pausetime minimum 2 characters Responsetime minimum 2 characters Responseti...

Page 72: ...ock Process block 1 Address format 1 through 126 The byte for the 1 through 126 address range has the following profile 7 6 5 4 3 2 1 0 1 Bit 7 1 address format 1 through 126 active Bit 0 through 6 Dr...

Page 73: ...ere is no bus access to the parameter called 131 Data change is not possible because factory setup has been selected Parameter Commands Master Slave Bit no 15 14 13 12 Parameter command 0 0 0 0 No com...

Page 74: ...parameter value the PWE block contains no value If a parameter value is to be changed by the master write the new value is entered in the PWE block and sent to the slave If the slave responds to a par...

Page 75: ...to be selected in parameter 415 Process Units This value must be remembered after a power failure so it is written in EEPROM PKE E19F Hex Write to parameter 415 Process Units IND 0000 Hex PWEHIGH 000...

Page 76: ...r transmitting commands from a master PC to a slave drive Master Slave 15 14 13 12 11 10 9 8 7 6 5 4 3 2 1 0 Bit no Bit Bit 0 Bit 1 00 Preset ref lsb 01 Preset ref msb 02 DC braking 03 Coastingstop 04...

Page 77: ...meter 209 Jog Frequency Bit 09 No function Bit 09 has no function Bit 10 Data Not Valid Data Valid Used for telling the drive whether the control is to be used or ignored Bit 10 0 means that the contr...

Page 78: ...eing ramped up or down after a start or stop command Bit 08 1 means that the present motor speed equals the preset speed reference Bit 09 Local Operation Serial Communication Control Bit 09 0 means th...

Page 79: ...transmitted to the drive in the form of a 16 bit word The value is transmitted as whole numbers 0 through 32767 200 16384 4000 Hex corresponds to 100 The serial communication reference has the followi...

Page 80: ...of choice The transmission speed of the drive must be set at a value that corresponds to the transmission speed of the master Parameter 502 Baud Rate cannot be selected through serial communication i...

Page 81: ...s been selected NOTE DC braking inverse through terminals 19 and 27 and bit 03 of the control word is active when logic 0 is selected Digital Input Serial Communication Term Serial Term Serial 19 27 C...

Page 82: ...1 1 1 4 1 0 0 0 1 1 0 0 1 2 1 0 1 0 3 1 0 1 1 3 1 1 0 0 1 1 1 0 1 2 1 1 1 0 3 1 1 1 1 4 506 Reversing REVERSING Value Digital input DIGITAL INPUT 0 Serial communication SERIALPORT 1 Logic and LOGIC A...

Page 83: ...ITAL INPUT Binary 80msec 522 Terminal 53 analog input V TERMINAL 53 ANALOG INPUT Volt 20msec 523 Terminal 54 analog input V TERMINAL 54 ANALOG INPUT Volt 20msec 524 Terminal 60 analog input mA TERMINA...

Page 84: ...the trip point Digital Input parameter 521 gives the signal status of the 8 inputs 16 17 18 19 27 29 32 and 33 Input 16 corresponds to the bit to the extreme left 0 no signal 1 signal connected Termin...

Page 85: ...ates default parameter Depending upon the application the drive may be delivered with other parameters selected 560 N2 override release time N2 OVER REL TIME Value 1 65534 OFF sec OFF Function The max...

Page 86: ...mode active 00000010 Automaticmotoradaptationcompleted 00000020 Automaticmotoradaptationrunning 00000040 Reversing and start 00000080 Ramp operation 00000100 Reversing 00000200 Speed reference 000004...

Page 87: ...frequency low 04000000 AMA motor too small 08000000 AMA motor too big 10000000 AMA check par 102 103 105 20000000 AMA check par 102 104 106 40000000 Reserved 80000000 Reserved Hex Code Alarm Word 0000...

Page 88: ...of the drive The calculation is based on the mean value in kWh over one hour This value can be reset using parameter 618 Reset of kWh Counter Parameter 603 Number of Power Ups Shows the number of time...

Page 89: ...ncy LOG MOTOR FREQ Hz 0 0 through 999 9 612 Output Voltage LOG MOTORVOLT Volt 50 through 1000 613 Output Current LOG MOTOR CURR Amp 0 0 through 999 9 614 DC Link Voltage LOG DC LINK VOLT Volt 0 0 thro...

Page 90: ...al initialization 618 Reset of kWh Counter RESET KWH COUNT Value No reset DO NOT RESET 0 Reset RESET COUNTER 1 Function Reset to zero of parameter 602 kWh Counter Description of choice If Reset has be...

Page 91: ...he control card test fails the drive will display TEST FAILED Replace the control card Initialization is selected to reset the drive to its factory default settings without resetting parameters 501 Ad...

Page 92: ...provided with the drive it is better to refer to the serial number printed on the Danfoss Graham nameplate when contacting the factory about the drive Parameter 624 Nameplate Software Version Number...

Page 93: ...N Delay RELAY6 ON DELAY 704 Relay 7 ON Delay RELAY7 ON DELAY 707 Relay 8 ON Delay RELAY8 ON DELAY 710 Relay 9 ON Delay RELAY9 ON DELAY Value 0 to 600 sec 0 sec Function This parameter allows a delay o...

Page 94: ...tic Ramp Up Down is enabled The drive is attempting to avoid a trip from overvoltage by extending its decel ramp time Sleep Boost SLEEP BST The boost function in parameter 406 Boost Setpoint is enable...

Page 95: ...the Reset signal has been given Note that the motor will start after the drive has received the Reset signal Stand by STANDBY The drive is able to start the motor when a start command is received Sto...

Page 96: ...T X X 8 Undervoltage DC LINK UNDERVOLT X X 9 Inverter overloaded INVERTER TIME X X 10 Motor overloaded MOTOR TIME X X 11 Motor thermistor MOTOR THERMISTOR X X 12 Current limit CURRENT LIMIT X X 13 Ove...

Page 97: ...25 299 765 538 975 ALARM 12 SETUP 1 TRIP RESET TORQUE LIMIT Alarms If an alarm is given the present alarm number will be shown in line 2 Lines 3 and 4 of the display will offer an explanation WARNING...

Page 98: ...tch Mode Fault SWITCH MODE FAULT Fault in the switch mode power supply internal 15 V supply Contact the Danfoss Graham service department ALARM 16 Short Circuiting CURR SHORT CIRCUIT There is a short...

Page 99: ...ATES The motor shaft is rotating Make sure that the load is not able to make the motor shaft rotate while the AMA is being performed Then start AMA all over ALARM 29 Heat Sink Temperature Too High HEA...

Page 100: ...rminal 27 parameter 304 Digital Inputs has been programmed for a Safety Interlock and is a logic 0 WARNING 61 Output Frequency Low FOUT FLOW The output frequency is lower than parameter 223 Warning Lo...

Page 101: ...lculated as follows External ref Par 204 Min ref Feedback setpoint External reference x Par 211 214 Preset ref Parameter 210 Reference Type is programmed Relative Par 204 Min ref Feedback setpoint Res...

Page 102: ...Unit of Local Reference Unit of Local Reference Unit of Local Reference Unit of Local Reference OF F MAX Yes Yes 0 5 012 Hand Start on LCP Hand Start on LCP Hand Start on LCP Hand Start on LCP Hand St...

Page 103: ...ing Low Frequency Warning Low Frequency Warning Low Frequency Warning Low Frequency Warning Low Frequency 0 0 Hz 0 0 par 224 Yes Yes 1 6 224 Warning High Frequency Warning High Frequency Warning High...

Page 104: ...Voltage Voltage Voltage Voltage Voltage 312 T T T T Terminal 54 Min Scaling erminal 54 Min Scaling erminal 54 Min Scaling erminal 54 Min Scaling erminal 54 Min Scaling 0 0 V 0 0 10 0 V Yes Yes 1 5 31...

Page 105: ...at Over T Function at Over Temp emp emp emp emp TRIP Yes Yes 0 5 412 T T T T Trip Delay Over rip Delay Over rip Delay Over rip Delay Over rip Delay Overcurr curr curr curr current ent ent ent ent 60 s...

Page 106: ...igital Input Data Read out Digital Input Data Read out Digital Input No No 0 5 522 Data Read out T Data Read out T Data Read out T Data Read out T Data Read out Terminal 53 Analog Input erminal 53 Ana...

Page 107: ...ate VL Nameplate VL Nameplate VLT Or T Or T Or T Or T Ordering No dering No dering No dering No dering No No No 0 9 624 Nameplate Software Version No Nameplate Software Version No Nameplate Software V...

Page 108: ...16 36 automaticreset 59 AutomaticSwitchingFrequencyModulation 61 auxiliary enclosure 8 auxiliary relay 8 B bandwidth bypass 45 BAUDRATE 80 blocks terminal 8 9 10 boostsetpoint 61 bus DC 16 BUS FEEDBAC...

Page 109: ...2 Display Mode I 24 Display Mode II 25 Display Mode III 25 DISPLAY TEXT ARRAY 1 84 DISPLAY TEXT ARRAY 2 84 disturbances signal 5 download 30 DOWNLOAD ALL PARAM 30 DOWNLOAD SIZE INDEP 30 DRIVE TYPE 92...

Page 110: ...TERRUPTED BY USER 99 inverse regulation 64 J JOG 94 jog 50 JOG FREQUENCY 43 Johnson Controls Metasys N2 70 80 K key Extend Menu 27 29 KWH COUNTER 88 L L1 L2 and L3 11 12 13 lamp alarm 23 lamp warning...

Page 111: ...imit 40 outputfrequencylowlimit 40 output frequency range 40 outputsignal 54 OVER TEMPS 88 OVERVOLTS 88 OVERLOADDELAY 62 P parallelmotors 34 37 PARAM DB ID 92 Parameters 001 Language 29 002ActiveSetup...

Page 112: ...401AutomaticRestartTime 59 402 Flying Start 59 403 Sleep Mode Timer 60 404 Sleep Frequency 60 406BoostSetpoint 61 407 Switching Frequency 61 408 Interference Reduction Method 61 409 Function in Case...

Page 113: ...lay 6 OFF Delay 93 Parameters otherreferences Parameter 003 29 Parameter 004 29 30 Parameter 005 30 Parameter 006 30 Parameter 105 14 Parameter 117 14 Parameter 200 through 228 40 Parameter 300 throug...

Page 114: ...59 RESET RUN HOUR 90 RESONANCE DAMP 37 resonance dampening 37 resultingreference 41 REVERSING 82 reversing 49 reversing and start 49 RFI 5 20 RS 485 17 RUN AMA 36 RUN AMA WITH LC FILT 36 run permissi...

Page 115: ...VLT Type 5 65 91 VT CHARACT 34 VVC 35 W WARNING 22 WarningFunctions 46 Warning High Current 46 Warning High Feedback 47 Warning High Frequency 46 Warning High Reference 47 Warning Low Current 46 Warn...

Page 116: ...116 NOTES...

Page 117: ...117...

Page 118: ...118...

Reviews: