background image

Icon

Function

Description

Crowd Map

Click the icon and select the Enable 

checkbox. The Crowd Map page is

displayed. For details, see "5.9 Setting

Crowd Map".

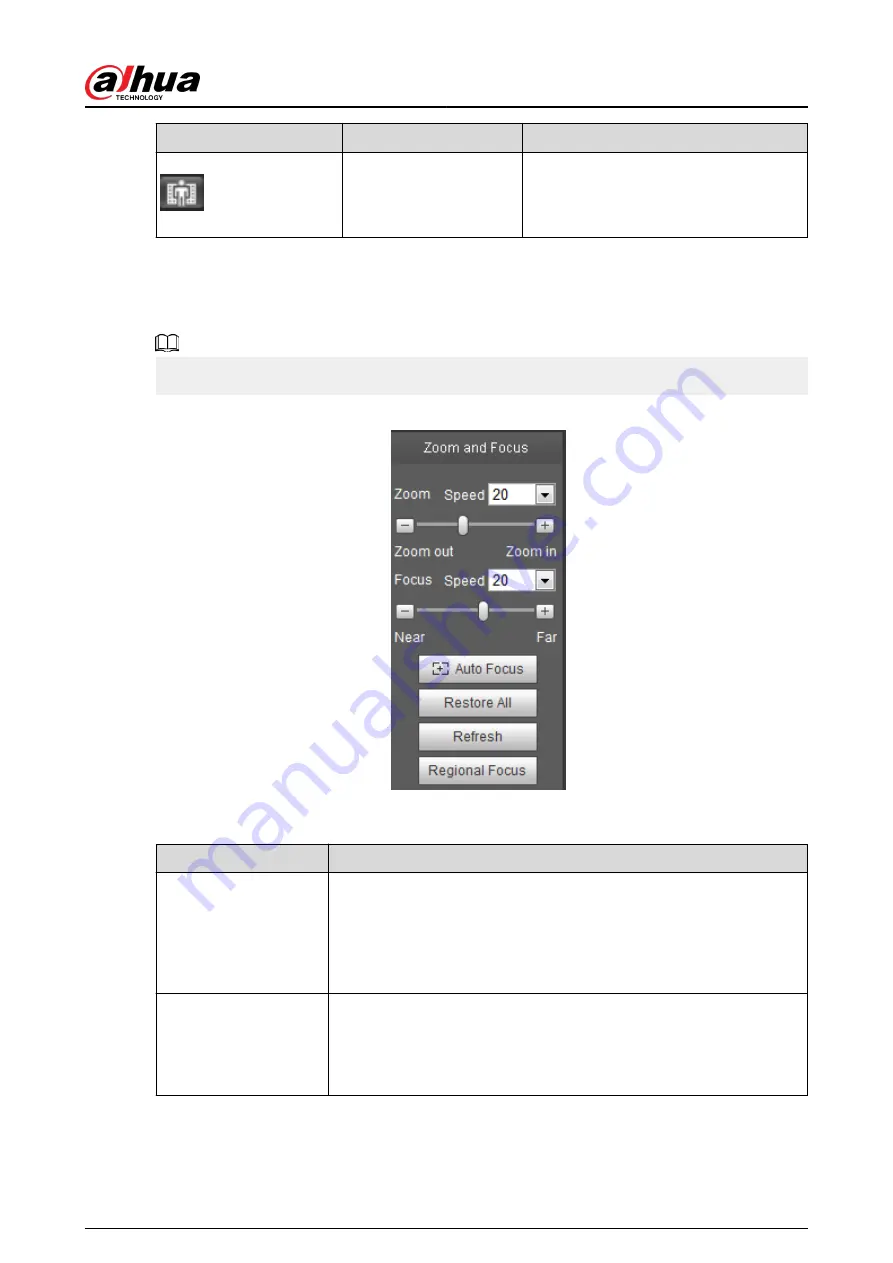
4.2.4.2  Zoom and Focus

You can adjust focal length to zoom in or out video image and the image clarity.

The focus would adjust automatically after zooming in or out.

Figure 4-5 Zoom and focus

Table 4-4 Description of zoom and focus

Parameter

Description

Zoom

Changes the focal length of the camera to zoom in or out the image.
1. Set the Speed  value. The Speed is the adjustment range in one

click. The larger the value is, the more the image would zoom in or

out in one click.

2. Click or hold  or  button, or drag the slider to adjust zoom.

Focus

Adjusts the optical back focal length to make the image clearer.
1. Set the Speed  value. The Speed is the adjustment range in one

click. The larger the value is, the more the adjustment in one click.

2. Click or hold  or  button, or drag the slider to adjust focus.

Operation Manual

17

Summary of Contents for IPC-HFW2431T-ZS-S2

Page 1: ...ZHEJIANG DAHUA VISION TECHNOLOGY CO LTD V2 1 8 Network Camera Web 3 0 Operation Manual...

Page 2: ...8 Added product material information Updated the information of illuminator Updated the language Updated the information of audio October 2023 V2 1 7 Added the information of 4G April 2023 V2 1 6 Add...

Page 3: ...Added modeling in 5 11 Setting Face Detection December 2019 V2 0 1 Added 5 5 Setting Smart Motion Detection August 2019 V2 0 0 Consolidated the outline and added baseline and safety contents and some...

Page 4: ...electronic version and the paper version All designs and software are subject to change without prior written notice Product updates might result in some differences appearing between the actual prod...

Page 5: ...the local electrical safety code and standards and check whether the power supply is correct before operating the device Please follow the electrical requirements to power the device When selecting t...

Page 6: ...gs power sockets and the point where they exit from the device Do not directly touch the photosensitive CMOS Use an air blower to clean the dust or dirt on the lens The dome cover is an optical compon...

Page 7: ...ents such as ethyl alcohol benzene diluent or abrasive detergents on the device to avoid damaging the coating and degrading the performance of the device The dome cover is an optical component When it...

Page 8: ...ive View Function Bar 12 4 2 4 Window Adjustment Bar 14 4 3 PTZ Operation 22 4 3 1 Configuring External PTZ Protocol 22 4 3 2 Configuring PTZ Function 23 4 3 3 Calling PTZ 34 4 4 Playback 37 4 4 1 Pla...

Page 9: ...1 2 Subscribing Alarm 144 5 2 Setting Smart Track 145 5 2 1 Setting Calibration Parameters for Smart Track 145 5 2 2 Enabling Alarm Track 148 5 3 Setting Panoramic Calibration 150 5 4 Setting Video De...

Page 10: ...e Density 200 5 15 Setting Stereo Analysis 203 5 15 1 Setting Rules for Stereo Analysis 203 5 15 2 Calibration Configuration 207 5 15 3 Zoom Calibration 208 5 15 4 Viewing Report 209 5 16 Setting ANPR...

Page 11: ...esetting Password 227 6 4 Backup and Default 229 6 4 1 Import Export 229 6 4 2 Default 229 6 5 Upgrade 230 6 6 Information 231 6 6 1 Version 231 6 6 2 Log 231 6 6 3 Remote Log 232 6 6 4 Online User 23...

Page 12: ...connected to PC through network switch or router Figure 1 1 General IPC network Get IP address by searching on ConfigTool and then you can start accessing IPC through network 1 3 Function Functions m...

Page 13: ...ck Switch between smart track and speed dome auto track Video Detection Motion detection video tampering detection and scene changing detection When an alarm is triggered the system performs linkages...

Page 14: ...kages such as recording alarm output sending email PTZ operation and snapshot Face Recognition After detecting face make comparison between the detected face with the face in face database and activat...

Page 15: ...hicle and vehicle and display the related information on the live page When an alarm is triggered the system links alarm output Alarm Setting The alarm is triggered when an external alarm input device...

Page 16: ...s according to network planning for the first use or during network adjustment 4 6 1 TCP IP Date time Set date and time to ensure the recording time is correct 4 8 2 Date Time Image parameters Adjust...

Page 17: ...168 1 108 by default Figure 3 1 Device initialization Step 2 Set the password for admin account Table 3 1 Description of password configuration Parameter Description Username The default username is a...

Page 18: ...r license agreement Step 4 Select the I have read and agree to all terms checkbox and then click Next Figure 3 3 Easy4ip Step 5 You can register the camera to Easy4ip select the checkbox as needed and...

Page 19: ...check for updates the system checks new version once a day automatically There will be system notice on Upgrade page and Version page if any new version is available Select Setting System Upgrade Onli...

Page 20: ...details see 3 Device Initialization When initializing the camera keep the PC IP and device IP in the same network Follow the instruction to download and install the plug in for the first login Proced...

Page 21: ...camera with multiple channels through selecting channel numbers you can set the parameters of the channels Alarm Click Alarm to subscribe and view alarm information Logout Click Logout to go to login...

Page 22: ...t stream value and image with high resolution but also requires large bandwidth This option can be used for storage and monitoring For details see 4 5 2 1 Video Sub Stream It has small bit stream valu...

Page 23: ...el image of the tracking speed dome click the icon and click or select randomly on the channel image of the tracking speed dome and then the speed dome can realize auto focus upon the selected region...

Page 24: ...Live page Only after enabling the function can you see the icon on the Live page The positions of the icon might vary depending on models Digital Zoom You can zoom in or out video image through two o...

Page 25: ...mage AF Peak The eigenvalue of image definition it displays during focus AF Max The best eigenvalue of image definition The smaller the difference between AF peak value and the AF max value the better...

Page 26: ...or lighter The default value is made by the light sensor and it is recommended Saturation adjustment Adjusts the image saturation This value does not change image brightness Original Size Click the ic...

Page 27: ...e page For details see 4 2 4 3 Fisheye Face Click the icon and the face detection or face recognition results are displayed on the Live page For face recognition see 5 10 1 Setting Face Detection For...

Page 28: ...Parameter Description Zoom Changes the focal length of the camera to zoom in or out the image 1 Set the Speed value The Speed is the adjustment range in one click The larger the value is the more the...

Page 29: ...cus on the subject of a selected area Click Regional Focus and then select an area in the image the camera performs auto focus in that area Refresh Get the latest zoom setting of the device 4 2 4 3 Fi...

Page 30: ...Figure 4 6 Fisheye Table 4 5 Description of fisheye configuration Parameter Description Installation mode Includes ceiling mount wall mount and ground mount Operation Manual 19...

Page 31: ...nd right on rectangular panoramic image screen 2P Two associated 180 rectangular image screens and at any time the two screens form a 360 panoramic image It is also called dual panoramic image You can...

Page 32: ...mount 1P 180 rectangular panoramic image screen from left to right You can drag the image in all the screens up and down to adjust the vertical view 1P 3 180 rectangular panoramic image screen three i...

Page 33: ...ockwise direction and press E to stop the rotation Scroll the mouse wheel to zoom the image Asteroid You can drag the image in upper lower left right direction Press I to display the panorama and pres...

Page 34: ...focus and location Procedure Step 1 Select Setting PTZ Settings Function Preset Figure 4 8 Preset Step 2 Set the speed and click and to adjust the parameters of direction zoom focus and iris to move...

Page 35: ...TZ settings Function Tour Figure 4 9 Tour Step 2 Click Add to add tour Double click the tour name to edit the name Step 3 Click Add to add preset Double click the duration to set the duration Step 4 S...

Page 36: ...mit to set the current position to be the left limit 2 Click Set Right Limit to set the current position to be the right limit Step 4 Click Start to start scanning Click Stop to stop scanning 4 3 2 4...

Page 37: ...us and iris according to the actual situation Step 4 Click Stop Rec to stop recording Step 5 Click Start to start patterning Step 6 Click Stop to stop patterning 4 3 2 5 Pan Enable Pan the camera can...

Page 38: ...the camera starts horizontal rotation Click Stop to stop rotation 4 3 2 6 PTZ Speed PTZ speed means the rotation speed of the PTZ camera during touring pattern or auto tracking Procedure Step 1 Select...

Page 39: ...he direction button 4 3 2 7 Idle Motion Idle motion means that the PTZ camera implements the operation which is configured in advance when it does not receive any valid command within the set time Pre...

Page 40: ...d set the idle time You need to select the corresponding number for some selected idle motions such as Preset001 Step 4 Click Save 4 3 2 8 PowerUp After setting Powerup motion the camera will perform...

Page 41: ...otion When you select Auto the system will perform the last motion that is executed for more than 20 s before power off Step 4 Click OK 4 3 2 9 PTZ Limit After setting PTZ limit the camera can only ro...

Page 42: ...up line and down line Step 3 Select the Enable check box to enable the PTZ limit function 4 3 2 10 Time Task After setting time task the camera performs the motions during the configured period Prere...

Page 43: ...tting AutoHome time the camera will resume the time task automatically Step 6 Click Period setting to set the time of the task and then click Save For setting arm time see 5 1 1 1 Setting Period Step...

Page 44: ...TZ Restart to restart PTZ 4 3 2 12 Default Be careful when doing this operation It will restore the camera to default configuration and result in data loss Procedure Step 1 Select Setting PTZ settings...

Page 45: ...4 3 3 Calling PTZ Click on Live page and the PTZ configuration panel is displayed You can control PTZ and call PTZ function 4 3 3 1 PTZ Control You can rotate device zoom image and adjust iris through...

Page 46: ...m left bottom right Click and draw a box in the image PTZ will rotate focus and quickly position the defined scene Rotate PTZ direction through joystick Select and hold and drag it to the direction th...

Page 47: ...op to stop scanning Preset Set the preset number and click Go to the camera quickly positions the corresponding preset Tour Set the tour number and click Start the camera moves in the order of the sel...

Page 48: ...nge record storage method record schedule and record control For details see 5 1 1 2 1 Setting Record Plan Before playing back picture configure snapshot time range snapshot storage method snapshot pl...

Page 49: ...lation mode during playback This function is only available on fisheye cameras Rules Info Click intelligent rules and object detection box are displayed It is enabled by default Rules Info is valid on...

Page 50: ...can see their relations in Record Type bar 5 Record Snapshot Type Select the record type or snapshot type Record type includes General Event Alarm Manual Snapshot type includes General Event Alarm 6...

Page 51: ...om the Data Src drop down list Select jpg from Record Type drop down list when playing back pictures and you do not need to select data source Figure 4 25 File type selection Step 2 Select the record...

Page 52: ...The system plays the recorded video of the selected date in the order of time Click any point in the colored area on the progress bar The playback starts from that moment Figure 4 28 Progress bar Cli...

Page 53: ...rocedure Step 1 Click the video files of the selected date are listed Step 2 Select dav or mp4 in Download Format Step 3 Click on the progress bar to select the start time of the target video and then...

Page 54: ...t the same time is not supported Operations might vary with different browsers For details of viewing or setting storage path see 4 5 2 5 Path 4 4 4 1 Downloading a Single File Procedure Step 1 Select...

Page 55: ...parameters of the camera to ensure surveillance goes properly 4 5 1 1 Conditions Configure camera parameters according to the actual situation including picture exposure backlight and white balance 4...

Page 56: ...namic effect starts or not can be determined by identifying the overexposure in the picture This gives you control over overexposure in the picture Camera with PTZ function supports zoom focus and iri...

Page 57: ...Figure 4 33 Camera conditions PTZ camera 4 5 1 1 2 Picture You can configure picture parameters as needed Procedure Step 1 Select Setting Camera Conditions Conditions Picture Operation Manual 46...

Page 58: ...re The higher the value is the more the contrast will be between bright and dark areas and the smaller the less If the value is set too big the dark area would be too dark and bright area easier to ge...

Page 59: ...icture shaking problem Optical Dejitering The lens vibration is sensed by the gyroscope sensor and the corresponding compensation is calculated using the intelligent anti shake algorithm The movable p...

Page 60: ...auto adjusting according to the ambient lighting condition If the image brightness is not enough and the shutter value has reached upper or lower limit the system adjusts gain value automatically to...

Page 61: ...frame no less than 2 frames images and reduces noise by using the frame information between previous and latter frames Grade This configuration is available only when the 3D DNR is enabled The higher...

Page 62: ...e is the brighter the dark will be but the more the noise will be There might be a few seconds of video loss when the device is switching to WDR mode from other mode HLC Enable HLC when extreme strong...

Page 63: ...h natural or artificial light to ensure color precision Manual Configure red and blue gain manually the system auto compensates WB according to color temperature Regional Custom The system compensates...

Page 64: ...you set Auto in Mode You can configure camera sensitivity when switching between color and black and white mode Delay This configuration is available only when you set Auto in Mode You can configure t...

Page 65: ...is too short the camera will focus on the dome cover Sets the shortest focus distance to avoid focusing on the dome cover You can also change the focus speed by changing focus length Sensitivity The...

Page 66: ...r limit to adjust the image Figure 4 41 Smart illumination Schedule Set different fill light modes at different times 1 Click Setting next to Period 2 Select the fill light mode and then configure the...

Page 67: ...onfigure Illumination Overexposure Remover Only some fill light modes support this function Step 5 Click Save 4 5 1 1 9 Defog The image quality is compromised in foggy or hazy environment and defog ca...

Page 68: ...tion 1P 360 rectangular panoramic image 2P When the install mode is Ceiling or Ground you can set this mode Two associated 180 rectangular image screens and at any time the two screens form a 360 pano...

Page 69: ...orrection function will only be displayed when the number of splicing sensors is 4 or less When the device enables image correction intelligent event and sub stream 2 are closed automatically 4 5 1 1...

Page 70: ...live page And the light will remain on unless you click again Schedule The light turns on as scheduled Click Settings next to Period to set the light schedule PIR Activation The light turns on only w...

Page 71: ...or Night in the Always Enable list the surveillance system works under Always Enable configuration Figure 4 49 Full time When Profile Management is set as Schedule you can drag the slide block to set...

Page 72: ...e 4 52 Splicing Step 2 Select the lenses that need to be spliced When splicing the image through selecting lenses you need to select the continuous splicing screens The screen with the icon deeper col...

Page 73: ...eters This section introduces video parameters such as video snapshot overlay ROI region of interest and path Click Default and the device is restored to default configuration Click Refresh to view th...

Page 74: ...t Rate value to the biggest value in the Reference Bit Rate Encoding Strategy Select the encoding strategy as needed General Disable smart codec Smart Codec Enable smart codec to improve video compres...

Page 75: ...it rate value VBR Variable Bit Rate The bit rate changes as monitoring scene changes The Bit Rate Type can be only be set as CBR when Encode Mode is set as MJPEG Quality This parameter can be configur...

Page 76: ...the network status 1 The default value which means that there is no layered coding 2 3 and 4 The lay number that the video stream is packed Watermark Settings You can verify the watermark to check if...

Page 77: ...ream Quality Configures the snapshot quality There are six levels of Image quality and the sixth is the best Interval Configures the snapshot frequency Select Customized and then you can configure sna...

Page 78: ...ras a Select Enable and then drag the block to the area that you need to cover You can drag 4 rectangles at most Click Remove All to delete all the area boxes select one box and then click Delete or r...

Page 79: ...ted and the block frame is displayed in the image You can edit the selected block as needed including moving the position and adjusting the size Edit the block name Double click the name in Name to ed...

Page 80: ...he channel title and you can expand 1 line at most Step 3 Move the title box to the position that you want in the image Step 4 Click Save 4 5 2 3 3 Configuring Time Title You can enable this function...

Page 81: ...Click Save 4 5 2 3 4 Configuring Text Overlay You can enable this function if you need to display text in the video image Text overlay and picture overlay cannot work at the same time and the IPC that...

Page 82: ...to expand the text overlay and you can expand 9 lines at most Step 3 Move the text box to the position that you want in the image Step 4 Click Save 4 5 2 3 5 Configuring Font Attribute You can enable...

Page 83: ...lick Save 4 5 2 3 6 Configuring Picture Overlay You can enable this function if you need to display picture information on the video image Text overlay and picture overlay cannot work at the same time...

Page 84: ...ting Camera Video Overlay Custom Overlay Figure 4 63 Custom overlay Step 2 Select the Enable check box and then select the text align Click to expand the custom overlay and you can expand 1 line at mo...

Page 85: ...is displayed in the image Such as which means 12x zoom rate North Select Enable and the north direction is displayed in the image RS485 Select Enable and it will enable RS 485 communication function T...

Page 86: ...e Step 4 Click Save 4 5 2 3 10 Configuring Structured Statistics The image displays structured statistics When the overlay function enabled during intelligent rules configuration this function is enab...

Page 87: ...Enable check box and then select the Mode to Auto or Manual Auto The GPS positions the longitude and latitude automatically Manual Enter the longitude and latitude manually Step 3 Move GPS position b...

Page 88: ...f the ranging information on live image Step 3 Click Save 4 5 2 3 13 Configuring ANPR The image displays ANPR statistics information When the overlay function enabled during intelligent rules configur...

Page 89: ...uration this function is enabled simultaneously Procedure Step 1 Select Setting Camera Video Overlay Face Statistics Figure 4 70 Face statistics Step 2 Select the Enable check box and select text alig...

Page 90: ...e quality value is the better the quality will be Click Remove All to delete all the area boxes select one box and then click Delete or right click to delete it Step 3 Click Save 4 5 2 5 Path You can...

Page 91: ...veRecord Playback Snapshot The snapshot of playback page The default path is C Users admin WebDownload PlaybackSnapshot Playback Download The downloaded video of playback page The default path is C Us...

Page 92: ...io encode mode applies to both audio and intercom The default value is recommended Sampling Frequency Sampling number per second The higher the sampling frequency is the more the sample in a second wi...

Page 93: ...ep 2 Click Add Audio File Figure 4 75 Add audio file Step 3 Configure the audio file Select Record enter the audio name in the input box and then click Record Select Upload click to select the audio f...

Page 94: ...e network Procedure Step 1 Select Setting Network TCP IP Figure 4 76 TCP IP Step 2 Configure TCP IP parameters Table 4 22 Description of TCP IP parameters Parameter Description Host Name Enter the hos...

Page 95: ...HCP and the camera acquires IP address automatically MAC Address Displays host MAC address IP Version Select IPv4 or IPv6 IP Address When you select Static in Mode enter the IP address and subnet mask...

Page 96: ...ion of configuring IP address with ARP Ping 1 Keep the camera that needs to be configured and the PC within the same local network and then get a usable IP address 2 Get the MAC address of the camera...

Page 97: ...of port parameters Parameter Description Max Connection The max number of users web client platform client or mobile phone client that can connect to the device simultaneously The value is 10 by defa...

Page 98: ...he bit stream type 0 means main stream Subtype 0 and 1 means sub stream Subtype 1 Example If you require the sub stream of channel 2 from a certain device then the URL should be rtsp admin admin ip po...

Page 99: ...era through the IP address 4 6 4 DDNS Properly configure DDNS and then the domain name on the DNS server matches your IP address and the matching relation refreshes in real time You can always visit t...

Page 100: ...main name registration is successful Username Enter the username and password that you got from the DDNS server provider You need to register an account includes username and password on the DDNS serv...

Page 101: ...or details see Table 4 26 Port The port number of the SMTP server Username The account of SMTP server Password The password of SMTP server Anonymity Select the check box and the sender s information i...

Page 102: ...x configuration Mailbox SMTP server Authenticatio n Port Description QQ smtp qq com SSL 465 The authentication type cannot be None You need to enable SMTP service in your mailbox The authentication co...

Page 103: ...ice in your mailbox Step 3 Click Save Step 4 Click Test to test whether the emails can be sent and received successfully 4 6 6 UPnP UPnP Universal Plug and Play a protocol that establishes mapping rel...

Page 104: ...enter http wide area IP address external port number and then you can visit the local area device with corresponding port 4 6 7 SNMP SNMP Simple Network Management Protocol can be used to enable soft...

Page 105: ...Figure 4 82 SNMP 1 Figure 4 83 SNMP 2 Operation Manual 94...

Page 106: ...unity string that the software agent supports You can enter number letter underline and dash to form the name Trap Address The target address of the Trap information sent by the software agent in the...

Page 107: ...a with Safari browser Bonjour is enabled by default Procedure Step 1 Select Setting Network Bonjour Figure 4 84 Bonjour Step 2 Select the Enable check box and then configure server name Step 3 Click S...

Page 108: ...n Stream 40000 Sub Stream1 40016 Sub Stream2 40032 and all the range is 1025 65500 Step 3 Click Save Results In the Live page select RTSP in Multicast and then you can view the video image with multic...

Page 109: ...S parameters Parameter Description Realtime Monitor Configure the priority of the data packets that used for network surveillance 0 for the lowest and 63 the highest Command Configure the priority of...

Page 110: ...uthorize Mode Select the authorize mode according to different carriers Dial up Number The numbers are different according to different carriers and it can be acquired from the carrier Username Acquir...

Page 111: ...ing a message the receiver can wake up the camera and connect it to 4G network through message or call Message send Set the receiver s phone number and when an alarm is triggered the system will send...

Page 112: ...5G network in a specific period Mobile configuration Configure the mobile phone to receive the linkage message When an alarm is triggered the system sends an alarm message to the receiver and then the...

Page 113: ...r Password Acquired from the carrier Interval It is the period beyond the dial up period which has been configured it is 30 s by default during which means the camera can auto connect to 5G network Af...

Page 114: ...end command message to active the camera The commands are as following On Make the camera online Off Make the camera offline Reboot Restart the camera Phone activation Set the receiver s phone number...

Page 115: ...work the status shows online The information of the IP address MAC address device name and device SN will be collected The collected information is for remote access only You can cancel Enable selecti...

Page 116: ...party platform such as Ali and YouTube to realize video live view RTMP can be configured by admin only RTMP supports the H 264 H 264 B and H 264H video formats and the AAC audio format only Procedure...

Page 117: ...e management helps to make best use of storage space 4 7 1 Setting Storage Plan Setting record plan and record control to achieve all time recording recording in specific period or alarm linked record...

Page 118: ...hedule enabled if the day is holiday the system snapshots or records as holiday schedule setting otherwise the system snapshots or records as general setting Step 4 Click Save 4 7 3 Setting Destinatio...

Page 119: ...cal SD card You can set it as read only or read write you can also hot swap and format SD card Functions might vary with different models Select Setting Storage Destination Local Click Read Only and t...

Page 120: ...the files to the internal SD card for emergency Procedure Step 1 Select Setting Storage Destination FTP Step 2 Select the Enable check box and select the FTP type You select FTP or SFPT from the drop...

Page 121: ...assword to log in to the FTP server Remote Directory The destination path in the FTP server and it is shared by default Directory Structure Set the directory structure which supports three levels at m...

Page 122: ...isplays 0000 Emergency Local Select Emergency Local and when the FTP server does not work all the files are saved to the internal SD card Step 4 Click Save Step 5 Click test to test whether FTP functi...

Page 123: ...ccount safety PTZ settings default import export remote auto maintain and upgrade 4 8 1 General You can configure device name language and video standard Procedure Step 1 Select Setting System General...

Page 124: ...are enabled the TV out will be set as Off SDI and HDCVI are available on select models Step 3 Click Save 4 8 2 Date Time You can configure date and time format time zone current time DST Daylight Savi...

Page 125: ...ze the system time according to the interval you set Interval Step 3 Click Save 4 8 3 Account Manage all the users You can add delete or modify users Users include admin added users and ONVIF users Ma...

Page 126: ...User You are admin user by default You can add users and configure different authorities Procedure Step 1 Select Setting System Account Account Username Figure 4 102 Username Step 2 Click Add User Ope...

Page 127: ...Figure 4 103 Add user operation permission Operation Manual 116...

Page 128: ...ation You cannot use existed user name Password Enter password and confirm it again The password must consist of 8 to 32 non blank characters and contain at least two types of characters among upper c...

Page 129: ...ded IP segment Enter the start address and end address of the host to be added 2 Select Validity Period Set the begin time and end time 3 Select Time Range Set the time range that allow user to log in...

Page 130: ...ange the password through entering the admin password and then the new password for the non admin account to be changed Figure 4 106 Change password through admin password login with admin account Del...

Page 131: ...iew the login authorities of the current account 4 8 3 2 Adding User Group You have two groups named admin and user by default and you can add new group delete added group or modify group authority an...

Page 132: ...Storage point configuration snapshot recording time configuration SFTP configuration and more Event YES NA Video detection settings audio detection settings alarm settings and more Network YES NA IP...

Page 133: ...dded group admin group and user group cannot be deleted Click in the row of admin group or user group to modify group memo 4 8 3 3 ONVIF User You can add delete ONVIF user and modify their passwords P...

Page 134: ...ser displays in the username list Related Operations Edit user information Click to change password group memo operation authorities and login authorities You can only change the password of the admin...

Page 135: ...ange the password through entering the admin password and then the new password for the non admin account to be changed Figure 4 112 Change password through admin password login with admin account Del...

Page 136: ...the web page This is to enhance network and data security Procedure Step 1 Select Setting System Safety System Service Figure 4 113 System service Step 2 Enable the system service according to the act...

Page 137: ...pport video decryption Mobile Push Enable this function and then the system would send the snapshot that was taken when alarm is triggered to your phone this is enabled by default Step 3 Click Save 4...

Page 138: ...pload them and then skip to Step 5 Step 3 Enter the required information and then click Create The entered IP or Domain name must be the same as the IP or domain name of the device Step 4 Click Instal...

Page 139: ...Figure 4 117 File download Step 7 Click Open Figure 4 118 Certificate information Step 8 Click Install Certificate Operation Manual 128...

Page 140: ...Figure 4 119 Certificate import wizard 1 Step 9 Click Next Figure 4 120 Certificate store Step 10 Select the storage location and click Next Operation Manual 129...

Page 141: ...it access Allowlist Only when the IP MAC of your PC in the allowlist can you access the camera Ports are the same Blocklist When the IP MAC of your PC is in the blocklist you cannot access the camera...

Page 142: ...outer MAC This section takes Network Access as an example Procedure Step 1 Select Setting System Safety Firewall Figure 4 123 Firewall Step 2 Select Network Access from Rule Type list and then select...

Page 143: ...st Device All Ports Set access ports You can select all ports or the ports in defined areas Device all ports Set all IP port in allowlist or Blocklist When selecting BlockList in Mode and All IP Addre...

Page 144: ...device Baud Rate Select the baud rate for the camera It is 9600 by default Date Bit It is 8 by default Stop Bit It is 1 by default Parity It is None by default Step 3 Click Save 4 8 5 2 External Ligh...

Page 145: ...atically Auto Mode Time When selecting Time in Auto Mode click Setting to set the arming period During the arming period the external light is on For details of arming period setting see 5 1 1 1 Setti...

Page 146: ...y 10 s Start Set the work status of the wiper Start Click Start and the wiper works as the set interval time Stop Click Stop and the wiper stops working Once Click Once and the wiper works once Stop O...

Page 147: ...tion face recognition people counting heat map video Metadata alarm and abnormality 5 1 Setting Alarm Linkage 5 1 1 Alarm Linkage When configuring alarm events select alarm linkages such as record sna...

Page 148: ...5 1 Alarm linkage 5 1 1 1 Setting Period Set arming periods The system only performs corresponding linkage action in the configured period Procedure Step 1 Click Setting next to Period Operation Manu...

Page 149: ...to set the time period of multiple days at one time You can set 6 time periods per day Step 3 Click Save 5 1 1 2 Record Linkage The system can link record channel when an alarm event occurs After ala...

Page 150: ...alarm in Method one Select a record type such as Normal and directly press and drag the left mouse button to set the time period for normal record on the timeline Method two Enter an actual time perio...

Page 151: ...the recorded video of 5 s before the alarm is triggered When an alarm or motion detection links recording and the recording is not enabled the system saves the video data within the pre event record t...

Page 152: ...configured snapshot plan the system enables or disables snapshot at corresponding time Procedure Step 1 Select Setting Storage Schedule Snapshot Figure 5 7 Snapshot Step 2 Select snapshot type and set...

Page 153: ...shot and set alarm linkage snapshot Figure 5 9 Snapshot linkage 5 1 1 4 Relay out Linkage When an alarm is triggered the system can automatically link with relay out device On the alarm event setting...

Page 154: ...he mode you need to set the flicker frequency For the camera with red and blue alarm light you can only select Flicker in Mode Duration After setting warning light duration the warning light is turned...

Page 155: ...nd external alarm function is enabled For details see 5 18 Setting Relay in Illegal Access The alarm is triggered when the number of consecutive login password error is up to the allowable number Ille...

Page 156: ...ppears When the subscribed alarm event is triggered and the Alarm page is displayed the corresponding alarm information is displayed in the alarm list at the right side of the Alarm page Select Play A...

Page 157: ...ck Step 2 Configure calibration parameters Auto calibration Select Auto in Calibration Mode and then click Start Calibration Figure 5 16 Auto calibration Manual calibration Select Manual in Calibratio...

Page 158: ...Figure 5 17 Manual calibration 1 Operation Manual 147...

Page 159: ...tion boxes to ensure the views of the speed dome and the panoramic camera as similar as possible Step 3 Click Save 5 2 2 Enabling Alarm Track Alarm Track is disabled by default Smart Track is enabled...

Page 160: ...tracks an object until the object moves out of the monitoring range when the intelligent rules of the panoramic camera trigger alarms Custom Set the auto alarm track time of the speed dome Idle Time I...

Page 161: ...PTZ camera You should calibrate the scene coordinates of Channel 1 and other channels Take Channel 2 as an example Procedure Step 1 Select Setting Event Panoramic Calibration Figure 5 20 Panoramic cal...

Page 162: ...tion Check whether there are considerable changes on the video by analyzing video images In case of any considerable change on the video such as moving object fuzzy image the system performs an alarm...

Page 163: ...Figure 5 22 Motion detection Step 2 Select the Enable check box to enable motion detection function Step 3 Set the area for motion detection 1 Click Setup next to Area Operation Manual 152...

Page 164: ...y default The red line in the waveform indicates that the Motion Detection is triggered and the green one indicates that there is no motion detection Adjust sensitivity and threshold according to the...

Page 165: ...meter Description Tamper Area When the percentage of the tampered image and the duration exceed the configured values an alarm will be triggered The tamper area is 30 and the duration is 5 s by defaul...

Page 166: ...he image and its moving speed reaches the preset sensitivity Enabling smart motion detection can avoid the alarms triggered by the environment changes and the function is enabled by default Prerequisi...

Page 167: ...hen you select Human the camera will detect human and non motorized vehicle Sensitivity Includes Low Middle and High The higher the sensitivity is the easier the alarm will be triggered Step 4 Click O...

Page 168: ...reshold The alarm is triggered when the system detects that the sound intensity exceeds the set threshold It is easier to trigger the alarm with higher sensitivity or smaller threshold Set a high thre...

Page 169: ...ection Stereo vision Heat map Stereo analysis IVS Face recognition People counting Video metadata Crowd map ANPR Vehicle density Step 2 Enable smart functions as need Different cameras support differe...

Page 170: ...t different periods for your camera Procedure Step 1 Select Setting Event Smart Plan Step 2 Enable Schedule Figure 5 28 Schedule Step 3 Click Add Plan 1 Rename the plan as needed 2 Select smart plan O...

Page 171: ...ttings 2 Configure the period In the Smart Plan list select the type as needed 3 Click Save 4 Optional Repeat step 1 4 to add more plans for different time You can set up to 6 different plans for one...

Page 172: ...10 gray levels The target should be continuously present in the image for no less than two seconds and the moving distance of the target should be larger than its width and no less than 15 pixels CIF...

Page 173: ...ular distribution as vertical rulers such as vehicle parked at roadside or road lamp poles Arrange three persons to draw at each of the three positions in the monitoring scene Horizontal ruler Select...

Page 174: ...on and Width Verification 2 Draw a straight line in the image to verify whether the rulers are correctly set In case of big difference between the estimated value and the actual one fine tune or reset...

Page 175: ...s recommended Missed alarm might increase in the scenes with dense targets frequent occlusion and people staying In scenes with complex foreground and background false alarm might be triggered for aba...

Page 176: ...ally control the PTZ during the locking time Click Unlock at lower left corner of the Rule Config page to manually unlock the PTZ and click Lock again to relock the PTZ Procedure Step 1 Select Setting...

Page 177: ...to set target filter but draw the minimum gathering area Click Draw Target to draw the minimum gathering area in the scene The alarm is triggered when the number of people in the detection area excee...

Page 178: ...s the shortest time for triggering an alarm after an object is abandoned For missing object the duration is the shortest time for triggering an alarm after an object is missing For parking detection c...

Page 179: ...al setup of crowd map 2 Set calibration area and ruler a Click Add Calibration Area and draw a calibration area in the image b Select a calibration type and enter the actual length and then click Add...

Page 180: ...al areas in the global area as needed 1 Click and then click Draw Area to draw local statistical area in global detection area You can draw up to eight local statistical areas 2 Double click the area...

Page 181: ...at triggers alarm first Detect global alarm one local alarm First turns to local area and then the crowd with highest density when there is no alarm in local area Detect global alarm multiple local al...

Page 182: ...ending emails Face Recognition When a face is detected in the area the system compares the captured face image with the information in the face database and links alarm according to the comparison res...

Page 183: ...ze click Draw Target at the right side of Target filter and then draw the target in the image Step 6 Set parameters Table 5 11 Description of face detection parameters Parameter Description OSD Select...

Page 184: ...to set the optimized time Attribute Select the Attribute check box and click to set the display of face attribute during the face detection Advanced Snapshot Angle Filter Set snapshot angle to be filt...

Page 185: ...Face Database Face database includes face picture face data and other information It also provides comparison data for the captured face pictures Procedure Step 1 Select Setting Event Face Recognition...

Page 186: ...ons register personnel and modify personnel information Arm Disarm Set the alarm time period Alarm event will be triggered only within the defined time See 5 1 1 1 Setting Period Delete Delete the sel...

Page 187: ...tion Step 3 Click Registration Figure 5 45 Registration 1 Step 4 Click Upload Picture select a face picture to be uploaded and then click Open You can manually select the area for a face After uploadi...

Page 188: ...re 5 47 Click Remove All to remove all tasks by one click Figure 5 47 Task list manually add If adding user fails the error code is displayed on the page For details see Table 5 13 For face modeling o...

Page 189: ...again 5 10 2 2 2 Batch Importing Import face pictures in batches Select this way when you need to add a large number of face pictures Prerequisites Before importing pictures in batches name face pictu...

Page 190: ...e face database that you want to set Step 3 Click Batch Registration Figure 5 48 Batch add Step 4 Click to select file path Figure 5 49 Batch import Step 5 Click Browse Figure 5 50 Imported successful...

Page 191: ...ep 2 Select the row where the face picture or the personnel information is located and then click or Figure 5 51 Face information modification Step 3 Modify face information according to the actual ne...

Page 192: ...realized The more the selected face pictures are the longer time the face modeling takes Please wait patiently During modeling some intelligent detection functions such as face recognition are not av...

Page 193: ...the modeling status is Valid in the list or is displayed on the left corner of the thumbnail it means the modeling succeeded When the modeling status is Invalid in the list or is not displayed on the...

Page 194: ...atabase and an alarm rule Face recognition succeeded When the detected face matches that in the face database the device links alarm out Face recognition failed When the detected face fails to match t...

Page 195: ...tion result 5 10 4 2 Viewing Result by Search Function View face recognition or face snapshot result Take face recognition search as an example Prerequisites You have installed a SD card in the camera...

Page 196: ...Figure 5 60 Search results face recognition Figure 5 61 MoreInfo face recognition Operation Manual 185...

Page 197: ...w next to Detect Region to draw a face detection area in the image Step 4 Optional Click Draw next to Exclude Region and then draw an area excluding face detection in the image Step 5 Optional Select...

Page 198: ...nly Snap Mode Optimized Snapshot Capture the clearest picture within the configured time after the camera detects face Recognition Priority Repeatedly compare the captured face to the faces in the arm...

Page 199: ...ace pictures captured in real time and their attribute information is displayed Click a face picture in the display area and the details are displayed Figure 5 63 Face detection result 5 12 Setting Pe...

Page 200: ...Procedure Step 1 Select Setting Event People Counting Figure 5 64 People counting Operation Manual 189...

Page 201: ...ts the people in the detection area and the duration that people stay in the area When the number of counted number of people in the detection area or the stay duration exceeds the configured value th...

Page 202: ...e Inside Number Type Stranding Alarm Select the Stranding Alarm check box and then set the stranding time when the stay duration exceeds the configured value the alarm will be triggered Stranding Time...

Page 203: ...people counting set the installation height and angle of the camera through calibration configuration Prerequisites You have set at least one rule in Setting Event People counting People Counting Pro...

Page 204: ...and the angle it forms with the ground If the height and angle are quite different from the actual situation repeat Step 2 and Step 3 5 12 3 Queuing The system counts the queue people in the detection...

Page 205: ...drawing Step 4 Set parameters Table 5 17 Description of people queuing Parameter Description Queue People No Alarm Set the queue people number for triggering the alarm and counting type When the queue...

Page 206: ...ds and alarm linkage actions For details see 5 1 1 Alarm Linkage Step 6 Click Save To view alarm information on the Alarm tab subscribe relevant alarm event For details see 5 1 2 Subscribing Alarm Res...

Page 207: ...and red means the maximum heat value Track Map Tendency statistics of moving object Start Time The start time of the report End Time The end time of the report Number of People When selecting heat ma...

Page 208: ...e diagram clearly 5 12 5 Viewing People Counting Report Generate people counting data in report form Procedure Step 1 Select Setting Event People Counting People Counting Report Figure 5 72 People cou...

Page 209: ...Data and the statistical quantity is displayed on the report Stranding Time Count the stay time select 5 s 30 s or 60 s Queue Time Count the queuing tine select 1 minute 5 minutes or 10 minutes Report...

Page 210: ...Save 5 13 2 Viewing Heat Map Report The system can export heat map data as a report Procedure Step 1 Select Setting Event Heat Map Report Figure 5 74 Heat map report Step 2 Set the start time and end...

Page 211: ...n and parking upper limit and view the counting data on the Live page Prerequisites Select Setting Event Smart Plan and then enable Vehicle Density Procedure Step 1 Select Setting Event Vehicle Densit...

Page 212: ...e system performs an alarm linkage Parking Upper Limit The system counts the vehicles in the detection area When the counted vehicle number exceeds the configured value an alarm triggered and the syst...

Page 213: ...ck Draw Target next to Pixel Counter and then press and hold the left mouse button to draw a rectangle the Pixel Counter then displays its pixel Step 6 Set arming periods and alarm linkage actions For...

Page 214: ...an and then enable Stereo Analysis Table 5 21 Description of stereo analysis function Rule Function Applicable Scene Activation Analysis Working with a recording broadcasting server the camera monitor...

Page 215: ...ection cabins People No Error vary from devices The camera can recognize the real time number of people in the detection area When the number of people exceeds the configured value an alarm will be tr...

Page 216: ...ion of stereo analysis rule Procedure Step 1 Select Setting Event Stereo Analysis Stereo Analysis Step 2 Click double click the name to modify the rule name and then select Fall Detection as Rule Type...

Page 217: ...alarm is triggered Alarm Type Duration For People Approaching Detection when the time for people approaching reaches the configured value the alarm is triggered For Fall Detection when the time of pe...

Page 218: ...Configuration To view alarm information on the Alarm tab you should subscribe relevant alarm event For details see 5 1 2 Subscribing Alarm 5 15 2 Calibration Configuration After configuring the rule...

Page 219: ...set at least one rule in Setting Event Stereo Analysis Stereo Analysis Zoom configuration is only available on recording broadcasting devices Procedure Step 1 Select Setting Event Stereo Analysis Zoo...

Page 220: ...ta and then generates a report Prerequisites You have set at least one rule in Setting Event Stereo Analysis Stereo Analysis Procedure Step 1 Select Setting Event Stereo Analysis Report Step 2 Select...

Page 221: ...r vehicles and display related attributes on the Live page 5 16 1 Scene Configuration Configure non motor vehicle detection Prerequisites Select Setting Event Smart Plan and then enable ANPR Procedure...

Page 222: ...ic Flow Statistics Select Traffic Flow Stat and the device detects the number of motor vehicles and non motor vehicles in the detection area and generates the statistical report If Traffic Flow Stat i...

Page 223: ...mation of vehicle are displayed at the right side Click the picture in the display area and the detailed information is displayed Figure 5 84 ANPR result 5 16 2 Setting Picture Overlay Set overlay of...

Page 224: ...and car logo Step 4 Click Save 5 16 3 Viewing ANPR Report Generate data of ANPR in report form Procedure Step 1 Select Setting Event ANPR Report Figure 5 86 Report Step 2 Select the report type start...

Page 225: ...the live page 5 17 1 Scene Configuration Set the detection scenes and rules including rules for people non motor vehicles and motor vehicles This section takes setting of the People Detection rules a...

Page 226: ...Parameter Description People Flow Statistics Select the People Flow Statistics check box to count the number of people in the detection area Traffic Flow Stat Select the Traffic Flow Statistics check...

Page 227: ...ne inch picture Enable Face Exposure Select the Enable Face Exposure check box to make face clearer by adjusting lens aperture and shutter Face Target Brightness Set the face target brightness and it...

Page 228: ...on motor vehicle and people and the box position This section takes the configuration of motor vehicle overlay as an example Procedure Step 1 Select Setting Event Video Metadata Picture Figure 5 90 Pi...

Page 229: ...ting Event Video Metadata Report The Report page is displayed Step 2 Select the report type start time end time and other parameters Step 3 Click Search to complete the report The statistical results...

Page 230: ...Step 4 Set arming periods and alarm linkage action For details see 5 1 1 Alarm Linkage Step 5 Click Save 5 18 2 Relay in 2 You can select the mode from Alarm and Arming Disarming Figure 5 93 Select t...

Page 231: ...NC Step 5 Click Save 5 19 Setting Abnormality Abnormality includes SD card network illegal access voltage detection and security exception Only the device with SD card has the abnormality functions i...

Page 232: ...Limit When the remaining space of SD card is less than this value the alarm is triggered Step 3 Set alarm linkage actions For details see 5 1 1 Alarm Linkage Step 4 Click Save 5 19 2 Setting Network...

Page 233: ...Event Abnormality Illegal Access Figure 5 97 Illegal access Step 2 Select the Enable check box to enable the illegal access detection function Step 3 Set Login Error If you consecutively enter a wron...

Page 234: ...indicates undervoltage and indicates overvoltage Step 3 Set alarm linkage actions For details see 5 1 1 Alarm Linkage Step 4 Click Save 5 19 5 Setting Security Exception When a hostile attack is dete...

Page 235: ...monitor attacks in real time so that attacks can be prevented timely Brute force attack of web path Generates the web serve directory and send a request through enumeration When URL false reaches the...

Page 236: ...check box next to Disarm by Period to enable the Disarm by Period function and then you can disarm by period For setting disarm period see 5 1 1 1 Setting Period This function is only valid when Disar...

Page 237: ...ime of auto reboot and auto deleting old files This function is disabled by default Procedure Step 1 Select Setting System Auto Maintain Figure 6 1 Auto maintain Step 2 Configure auto maintain paramet...

Page 238: ...Service Procedure Step 1 Open IE browser enter the IP address of the device in the address bar and press Enter Figure 6 2 Login Step 2 Click Forgot password Figure 6 3 Prompt Step 3 Click OK Clicking...

Page 239: ...se use the security code within 24 hours after you receive it Otherwise it will become invalid If you fail to use the security code for two times continuously there will be fail notice when you try to...

Page 240: ...6 6 Import Export Step 2 Click Import or Export Import Select local configuration file and click Open to import the local system configuration file to the system Export Select the storage path and cl...

Page 241: ...eds File Upgrade 1 Click Browse and then upload upgrade file 2 The upgrade file should be a bin file 3 Click Upgrade The upgrade starts Online Upgrade 1 Select the Auto check for updates check box The...

Page 242: ...h as hardware system version and web version Select Setting Information Version to view the version information 6 6 2 Log You can view and back up logs Procedure Step 1 Select Setting Information Log...

Page 243: ...d Includes file access file access error and file search Account Includes login logout adding user deleting user modifying user adding group deleting group and modifying group Safety Includes password...

Page 244: ...check box to enable remote log function Step 3 Set address port and device number Step 4 Click Save 6 6 4 Online User View all the current users logging in to web Select Setting Information Online Us...

Page 245: ...nt software Nice to have recommendations to improve your device network security 1 Physical Protection We suggest that you perform physical protection to device especially storage devices For example...

Page 246: ...users regularly to see if the device is logged in without authorization Check device log By viewing the logs you can know the IP addresses that were used to log in to your devices and their key opera...

Page 247: ......

Reviews: