5. DIRECTIONS FOR DISASSEMBLY AND ADJUSTMENT
12
DIRECTIONS
Gear Mechanism Ass y Replacement
BEFORE ATTEMPTING TO SERVICE OR ADJUST ANY PART OF THE WASHING MACHINE, DISCONNECT
THE POWER CORD FROM THE ELECTRIC OUTLET.
Warning
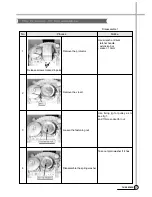
1
Raise the top plate on the outer cabinet.
2
Loosen four screws mounting outer tub cover and
remove outer tub cover from the tub ass’y.
4
Loosen the pulsator agitator mounting screw and
remove the pulsator agitator.
3
Remove the cap agitator and filter lint from the pulsator
agitator ass’y by using screw driver
5
Remove the special nut by using “T” type box wrentch.
6
Remove the special washer.
Summary of Contents for DWF-200AS
Page 1: ...Service Manual Model DWF 200AS Auto Washer S M No WF200AS001 Oct 2003...
Page 29: ...APPENDIX 28 WIRING DIAGRAM Wiring Diagram Pump Non Bubble Multi Valve 110 127...
Page 30: ...29 WIRING DIAGRAM Wiring Diagram Pump Non Bubble Multi Valve 110 127...
Page 31: ...30 WIRING DIAGRAM Wiring Diagram Non Pump Non Bubble 220 240...
Page 32: ...31 WIRING DIAGRAM Wiring Diagram Pump Bubble Multi Valve 220 240...
Page 33: ...PARTS DIAGRAM 32 PARTS DIAGRAM...
Page 34: ...33 PARTS DIAGRAM...
Page 35: ...34 PARTS DIAGRAM...
Page 36: ...35 PARTS DIAGRAM...


