17
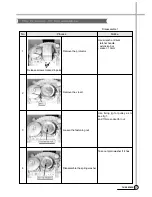
THE REPAIR
No.
Process
Notice
Disassemble 1
1
2
3
4
Release screws marked 4-point
Remove the protector
Remove the v-belt
Loosen the fastening nut
Disassemble the spring washer
Use wrench or driver
- ratchet handle
- extension bar
- socket : 10mm
Use fixing jig for pulley as to
see fig 1.
and 17mm-socket for nut
Take out plain washer if it has
The Process Of Disassemble
Summary of Contents for DWF-200AS
Page 1: ...Service Manual Model DWF 200AS Auto Washer S M No WF200AS001 Oct 2003...
Page 29: ...APPENDIX 28 WIRING DIAGRAM Wiring Diagram Pump Non Bubble Multi Valve 110 127...
Page 30: ...29 WIRING DIAGRAM Wiring Diagram Pump Non Bubble Multi Valve 110 127...
Page 31: ...30 WIRING DIAGRAM Wiring Diagram Non Pump Non Bubble 220 240...
Page 32: ...31 WIRING DIAGRAM Wiring Diagram Pump Bubble Multi Valve 220 240...
Page 33: ...PARTS DIAGRAM 32 PARTS DIAGRAM...
Page 34: ...33 PARTS DIAGRAM...
Page 35: ...34 PARTS DIAGRAM...
Page 36: ...35 PARTS DIAGRAM...


