13
DIRECTIONS
To assemble the gear mechanism ass’y, reverse the disassembly procedure.
NOTES
7
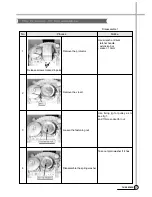
Remove the tub i assy.
q
Remove four special bolt of gear mechanism assy by
using a box wrentch.
8
Lay the front of the washer on the floor.
9
Remove four special bolts of gear protect by using a box
wrentch and remove gear protect.
0
Remove the V-belt.
w
Pull out the gear mechanism assy.
Summary of Contents for DWF-200AS
Page 1: ...Service Manual Model DWF 200AS Auto Washer S M No WF200AS001 Oct 2003...
Page 29: ...APPENDIX 28 WIRING DIAGRAM Wiring Diagram Pump Non Bubble Multi Valve 110 127...
Page 30: ...29 WIRING DIAGRAM Wiring Diagram Pump Non Bubble Multi Valve 110 127...
Page 31: ...30 WIRING DIAGRAM Wiring Diagram Non Pump Non Bubble 220 240...
Page 32: ...31 WIRING DIAGRAM Wiring Diagram Pump Bubble Multi Valve 220 240...
Page 33: ...PARTS DIAGRAM 32 PARTS DIAGRAM...
Page 34: ...33 PARTS DIAGRAM...
Page 35: ...34 PARTS DIAGRAM...
Page 36: ...35 PARTS DIAGRAM...


