background image

12


WARNING

•  To avoid personal injury, unplug the range, turn off all controls, and 

ensure all parts are cool before cleaning.

•  To avoid dangerous fumes and property damage, clean only the 

parts listed in this manual in the manner specified:


-

Do not use abrasive/corrosive cleaners or applicators (e.g., steel 

wool, scouring pads) unless instructed to do so. Scrub with a 

sponge, soft cloth, fibrous/plastic brush, or nylon cleaning pad.


-

Do not steam-clean the range. The electrical circuitry could be 

damaged. 

•  Having repositioned the range after cleaning, shine a flashlight below 

to verify that the anti-tip foot engages the anti-tip bracket.

Using Self-Clean Mode

•  This mode eliminates manual scrubbing. The oven functions 

better, and produces less smoke and odor when it is clean.

•  The oven door locks automatically during self-cleaning and 

cool-down.

•  Self-cleaning lasts about 21/2 hours.
•  Popping sounds are normal during self-cleaning; some smoke 

is normal during the first few self-cleaning cycles.

•  If power fails during self-cleaning, the oven door remains 

locked; self-cleaning resumes when power is restored.

•  The light and convection fan switches are inactive when the 

door is locked. 


WARNING

•  Wipe up residue with a damp cloth before self-cleaning.

•  Do not touch range surfaces during/immediately after self-cleaning.

•  Remove all foreign items (including oven racks) during self-cleaning. 

1.  Remove the racks, convection filter, and any other foreign 

items from the oven.

2.  Clean soil from the porcelain surfaces outside the door gasket, 

rinse with a vinegar-water solution, and wipe dry. (Heavily 

soiled areas may be cleaned with a plastic scouring pad.)

3.  Dab the door gasket with a solution of water and mild soap.


WARNING

•  Clean the gasket very gently. Any damage may compromise the 

seal needed for proper function.

•  Do not try to force the door open during self-cleaning.

4.  Keep the kitchen well ventilated and the oven door shut.
5.  Push-turn the oven-control knob to 

CLEAN

.


-

The knob lights, indicating self-cleaning is active.


-

The oven door locks itself within 20 seconds. Locking keeps 

the door from being opened, preventing possible burn inju-

ries due to high oven temperatures.

To stop self-cleaning manually, turn off the oven. When self-

cleaning is complete:
•  the door unlocks when oven temp reaches 600°F (315°C). When 

opening the door, stand aside to let hot air escape safely.

•  Turn the oven off, or self-cleaning will restart when you close 

the oven door.

•  Usually, powdery ash remains on the oven floor. When the oven 

cools fully, wipe the ash up with a damp cloth or sponge.

•  Before using the oven, reinstall the convection filter and oven 

racks.

General Cleaning

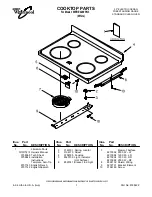
Cleaning the Cooktop

For best results, clean the cooktop after every use. Wipe up spills 

as soon as surfaces cool. Spills that dry on burner parts are hard to 

remove. Certain foods (e.g., tomatoes, citrus juices, vinegar, alco-

hol, milk) can mar the finishes if they remain for any length of time.

IMPORTANT:

 The grates are exposed to very high temperatures 

and the weight of cookware. Parts are occasionally exposed to 

acidic food. These conditions discolor the porcelain-enamel parts 

over time. Careful maintenance slows the aging process.
All cooktop cleaning begins by unplugging the range and waiting 

until all surfaces are cool to the touch.

Cleaning the Grates and Spill Tray

IMPORTANT:

 The cleaners listed below are for the grates and spill 

tray ONLY.

•  For everyday cleaning, use a soft cloth or non-abrasive pad with 

warm, soapy water.

•  Tough stains may be removed by applying such full-strength 

sprays as Simple Green™, Ajax™ All-Purpose Cleaner, or For-

mula 409™. To minimize wear, use the mildest cleaner needed 

for the job.

•  For very stubborn stains, use a mildly abrasive cleaner or appli-

cator (e.g., Soft Scrub™, Bon Ami™, S.O.S.

®

, or other soap-filled 

steel-wool pads). 

Use these cleaners very carefully and only 

occasionally

; otherwise, they will damage the finish. 

Dacor is 

not responsible for finish damage from abrasive cleaners

.

Care and Cleaning

Summary of Contents for Professional HGR30PSLPH

Page 1: ...712 Rev E Model HGR30PS Table of Contents Important Safety Instructions 1 Consignes de S curit Importantes 3 Getting to Know the Range 5 Operating the Range 7 Care and Cleaning 12 Troubleshooting 15 W...

Page 2: ...ves suggestions and remedies that may pre empt a call for service Valuable customerinput helps us continually improve ourproducts and services so feel free to contact ourCustomerAssurance Team forassi...

Page 3: ...th WARNING Hazards unsafe practices that COULD cause severe injury or death CAUTION Hazards unsafe practices that COULD cause minor injury or property damage WARNING Follow exactly the directions in t...

Page 4: ...are of the proper size material construction and easily manageable weight Cookware must be large enough to contain the food without spilling over Choose pans with solid easy to hold handles that will...

Page 5: ...robl mes ou de situations que vous ne comprenez pas Symboles de s curit et tiquettes DANGER Dangers imm diats qui entra neront des blessures graves ou la mort ATTENTION Dangers ou pratiques dangereuse...

Page 6: ...s le four et la surface de cuisson et peut provoquer un empoisonnement au monoxyde de carbone ou un incendie La batterie de cuisine doit avoir une taille un mat riau et une construction appropri s pou...

Page 7: ...nding Illumina knob illuminates when a burneris on The centerknob operates the oven TRIM RINGS These surround each knob keeping liquids away from internal parts Burner Locations and Cooktop Features A...

Page 8: ...heat of the self cleaning cycle H Oven Control Knob Controls Bake E and Broil B burners and self clean mode illuminates to show the oven is on I Oven ON Indicator Illuminates when the oven is on cycl...

Page 9: ...imples formed into the spill tray rim Operating the Range SimmerSearBurnerAssembly left front burneronly Standard BurnerAssembly left rear right rear right front burners STEP1 Install burner head Put...

Page 10: ...burners Food cooks as quickly at a gentle boil as at a rolling boil which wastes energy and cooks out moisture flavor and nutrients Use a low medium flame with poor heat conducting cookware e g glass...

Page 11: ...Self Clean mode Mode Description Bake Provides conventional heat via a burnerin the oven floor Temperatures may be set from 200 500 F Use this mode forsingle rack baking Convection Bake Uses the botto...

Page 12: ...eriors Some recipes especially homemade may need adjusting and testing when converting from standard to convection mode First prepare a dish in bake mode then follow the convection guidelines If the r...

Page 13: ...pe directions Tips Multi Rack Baking Standard Bake mode is best formulti rack baking Pizza cake cookies biscuits muffins rolls and frozen conve nience foods can be prepared on two orthree racks at onc...

Page 14: ...l ventilated and the oven doorshut 5 Push turn the oven control knob to CLEAN The knob lights indicating self cleaning is active The oven doorlocks itself within 20 seconds Locking keeps the doorfrom...

Page 15: ...3 Clean the burnerrings with window cleanerorrubbing alcohol and a plastic bristle brush orfirm toothbrush 4 Clean the burnercaps with a solution of mild detergent and hot water 5 Rinse all parts in...

Page 16: ...inside rim with the light socket and gently press the lens into place 6 Replace the rack support and racks and plug in the range Care and Cleaning 2 Soak the filterin hot soapywater then rinse and dr...

Page 17: ...Range Power supply polarity reversed orimproperly grounded Have a licensed electrician check the electrical outlet Orange glow on oven ceil ing during broiling Normal operation Broil burnerigniterglo...

Page 18: ...uring defect Dacorwill furnish a new part FOB factory to replace the defective part All delivery installation laborcosts and otherservice fees are the pur chaser s responsibility Warranty and Service...

Page 19: ...RANTY PROCESSING DEPT PO BOX 90070 CITY OF INDUSTRY CA 91715 9907 NO POSTAGE NECESSARY IF MAILED IN THE UNITED STATES BUSINESS REPLY MAIL FIRST CLASS MAIL CITY OF INDUSTRY CA PERMIT NO 1600 POSTAGE WI...

Page 20: ...what purpose was the product purchased A Replacement only C New Home B Part of a Remodel D Other 4 What is yourhousehold income A Under 75 000 D 150 000 200 000 B 75 000 100 000 E 200 000 250 000 C 10...

Reviews: