background image

13

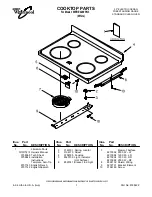
Rear Trim Piece Installation

(Model DR30GIS/DR30GIFS only)

For self-rimming installations, with or without a raised vent, 

install the included 1 inch deep rear trim piece to overhang 

the countertop/raised vent in back. Use the two (2) 

included #8 x 1/4 screws. 

IMPORTANT:

 If you are installing 

a raised vent and the trim piece included with the range 

is not 1 inch deep, you have a revision A range and must 

order the appropriate trim kit (see notes on page 8).

Installing a Raised Vent (Optional)

Install the ERV3015 raised vent before final installation of 

the range. See the installation instructions included with 

the raised vent. If you are installing the raised vent with a 

range with a serial number that starts with “FA” in a cabinet 

that is 24 to 24 1/4 inches deep, you must install the 

optional  

3 1/2 inch side panels and 1 inch deep trim piece included 

in kit (PN ADTK30GSR24).

IMPORTANT:

 The raised vent attaches to the back portion 

of the raised vent/range cutout. It is self-supporting in the 

cutout and does not actually attach to the range itself.

Adjust the Range Height

1.  For stand alone configurations, raise the range until 

the top of the trim around the cooktop is at least 

the same height as the countertop. For self-rimming 

configurations, raise the range until the bottom of 

the trim surrounding the cooktop is even with the 

countertop. To adjust the height, turn the foot on the 

bottom of each leg as shown below.

2.  Use a level to make sure that the range does not tilt 

front to back or side to side. Re-adjust the legs as 

necessary. 

up

down

Gas Connection

 WARNING

• 

Make sure the gas is turned off at the gas supply 

valve before connecting the gas line.

• 

Verify that the gas supply meets specifications before 

connection. See page 5.

• 

Do not apply excessive pressure when tightening gas 

connections and fittings.

• 

Do not use Teflon tape or plumber’s putty on flexible 

gas line connections.

• 

Test the gas lines for leaks as instructed before use. 

If a leak is detected, open all doors and windows and 

allow the gas to dissipate before fixing the leak and 

testing the unit.

• 

Do not use a flame to check for leaks.

• 

The maximum gas supply pressure to the regulator 

must never exceed 1/2 pounds per square inch (psi) 

or 3.5 kPa.

• 

The range and its individual shutoff valve must be 

disconnected from the gas supply piping system 

during any pressure testing of that system at test 

pressures in excess of 1/2 psi (3.5 kPa).

• 

The range must be isolated from the gas supply piping 

system by closing its individual manual shutoff valve 

during any pressure testing of the gas supply piping 

system at test pressures equal to or less than 1/2 psi 

(3.5 kPa).

• 

For LP gas installations, the LP gas tank must have its 

own high-pressure regulator in addition to the pressure 

regulator installed on the range.

IMPORTANT:

 The installed gas pressure regulator is pre-

set at the factory for the type of gas to be used with the 

range. Verify that the range is compatible with the type of 

gas available by checking the product data label affixed to 

the range. Ranges intended for use with LP gases have 

“LP” as a part of the model number. Consult your dealer if 

the range is not compatible with your gas supply.
1.  Make sure the gas supply valve is in the off position 

and the range power cord is disconnected.

2.  Connect a flexible gas supply line to the gas shut-off 

valve previously installed on the stub out. The gas 

line needs to be long enough to allow the range to be 

pulled out for service.

3.  Connect the gas line to the regulator on the back of the 

range (see page 5 for location).

4.  Turn all cooktop control valves to the 

“OFF”

 position.

5.  Turn on the gas supply valve and check 

all lines and connections for leaks using a 

soap and water solution or an electronic 

gas leak detector.

6.  Turn the gas supply off.

“OFF” 

symbol on 

knob

Installation Instructions

Summary of Contents for DR30GIS

Page 1: ...ive 30 Inch Gas Range Part No 105908 Rev B THIS APPLIANCE HAS BEEN TESTED IN ACCORDANCE WITH THE LATEST EDITION OF ANSI Z21 1a 2011 STANDARD FOR HOUSEHOLD GAS COOKING APPLIANCES For use with models DR...

Page 2: ...change without notice Dacor assumes no liability for changes to specifications 2012 Dacor all rights reserved Product data label view through right side of grate with flashlight Model Identification...

Page 3: ...om a neighbor s phone Follow the gas supplier s instructions If you cannot reach your gas supplier call the fire department Installation and service must be performed by a qualified installer service...

Page 4: ...a home appliance as outlined in the literature accompanying it This range is not intended for commercial use DO NOT TOUCH THE SURFACES OF THE OVEN OR COOKTOP DURING OR IMMEDIATELY AFTER USE Do not cl...

Page 5: ...EVENT OF A RANGE TOP GREASE FIRE a SMOTHER FLAMES with a close fitting lid cookie sheet or metal tray then turn off the burner BE CAREFUL TO PREVENT BURNS If the flames do not go out immediately EVAC...

Page 6: ...rt Number Description Compatibility AER30GLBG Low profile 1 3 4 inch Standard on models DR30GIS DR30GIFS Optional on models DR30GS DR30GFS AERB30G03 3 Inch Optional on models DR30GS DR30GFS NOT compat...

Page 7: ...the product data label see inside cover for location The Electrical Supply Requirements provided below are for reference Electrical Circuit Required Total Connected Load 120 Vac 60 Hz 15 Amp 0 5 kW 4...

Page 8: ...be sealed Cabinet Layout Note 2 B A Back wall immediately behind range6 Top of finished counter 13 33 0 cm max 4 14 35 6 cm min 4 C Suggested location of utilities3 Note 5 Note 1 A B C 30 minimum 76...

Page 9: ...ce Notch countertop to width of cabinets 3 4 min 1 9 cm countertop overhang 10 min 25 4 cm to any combustibles above counter both sides 21 1 8 53 7 cm to 24 1 8 61 3 cm 20 7 8 53 0 cm 25 3 4 65 4 cm m...

Page 10: ...et opening below countertop below countertop Cabinet face Notch countertop overhang to width of cabinets 3 8 9 5 mm min countertop overhang 3 7 6 cm 10 min 25 4 cm to any combustibles above counter bo...

Page 11: ...anual Stainless steel cleaner 1 dual burner ring 1 outer dual burner cap 1 inner dual burner cap 3 standard burner caps 2 large 1 small 3 standard burner rings 2 large 1 small 2 oven racks Installatio...

Page 12: ...rs when attaching to a wood sub floor 1 Determine the location of the range center line and front panel when the range is in its final position based on the Product Dimensions on page 4 and the actual...

Page 13: ...will support wall installation of the anti tip bracket If you do not contact the base plate or you contact metal stud mounting materials the wall mounting method may not be used and the floor mounting...

Page 14: ...ions Door Removal Remove the door to make the range easier to move during the installation process WARNING Do not attempt to disengage the hinge catches with the door removed from the oven The hinge s...

Page 15: ...ttings Do not use Teflon tape or plumber s putty on flexible gas line connections Test the gas lines for leaks as instructed before use If a leak is detected open all doors and windows and allow the g...

Page 16: ...sure that the notch on the bottom of each hinge rests on top of the lower lip of each hinge receptacle before attempting to open the oven door Rotate the hinge locks toward the front of the range imm...

Page 17: ...stall dual burner ring on dual burner base Line up indentations on bottom of burner ring with pins on top of burner base STEP 1 Install standard burner rings on standard burner bases Put holes on edge...

Page 18: ...ure the knobs light when in the HIGH position 6 After testing all the cooktop burners turn them all off 7 Open the oven door Test the oven light by turning on the light switch on the right side of the...

Page 19: ...grounded three prong electrical outlet that has been installed by a licensed electrician according to these instructions and in accordance with all applicable electrical codes See pages 5 and 16 Is th...

Page 20: ...18 Notes...

Page 21: ...19 Notes...

Page 22: ...20 Notes...

Page 23: ......

Page 24: ...Dacor 14425 Clark Avenue City of Industry CA 91745 Phone 800 793 0093 Fax 626 403 3130 www dacor com...

Reviews: