Cygnus UW-TSR Operation Manual
M4-CYG1UW-TSR-M-ENG_Iss11.docx
62
11.
Calibrating the Gauge
The Gauge is supplied tested and calibrated. The Gauge will have
been calibrated to measure thickness through steel (grade
S355JO).
Either a 15mm or ½
”
test block is supplied with the kit so the
Gauge can be quickly checked for correct operation. Note, this test
block is not intended to be used for calibration of the Gauge and
may not indicate an exact 15.00 mm.
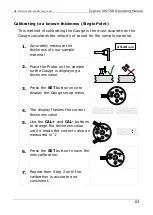
The best way to calibrate the Gauge is to calibrate using a
Known Thickness sample of the material you intend to
measure. This method determines the velocity of sound for
the material sample, which will always be more accurate than
using a ‘general’ velocity value.
For calibration instructions
see page 63.
If there is no test sample available the Gauge can be calibrated by
setting the Velocity of Sound directly. A table on page 80 at the
back of this manual lists common materials and their velocity of
sound value. For calibration instructions see page 64.
A third method is to leave the Gauge set to its factory-preset value
for Steel [5920 m/s or 0.2332 in/us], and then use a Conversion
Factor from the table of velocities on page 80.


