2.5.2 Synchronizing a Ndgio5G and an HPTDC8-PCI
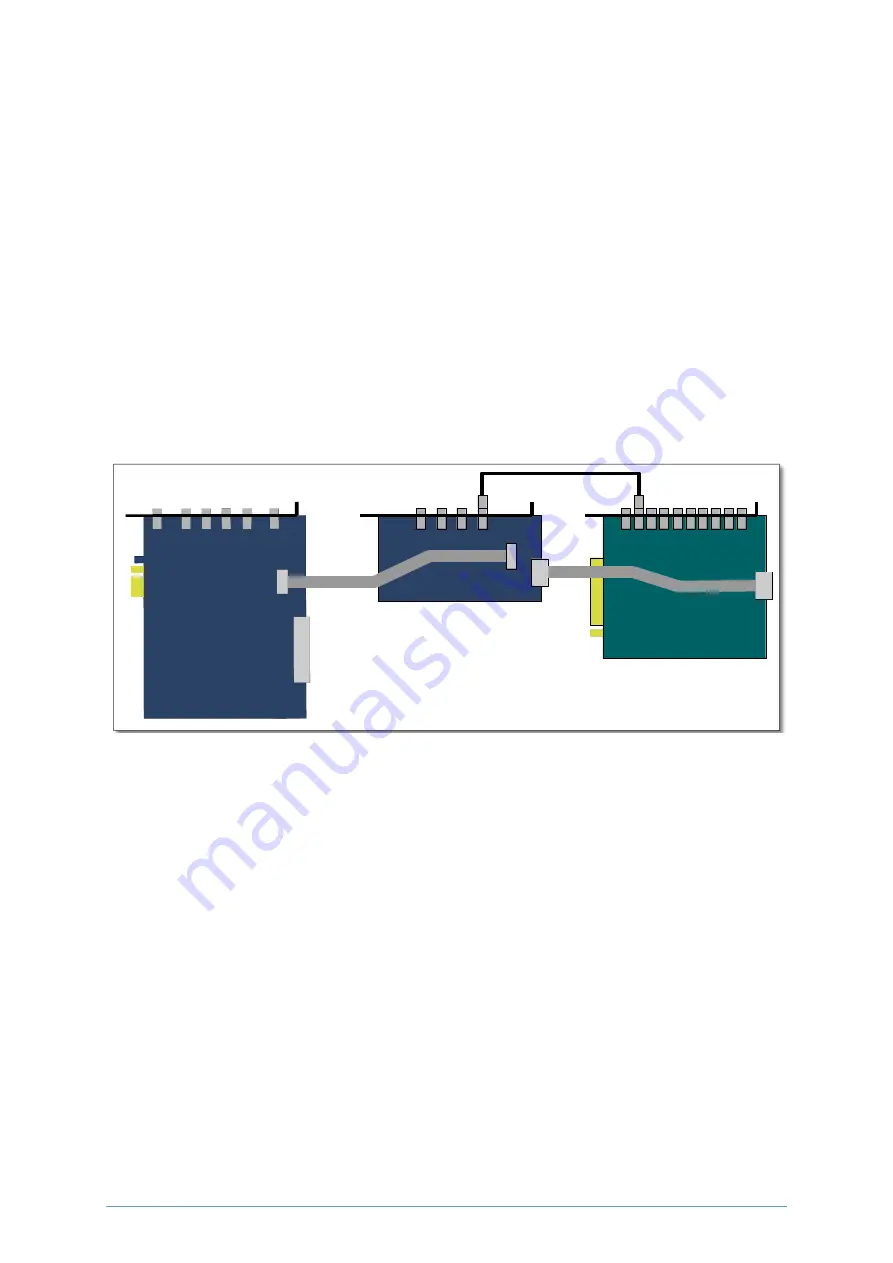
In order to operate a Ndigo5G in sync with one ore more HPTDC8-PCI boards, a board to
board in -terconnection using a Ndigo Extension Board needs to be done. The Ndigo Extension
Board has four clock outputs. One of them needs to be connected to the external clock input of
the HPTDC using a standard Lemo 00 cable. The Ndigo5G is connected to the Ndigo Extension
Board using the Samtec ribbon cable provided with the Ndigo Extension Board. The signals used
for synchronization of the boards are transmitted by a standard 10pin ribbon cable connecting
the Ndigo Extension Board and the HPTDC. A schematic of all necessary connections is shown
in Figure
In principle the user can use the standard device drivers of the Ndigo5G and the HPTDC8-
PCI to perform data acquisition. It is, however, recommended to use the cronoSync-library,
which is a part of the cronoTools provided with with the Ndigo5G device driver. CronoSync
offers an easy group-based access to the data recorded and handles the synchronization of all
cronologic data ac-quisition devices used. A detailed description of cronoTools and cronoSync
can be found in the cronoTools user guide.
C1
C2
Figure 2.27: Interconnection scheme of a Ndigo5G (left) and a HPTDC8-PCI (right) using a
Ndigo Extension Board (middle).
2.6 Performing a firmware update
After installing the Ndigo device driver, a firmware update tool is available.
By choosing
“NdigoFirmwareGUI.exe” a firmware update can be performed. After invoking the applica-
tion a window as shown in Figure
will appear. The tool can be used for updating the
firmware and to create a backup of the on-board calibration data of the Ndigo unit. If several
boards are present, the one which is going to be used can be selected in the upper left corner of
the window. Pressing the “Backup” buttons a backup of the firmware or the calibration data
will be created, respectively. In order to perform a firmware update, chose the “.ndigorom”-file
to used by pressing “Browse”. The file contains the firmware PROMs for all boards of the Ndigo
product line. By pressing “Flash” the firmware is written to the board. “Verify” can be used
to compare the data stored inside the PROM to the one inside a file.
Important note:
The new firmware will only be used after a power cycle, i.e. after switching
the PC (or Ndigo crate) off and back on. A simple reboot is not sufficient. Therefore the
cronologic GmbH & Co. KG
22
Ndigo5G User Guide
Summary of Contents for Ndigo5G-10
Page 2: ......
Page 3: ......
Page 7: ......
Page 45: ...cronologic GmbH Co KG 40 Ndigo5G User Guide...
Page 54: ...on page 47 cronologic GmbH Co KG 49 Ndigo5G User Guide...


