background image


Supplemental Guide – DOC. 8413A 

UC-PHONE-T & UC-PHONE-T-PLUS  

  15 

2.


Tap OK to continue or CANCEL to cancel. 

Screen Capture 

The Screen Capture section allows you to use a web browser to view screen captures of 

the phone’s display. 

Move the Screen Capture switch to the right to enable the screen capture feature. 

When the switch is moved to the left, the screen capture feature is disabled. 

Requirements 

To take screen captures, the following is required: 


The IP address of the phone 


A PC with a web browser. The PC and phone should be on a commonly accessible 

network. 


The phone’s administrative login credentials. 

Procedure 

Perform the following procedure to take screen captures. 

1.


Open the web browser and navigate to the XXX.XXX.XXX.XXX/screencapture 

where XXX.XXX.XXX.XXX is the IP address of the phone. 

2.


Enter the administrative login credentials. The browser will display a screen 

capture of whatever is on the phone’s display. 

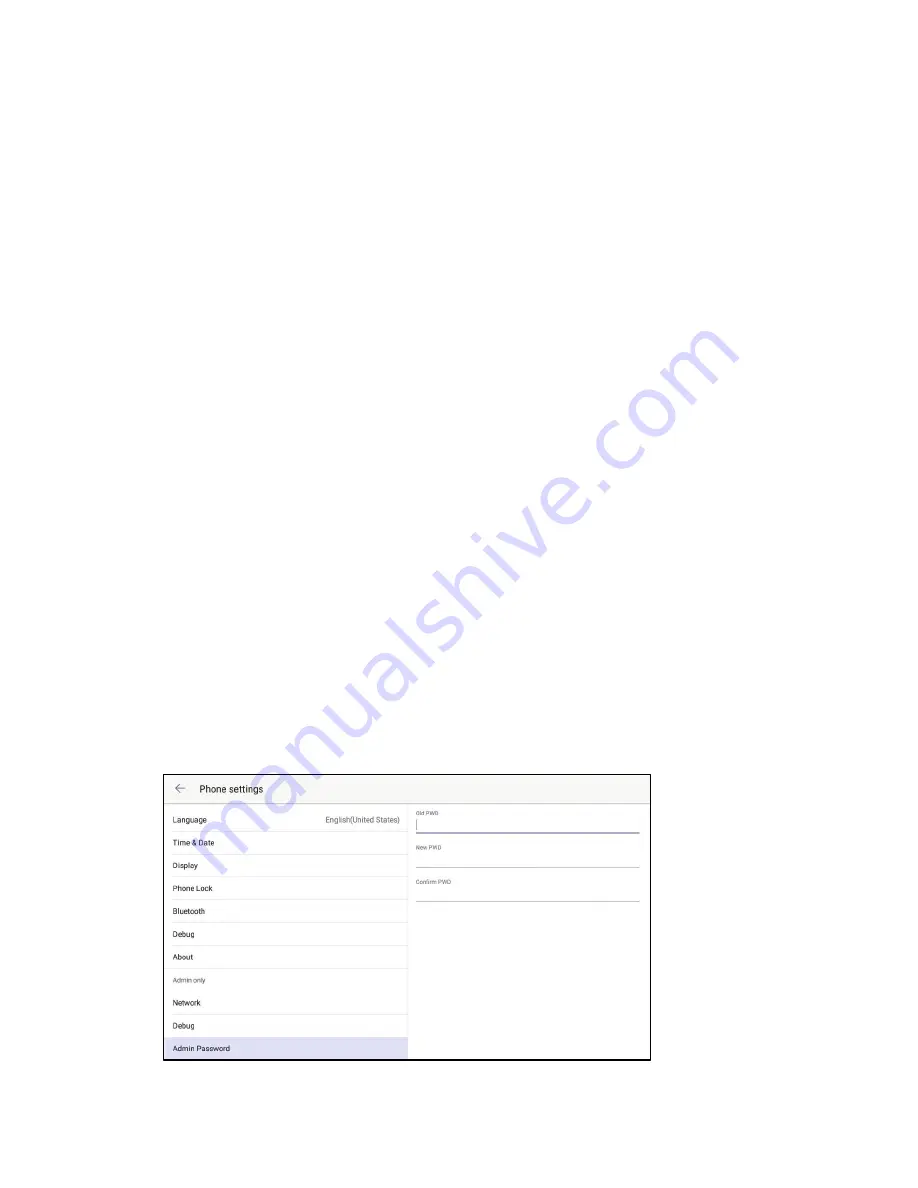
Admin Password (Admin Only) 

Tap Admin Password to change the admin password. Controls for changing the 

password are displayed on the right side of the screen. 

Admin Password 


Summary of Contents for UC-PHONE-T

Page 1: ...UC PHONE T UC PHONE T PLUS Crestron Flex VoIP Desk Phones for Microsoft Teams Software Supplemental Guide Crestron Electronics Inc ...

Page 2: ...rtain Crestron products contain open source software For specific information visit www crestron com legal open source software Crestron the Crestron logo and Crestron XiO Cloud are either trademarks or registered trademarks of Crestron Electronics Inc in the United States and or other countries Microsoft Teams is either a trademark or registered trademark of Microsoft Corporation in the United St...

Page 3: ... 7 Debug 8 About 8 Network Admin Only 9 Debug Admin Only 13 Admin Password Admin Only 15 Web Configuration 17 Connect to the Device 17 Log Out from the Device 18 Status 19 Network 19 Features 24 Settings 27 Security 36 Crestron XiO Cloud Service 39 Claim a Single Device 39 Claim Multiple Devices 40 Startup Sign In 43 Phone Operation 46 Physical Description 46 Sign In 47 The Teams Phone Display 49 ...

Page 4: ...ii Contents Supplemental Guide DOC 8413A Meetings Screen 53 Voicemail 55 Microsoft Teams Rollout 56 ...

Page 5: ...kstation and meeting space is provided via the familiar and intuitive Microsoft Teams touch screen UI affording simple operation with comprehensive call and contact management features built in calendaring and one touch meeting joins This supplemental guide discusses the requirements and configuration instructions for the UC PHONE T UC PHONE T PLUS phones For information on installing these phones...

Page 6: ... id 31 NOTE You must be logged in to your Crestron com account to access the training course End User The end user should have the following A Microsoft Teams account Knowledge of Microsoft Teams Configuration The phone is configured with the touch screen phone settings and a computer with web browser software device settings When using a computer the phone and computer must be connected to a comm...

Page 7: ... Set Language The currently selected language is displayed in the language field To select a new language 1 Tap Language A list of languages will display on the right side of the screen Language 2 Tap a language to select it 3 A message will display asking to confirm the change Tap OK to change the language or tap CANCEL to cancel ...

Page 8: ...o scroll through settings for hour minutes seconds and AM or PM Tap OK when done or tap CANCEL to cancel DHCP Time Select whether the phone updates time with the offset time offered by the DHCP server Date Time Format Select the formats for the date WWW MMM DD DD MMM YY YYYY MM DD DD MM YYYY MM DD YY DD MMM YYYY or WWW DD MMM and time 12 Hour or 24 Hour Tap OK when done or tap CANCEL to cancel SNT...

Page 9: ...D YY DD MMM YYYY or WWW DD MMM and time 12 Hour or 24 Hour Tap OK when done or tap CANCEL to cancel Display Tap Display to configure the display s backlight and screen saver settings Settings are displayed on the right side of the screen Display Backlight Settings The backlight level and duration can be set from the Backlight section of the Display settings Backlight Active Level Touch and drag le...

Page 10: ...CEL to cancel Phone Lock Tap Phone Lock to configure the phone s lock feature Settings are displayed on the right side of the screen Phone Lock To enable and configure the phone lock feature move the Lock Enable switch to the right and configure the lock To disable the lock move the Lock Enable switch to the left 1 In the New PIN field enter a six digit PIN 2 In the Confirm PIN field enter the six...

Page 11: ...to the left When enabled a list of available Bluetooth devices that are in pairing mode are displayed under AVAILABLE DEVICES Tap the device that is to be connected NOTE To avoid conflicts only one phone and one Bluetooth device should be in pairing mode at a time Once Bluetooth is enabled the phone s device name can be set and the phone can be configured to be discoverable by other devices Device...

Page 12: ... phone The reboot control appears on the right side of the screen Debug Tap Reboot phone to reboot the phone About Tap About to view information about the phone s IP address MAC address firmware and software versions the privacy statement and the Crestron Unified Communication Software License Agreement About ...

Page 13: ...the license agreement Network Admin Only Tap Network to view and configure the phone s network settings Viewing and configuring the network settings requires the admin password After tapping Network the display prompts the user to enter the admin password Admin Password Enter the admin password default password admin and tap Enter The network settings are displayed on the right side of the screen ...

Page 14: ...condary DNS servers When the switch is moved to the left DHCP will be used to obtain addresses for the DSN servers IPv6 Type Touch and tap the the method used for obtaining an IPv6 address DHCP or Static Tap OK when done or tap CANCEL to cancel IPv6 Static DNS Move the IPv6 Static DNS switch to the right to enter static IPv6 addresses for the primary and secondary DNS servers When the switch is mo...

Page 15: ...d to the left HTTP addressing is no longer available Once the HTTP is enabled enter the port number 1 through 65535 that should be used for HTTP communication in the HTTP Port field HTTPS Status Move the HTTPS Status switch to the right to enable HTTPS addressing When the switch is moved to the left HTTPS addressing is no longer available Once HTTPS is enabled enter the port number 1 through 65535...

Page 16: ...Password fields Other parameters are managed from the web interface For details refer to 802 1x on page 23 EAP PEAP GTC When selected PEAP GTC authentication is used Enter the identity and password in the Identity and MD5 Password fields Other parameters are managed from the web interface For details refer to 802 1x on page 23 EAP TTLS EAP GTC When selected TTLS GTC authentication is used Enter th...

Page 17: ... the right to enable CDP When the switch is moved to the left CDP is disabled 2 Enter the interval in seconds for the phone to send the CDP request in the Packet Interval field Debug Admin Only Tap Debug to view and configure the phone s logging settings reset the phone and enable and or disable screen captures Viewing and configuring the network settings requires the admin password After tapping ...

Page 18: ... switch to the right to enable logging When the switch is moved to the left logging is disabled 2 Tap Log level and then touch and drag up or down to scroll through the list of available methods 3 Tap the log level to select it and then tap OK Otherwise click CANCEL to cancel Reset The Reset section allows you to reset phone settings to the factory default settings Reset User Settings Use this fun...

Page 19: ...The IP address of the phone A PC with a web browser The PC and phone should be on a commonly accessible network The phone s administrative login credentials Procedure Perform the following procedure to take screen captures 1 Open the web browser and navigate to the XXX XXX XXX XXX screencapture where XXX XXX XXX XXX is the IP address of the phone 2 Enter the administrative login credentials The br...

Page 20: ...HONE T UC PHONE T PLUS Supplemental Guide DOC 8413A 1 Enter the old password in the Old PWD field 2 Enter the new password in the New PWD field 3 Confirm the new password in the Confirm PWD field and tap DONE ...

Page 21: ...the Device To connect to the device follow this procedure 1 Obtain the device s IP address from the partner settings For details refer to About on page 8 2 On the computer open a web browser and navigate to the IP address of the device The welcome screen is displayed Welcome Screen 3 Enter the default user name admin and password admin 4 Click Sign In to continue The device s Status screen is disp...

Page 22: ... operation in a network environment Features configures the phone lock Bluetooth and LEF operation Settings configures the backlight and screensaver the date and time auto provisioning diagnostic information tones and power saving features The settings session is also used to upgrade firmware Security configures the phone passwords user and admin as well as how certificates are used Tap to view su...

Page 23: ...twork information Network The Network menu contains sections for basic network configuration configuring the device s PC port and advanced network configuration Click a section name to configure parameters Basic Click Basic to configure the basic network parameters such as IP address subnet mask default gateway and DNS servers Network Basic 1 Select the mode of operation for the Internet port IPv4...

Page 24: ... a connection to the LAN You can enable or disable the port Network PC Port 1 Click PC Port to configure the PC port 2 Select the mode of operation from the PC Port Mode drop down list Select Auto Negotiation from the drop down list to provide a LAN connection to a PC connected to the PC port Select Disabled from the drop down list to disable the PC port 3 Click Confirm to save settings or Cancel ...

Page 25: ...Supplemental Guide DOC 8413A UC PHONE T UC PHONE T PLUS 21 Network Advanced ...

Page 26: ...and PC ports as part of a VLAN WAN Port Move the Active switch to ON to connect the Internet port and configure the port for operation When the switch is set to OFF the Internet port is no longer connected to the VLAN Once the Internet port is assigned to the VLAN enter a value for VID 1 4094 and select a priority level 0 7 from the Priority drop down list PC Port Move the PC Port switch to ON to ...

Page 27: ... None When selected authentication protocols are not used EAP MD5 When selected MD5 authentication is used MD5 is the base security requirement in the EAP standard and uses username and password as the authentication credentials Enter the identity and password in the Identity and MD5 Password fields EAP TLS When selected TLS authentication is used a Enter the identity and password in the Identity ...

Page 28: ...tity and password in the Identity and MD5 Password fields Span to PC The Span to PC sets the phone to span data packets received from the Internet port to the PC port To span data packets from the Internet port to the PC port set Span to PC Port to ON To turn off spanning set Span to PC Port to OFF ICMPv6 Status The phone can obtain IPv6 network settings using the Stateless Address Autoconfigurati...

Page 29: ...ock code in the Phone Unlock PIN 6 Digits field 3 Enter the amount of idle time in seconds to elapse before the phone locks in the Idle time out 30 3600s field 4 Click Confirm to save settings or Cancel to cancel Bluetooth The phone can connect with a compatible Bluetooth headset for wireless operation Click Bluetooth to view controls for enabling or disabling Bluetooth The Bluetooth section is di...

Page 30: ...rol section is displayed Features LED Control Set Incoming Call LED to ON to have the LED flash when the phone receives a call To turn off LED notification for incoming calls set Incoming Call LED to OFF Set Voice Mail LED to ON to have the LED flash when the phone receives a voice mail message or text message To turn off LED notification for incoming voice mail messages and text messages set Voic...

Page 31: ...the screensaver to show when the phone is idle Click Preference to display the Preference section Settings Preference Backlight Configure the backlight for use 1 Select a brightness level from the Brightness drop down list 2 Select a duration for the backlight from the Backlight Time seconds drop down list 3 Click Confirm to save settings or Cancel to cancel Screen saver Configure the screensaver ...

Page 32: ...CP server set DHCP Time to ON Otherwise set to OFF Manual Time To manually set the date and time set Manual Time to ON and enter the date time time format and date format NTP By DHCP Priority To set the phone to use the DHCP setting over a manual setting select High from the drop down list Otherwise select Low from the drop down list Primary Server and Secondary Server Enter the hostname or IP add...

Page 33: ...elds and Offset minutes field Automatic Daylight Savings Time is used automatically based on location The location is selected from the Location drop down list Time Format Select the format to use for displaying time from the Time Format drop down list Click Confirm to save settings or Cancel to cancel Upgrade The Upgrade section provides information about the device s firmware and provides contro...

Page 34: ...restore the device to the factory default settings Reboot The Reboot section provides a control for rebooting the device Click Reboot to reboot the device Upgrade The Upgrade section provides controls for updating the device firmware To upload new firmware click inside the empty field select a firmware file and click Upload Auto Provision The Auto Provision section provides controls for configurin...

Page 35: ...trying the transfer via auto provisioning Integer values from 1 to 300 are allowed Common AES Key Configures the plaintext AES key for decrypting the Common CFG file MAC Oriented AES Key configures the plaintext AES key for decrypting the MAC Oriented CFG file Power On Configures whether the phone should perform auto provisioning when powered on If set to ON auto provisioning will be performed whe...

Page 36: ...o ON to enable the phone to connect with Crestron XiO Cloud service Set to OFF to disable the phone s connection to Crestron XiO Cloud service For more information refer to Crestron XiO Cloud Service on page 39 Click Confirm to save settings or Cancel to cancel Configuration The Configuration section is used to import and export configuration files bin and cfg capture packets for troubleshooting a...

Page 37: ...e drop down list and click Export Pcap The phone can be set to capture packets for troubleshooting To capture packets select the type of packet to capture from the Pcap Type drop down list Normal After clicking Start the capture file is saved on the phone Click Stop and export to export the capture file to the PC Enhanced After clicking Start the capture file is saved directly to the PC and the fi...

Page 38: ... Select a detail level from the drop down list 0 system is unusable 1 action must be taken immediately 2 critical condition 3 error conditions 4 warning conditions 5 normal but significant condition 6 informational Syslog Facility Sets the facility that generates the log messages Select a facility from the Syslog Facility drop down list Syslog Prepend Mac Set to ON to prepend the phone s MAC addre...

Page 39: ...field Tones are specified as follows tone list element element element Where element Freq1 Freq2 Freq3 Freq4 Duration Freq the frequency of the tone ranges from 200 to 4000 Hz If it is set to 0 Hz it means the tone is not played A tone is comprised of at most four different frequencies Duration the duration in milliseconds of the dial tone ranges from 0 to 30000ms You can configure at most eight d...

Page 40: ...e in use Idle TimeOut minutes Office Hour Idle TimeOut Enter a time in minutes for the phone to wait in the idle state before entering power saving mode during office hours Off Hour Idle TimeOut Enter a time in minutes for the phone to wait in the idle state before entering power saving mode during off hours User Input Extension Idle TimeOut Enter a time in minutes for the phone to wait in the idl...

Page 41: ...eld 3 Enter the new password in the New Password field 4 Confirm the new password in the Confirm Password field 5 Click Confirm to save settings or Cancel to cancel Trusted Certificates The Trusted Certificates section manages the list of Transport Layer Security TLS trusted certificates that the phone uses to verify certificates sent by the server Security Trusted Certificates The phone has 30 bu...

Page 42: ...drop down line To upload a trusted certificate click inside the Upload Trusted Certificate File field select a certificate file pem cer crt and der file types and click Upload Click Confirm to save settings or Cancel to cancel Server Certificates The Server Certificates section manages the list of Transport Layer Security TLS server certificates that the phone sends to authenticate client connecti...

Page 43: ... XiO Cloud service can be used to deploy and manage multiple devices across an enterprise The Crestron XiO Cloud service requires devices to be claimed so they can be managed by the service To claim a single device or multiple devices perform one of the following procedures Claim a Single Device 1 Record the MAC address and serial number that are labeled on the shipping box or on a sticker attache...

Page 44: ...n the device tree under the group Unassociated Devices The device can now be managed or assigned to a group For information on creating environments managing devices and managing users with the Crestron XiO Cloud service refer to the Crestron XiO Cloud Service User Guide Guide Doc 8214 at www crestron com manuals Claim Multiple Devices 1 Record all of the MAC addresses and respective serial number...

Page 45: ...from the drop down menu The Claim Multiple Devices dialog box is displayed Claim Multiple Devices Dialog Box 5 Click Choose and select the CSV file created in step 1 6 Click Claim to claim all of the devices listed in the file A message indicating the claim status of each device is displayed NOTE If an error message displays stating the device does not exist connect the device to a network that ha...

Page 46: ... 8413A The devices can now be managed or assigned to a group For information on creating environments managing devices and managing users with the Crestron XiO Cloud service refer to the Crestron XiO Cloud User Guide Doc 8214 at www crestron com manuals ...

Page 47: ...e language and tap The Crestron privacy statement will display NOTE The interface language can be changed if desired Refer to Set Language on page 3 for details 2 Tap Agree to continue The Microsoft Teams start screen is displayed Microsoft Teams Start Screen 3 Tap Sign in to display the Sign in screen NOTE You can also tap on the top right to set the partner settings For details refer to Partner ...

Page 48: ...ress of the Microsoft Teams account Tap Go when finished The Enter Password screen is displayed Enter Password Screen 5 Tap the Password field and use the on screen keyboard to enter the password of the Microsoft Teams account Tap Go when finished If configured the phone will perform two step verification Otherwise the phone will ask you to select the type of login account ...

Page 49: ...e is to be placed on a user s desk Devices with a personal account will show call history and have access to voice mail Use the Shared setting if the device will be placed in a conference room Call history information and voice mail features are not available Select and account type and tap OK The device will log into the Microsoft Teams service and display the home screen Home Screen ...

Page 50: ...n hold Press again to resume the call VOICEMAIL Press to access voicemail VOLUME Press to lower the volume Press to raise the volume Numeric Keypad Use to dial numbers or enter information Indicator LED Indicates call status message status and phone s system status Red The phone is initializing Fast flashing red The phone is ringing Slow flashing red The phone receives a voicemail or misses a call...

Page 51: ...crophone on or off The button glows red when the mute feature is activated REDIAL Press to redial the last dialed number SPEAKERPHONE Press to toggle the speakerphone for hands free operation The button glows green when the speakerphone is activated Sign In Upon startup you will be prompted to sign in to the Microsoft Teams application 1 Tap Sign in The Sign in screen is displayed ...

Page 52: ...hen done The device will ask you to select the type of login account The device can be set up with a personal account or a shared account Use the Personal setting if the device is to be placed on a user s desk Devices with a personal account will show call history and have access to voice mail Use the Shared setting if the device will be placed in a conference room Call history information and voi...

Page 53: ...hree separate screens Calls Displays the call log Personal use only searches for contacts and makes phone calls Meetings Lists all scheduled meetings and creates new meetings Voicemail Personal use only Lists all voicemail messages NOTE At any time you can make a call by picking up the handset pressing the headset button or pressing the speakerphone button and dialing the number on the numeric key...

Page 54: ...selected call log entry on the right side of the screen To navigate the call log drag up or down to scroll through the call log From the Keypad To make a call pick up the handset press the headset button or press the speakerphone button and dial the number From the Call Log Tap a call log entry The call details are shown on the right side of the screen Tap any of the contact options shown for the ...

Page 55: ...splay the search screen Direct Call You can directly call a contact by either dialing their phone number or searching for a contact Directly call a contact Dial the desired phone number and tap next to the number to place the call Search for a contact a Tap inside the To field to display the on screen keyboard to search by name b Type the name of the desired contact Search results are shown below ...

Page 56: ... number or contact to the group call Add a phone number i Dial the desired phone number and tap the number to add it to the group call The number appears in the To field ii Repeat for each phone number to add to the group call Add a contact i Tap inside the To field to display the on screen keyboard to search by name ii Type the name of the desired contact Search results are shown below the To fie...

Page 57: ...the group call Meetings Screen Tap Meetings to show the Meetings screen The Meetings screen displays the schedule of meetings on the left side of the screen and the meeting details for the selected meeting on the right side of the screen To navigate the list of meetings drag up or down to scroll through the list of meetings To join a meeting tap Join in the meeting list or in the meeting details T...

Page 58: ...red d Tap the date to select a date and then tap the time to select a time If the meeting is going to be an all day event select All Day e If the meeting will be held in a physical location in addition to a Microsoft Teams meeting Enter the location in the Location field f Select the frequency of the meeting in the Repeat field g Select how a participant s schedule should be marked during the meet...

Page 59: ...cted voicemail message on the right side of the screen To navigate the list of voicemail messages drag up or down on the left side of the screen to scroll through the list of messages Tap a message to display playback controls and message transcription if available The caller s contact information is displayed on the right side of the screen Voicemail controls Play pause Speaker Handset View conta...

Page 60: ...56 UC PHONE T UC PHONE T PLUS Supplemental Guide DOC 8413A Microsoft Teams Rollout For information on Microsoft Teams software visit https docs microsoft com en us MicrosoftTeams teams overview ...

Page 61: ...Supplemental Guide DOC 8413A UC PHONE T UC PHONE T PLUS 57 This page is intentionally left blank ...

Page 62: ...restron Electronics Inc Supplemental Guide DOC 8413A 15 Volvo Drive Rockleigh NJ 07647 2052861 Tel 888 CRESTRON 07 03 19 Fax 201 767 7576 Specifications subject to www crestron com change without notice ...

Reviews: