background image

Installing PC-CAM 750 1-6

Image Counter 

Depending on which mode you are in, this counter displays the total number of photos or videos 
taken.

Inserting or 
Changing 
Batteries

For PC-CAM 750 to function as a portable digital camera when it is disconnected from the computer, 
you need to insert four 1.5 V AAA alkaline batteries into its battery compartment.

To insert or replace batteries:

1. Press the Power button for two seconds to turn off the camera.

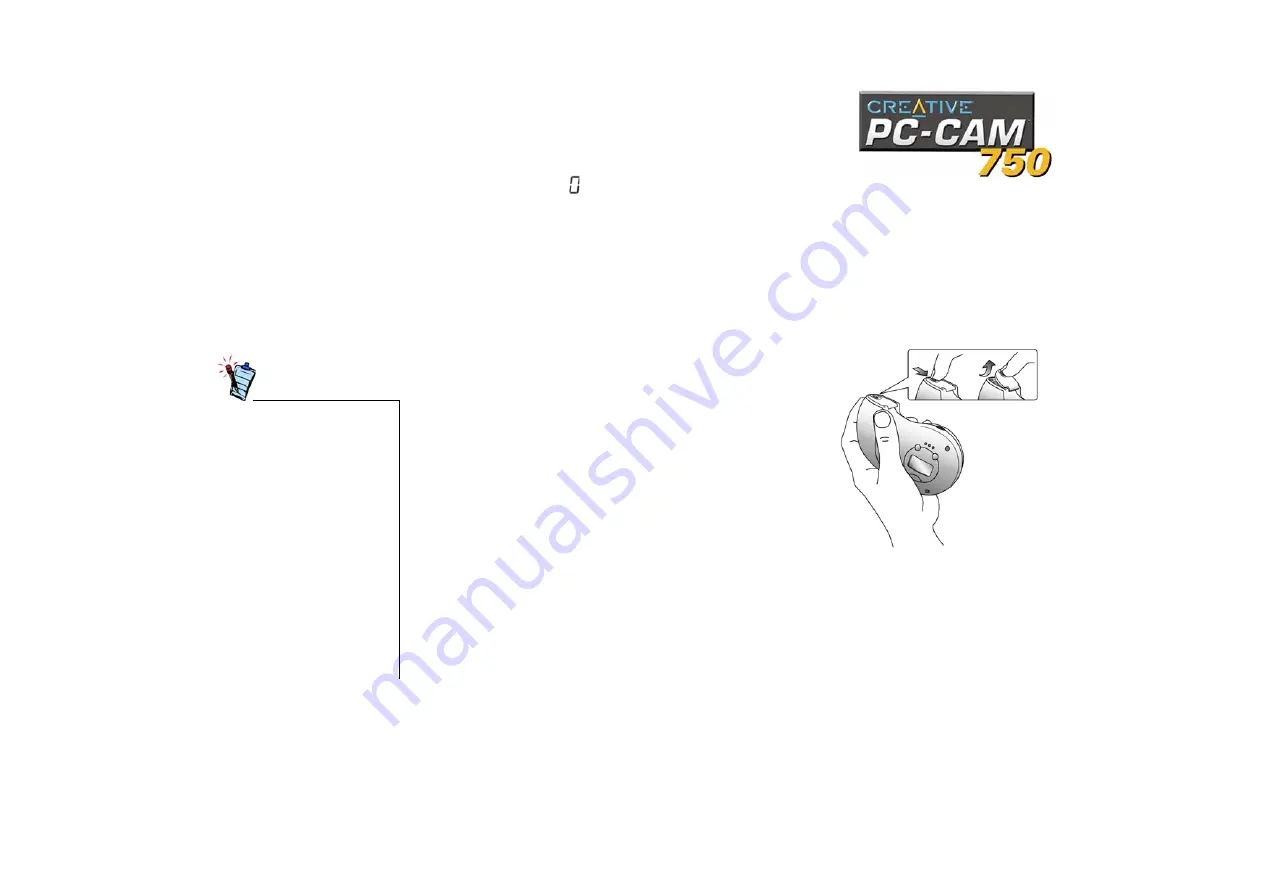
2. Holding the camera in one hand, push the battery 

compartment cover catch inwards, and then lift the cover up 
with your fingertip as shown in Figure 1-3.

3. Remove the old batteries (if any).

• No batteries are required 

when the camera is connected 
to the computer.

• If the camera is to be 

connected to the computer for 
a long period of time, remove 
the batteries to prevent battery 
leakage.

• Make sure that you insert the 

batteries in the correct 
direction. If not, they may leak 
and cause damage to the 
camera.

• Do not mix old batteries with 

new ones or batteries of 
different types together.

Figure 1-3: Opening the battery compartment.

Summary of Contents for PC-CAM 750

Page 1: ...ment is furnished under a license agreement and may be used or copied only in accordance with the terms of the license agreement It is against the law to copy the software on any other medium except a...

Page 2: ...ch that the Software and the functions it provides are accessible only to persons who are physically present at the location of the computer on which the Software is loaded You may not allow the Softw...

Page 3: ...CEPT AS EXPRESSLY PERMITTED HEREIN You agree that your non exclusive license to use the CDDB Data the CDDB Client and CDDB Servers will terminate if you violate these restrictions If your license term...

Page 4: ...u and not Creative or its distributors or dealers assume the entire cost of all necessary servicing repair or correction This warranty gives you specific legal rights and you may also have other right...

Page 5: ...ct ORIGINAL PRODUCT Upon installation the Microsoft Software files become part of the ORIGINAL PRODUCT and are subject to the same warranty and license terms and conditions as the ORIGINAL PRODUCT If...

Page 6: ...ply with the limits for a Class B digital device pursuant to Part 15 of the FCC Rules These limits are designed to provide reasonable protection against harmful interference in a residential installat...

Page 7: ...but not limited to intranets etc in pay audio or pay on demand applications is not authorised and or licensed http www iis fhg de amm Declaration of Conformity According to the FCC96 208 and ET95 19 M...

Page 8: ...Third Party Software iv README File iv Minimum System Requirements v Updating Drivers v Document Conventions vi 1 Installing PC CAM 750 PC CAM 750 1 1 Buttons and LCD on PC CAM 750 1 3 Buttons 1 3 LC...

Page 9: ...l Camera Turning on the Camera 3 1 Battery Low 3 1 Taking Pictures 3 2 Tips on Taking Good Pictures 3 5 Recording Videos 3 6 Recording Voices or Sounds 3 6 Downloading Images and Audio from the Camera...

Page 10: ...PC CAM 750 B 1 Problems in Windows XP B 3 C Note on USB Compatibility D Technical Support Knowledgebase D 1 Webchat D 1 eMail D 1 Telephone D 2 Download Drivers D 2 Download Manuals D 2 If You Have a...

Page 11: ...Introduction...

Page 12: ...am Monitor PC CAM 750 can function as a security camera recording short videos of any movement in its field of view It can also be programmed to take pictures automatically at regular intervals Portab...

Page 13: ...to notify you whenever anybody moves within the camera s field of view Microsoft NetMeeting Microsoft NetMeeting is a voice communications client that includes support for international confer encing...

Page 14: ...our 1 5 V alkaline AAA batteries twin pack One PC CAM 750 installation CD One Quick Start guide Third Party Software Ulead Photo Express MCE 4 0 Adobe Acrobat Reader Version 5 0 Microsoft NetMeeting R...

Page 15: ...600 pixels CD ROM drive installed Sound Blaster or other compatible audio card and microphone required for videoconferencing Modem or LAN access to the Internet at 28 8 Kbps or faster required for vid...

Page 16: ...is notepad icon indicates information that is of particular importance and should be considered before continuing This alarm clock icon indicates that failure to adhere to directions may result in los...

Page 17: ...1Installing PC CAM 750...

Page 18: ...he front and back views of the camera Front LED Lights up when the camera is connected to the computer Snapshot button Viewfinder Focus free lens Front view Back view Viewfinder Camera ready LED Strob...

Page 19: ...single snapshot high and normal resolution mode icons Battery level indicator Operation mode button Flash mode button Image counter Power button Flash mode Icons Audio cues enabled icon Multiple snaps...

Page 20: ...utton for two seconds Note The camera will turn itself off if it is left idle for three minutes Operation Mode button This button will change the camera s operation mode each time it is pressed There...

Page 21: ...ra captures images at 1600 x 1200 pixels with software interpolation Single snapshot normal resolution This icon indicates that you are in Single snapshot normal resolution mode In this mode the camer...

Page 22: ...is sufficient light and activates the camera flash if needed Always Flash This icon indicates that your camera is in Always Flash mode In this mode the camera emits one flash for every photo taken Red...

Page 23: ...ff the camera 2 Holding the camera in one hand push the battery compartment cover catch inwards and then lift the cover up with your fingertip as shown in Figure 1 3 3 Remove the old batteries if any...

Page 24: ...XP see In Windows XP on page 1 10 In Windows 98 98 SE Me 1 Do not connect PC CAM 750 to your computer before installing the drivers If you accidentally begin installation with PC CAM 750 connected th...

Page 25: ...d to insert the Windows 98 CD replace the PC CAM 750 Installation CD with the appropriate CD Note Windows 98 is available in various editions Be sure to use the correct edition for your computer ii In...

Page 26: ...ete the installation You may be asked after an application is installed if you want to restart your computer Do not restart your computer until all the drivers and applications are installed 5 Connect...

Page 27: ...ded and then click the Next button Installation will be complete in a while 7 If three Hardware Installation dialog boxes appear one at a time ignore the messages and click the Continue Anyway button...

Page 28: ...2000 XP click the Hardware tab and then click the Device Manager button 4 Click the plus sign next to the Imaging Device icon The entries Creative PC CAM 750 Still Image and Creative PC CAM 750 Video...

Page 29: ...2Using PC CAM 750 as a Web Camera...

Page 30: ...er do one of the following Click Start Programs Creative Creative PC CAM PC CAM Center Press the Snapshot button on the camera while it is connected to your computer If during installation you clicked...

Page 31: ...out a preview The preview mode is active by default For instructions on how to take a photo or record a video without a preview refer to the PC CAM Center Help file To launch PC CAM Center Help see St...

Page 32: ...tomatically check box is selected click to clear it 5 To start recording a video click the Capture video button The button starts blinking to indicate that recording is now in progress 6 To stop the r...

Page 33: ...mbnail of the video that is displayed in the Thumbnails window The video is displayed in the PC CAM Center Viewing window in its actual size If you are not satisfied with the result you can select a h...

Page 34: ...3Using PC CAM 750 as a Digital Camera...

Page 35: ...5 V AAA alkaline batteries into the camera s battery compartment Turning on the Camera To turn on the camera do the following Press the Power button on the camera One beep indicates that your camera h...

Page 36: ...n this mode the flash is turned off 4 To change the operation mode of the camera press the Operation Mode button Single snapshot high resolution Select this mode if you want to take single snapshots a...

Page 37: ...640 x 480 pixels Select the flash mode that you want and then press the Snapshot button to take a snapshot The front red LED blinks once and the camera ready green LED blinks when the image is stored...

Page 38: ...of snapshots has increased by five 5 Aim the camera at the desired object use the camera s viewfinder to verify that the object is in the camera s view Note The object should be at least 75 cm 30 inch...

Page 39: ...ample sun or spotlight is directly behind the object Distance This camera is focus free but be sure the minimum distance between camera and object is not less than 75 cm 30 inches Any closer the close...

Page 40: ...shes to indicate that the recording has begun 4 The front red LED lights up and the camera ready green LED indicator blinks At this point do not shake the camera When the video is complete the indicat...

Page 41: ...o or Voice tab containing the destination media album you want Only the tab belonging to the media of the selected files will appear 6 Click the album you want to transfer the files to 7 Click the OK...

Page 42: ...y for more than two seconds to delete all the files from the camera 2 A beep is heard when the memory is cleared and the LCD displays the available frames in that particular mode To clear the last ima...

Page 43: ...ATechnical Specifications...

Page 44: ...ture glass lens Built in optical viewfinder Operation Mode button for selection of four different modes of still capture When detached Capable of capturing up to 20 still pictures JPEG format single s...

Page 45: ...odel supports Windows 98 Windows Me Windows 2000 and Windows XP Microsoft Windows Image Acquisition WIA support WDM MiniDriver for DirectShow and Video For Windows compatibility TWAIN support Standard...

Page 46: ...6 x 144 160 x 120 Undocked mode 1600 x 1200 with software interpolation 1024 x 768 640 x 480 Light Sensitivity 10 lux Video Formats 24 bit RGB 4 2 0 YUV Planar JPEG Exposure Control Automatic optional...

Page 47: ...BTroubleshooting...

Page 48: ...CD ROM drive 4 Follow the instructions on the screen to complete the installation Problems Using PC CAM 750 There is no USB port available to connect the USB cable Do one of the following Unplug the d...

Page 49: ...B controller Do the following 1 Remove some devices from the computer 2 Restart the computer The computer will automatically re allocate the resources When the camera is connected to the computer pres...

Page 50: ...o submit their hardware solutions for certification If a hardware device driver is not submitted or does not qualify for Microsoft certification a warning message similar to the one below appears You...

Page 51: ...CUSB Compatibility...

Page 52: ...ay be related to your PC s USB port the following is a list of available options 1 Contact your PC vendor Your PC vendor may be able to upgrade your motherboard or its BIOS to a newer version that add...

Page 53: ...D Technical Support...

Page 54: ...the best solution to your particular problem Should you need additional help you can escalate your query online through live chat or email ensuring that you receive the best possible service in the m...

Page 55: ...Creative product If You Have a Problem Please retain all contents including packaging and proof of purchase until you are fully satisfied with your product If you have a problem installing or using y...

Page 56: ...upport to clarify the nature of the problem and to obtain details of our repair replacement procedure Returning a product for repair Creative Labs requires that all returns for repair replacement must...

Page 57: ...ranty as it stands in the accompanying warranty card that the hardware product will be free of defects in materials and workmanship for a period of two 2 years after the date of purchase or such other...

Page 58: ...data arising from or relating to the use of this product even if Creative or its licensors have been advised of the possibility of such loss Specifically this warranty does not cover failures of the p...

Page 59: ...353 1 4380060 Belgium Tel 353 1 4333291 Denmark Tel 353 1 4333230 Finland Tel 353 1 4333270 Norway Tel 353 1 4333240 Sweden Tel 353 1 4380030 Holland Tel 353 1 4333272 Switzerland Tel 353 1 4380070 Po...

Reviews: