36
www.cooperbussmann.com/wirelessresources
Cooper Bussmann 915U-2 Wireless Mesh I/O and Gateway User Manual
Rev Version 1.2.2
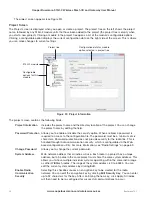
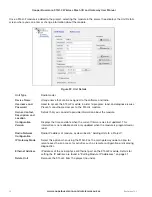
The project screen appears (see Figure 30).
Project Screen
The Project screen is displayed when you open or create a project. The project tree on the left shows the project
name, followed by any 915U-2 module units that have been added to the project (the project tree is empty when
you start a new project). Clicking a module in the project tree opens a list of the module’s configurable options.
Clicking a configurable option displays the current configuration data on the right side of the screen. This is where
you can make changes to current settings.
915U-2 module
Project tree
Configuration data for module
option selected in project tree
Configurable
options for this
module
Figure 30 Project Information
The project screen contains the following fields.
Project Information
Includes the project name and the directory location of the project. You can change
the project name by editing the field.
Password Protection
Allows you to enable or disable the security option. When enabled, a password is
required to access to the configuration file. The password must be a minimum of six
characters. Password protection does not provide security for the radio link. This is
handled through radio communication security, which is configurable via the Web-
based configuration utility. For more information, see “Radio Settings” on page 69.
Change Password
Allows you to change the current password.
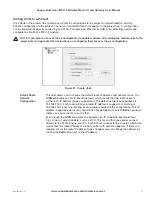
System Address
Main network address that all radios will use. Each radio in a project has a unique
address, but all radios in the same project must share the same system address. This
allows you to have multiple individual systems operating within the same radio range
as other WIBMesh radios. The range of the system address is 0 to 65535. You can
edit the current system address by clicking
Edit
.
Enable Radio
Communication
Security
Selecting this checkbox causes an encryption key to be created for the radio
network. You can edit the encryption key by clicking
Edit Security Key
. You can enter
up to 32 characters for the key. After confirming the new key, click Apply. All radios
will then need to be re-configured for successful communications to occur.

