6
6. Battery Installation
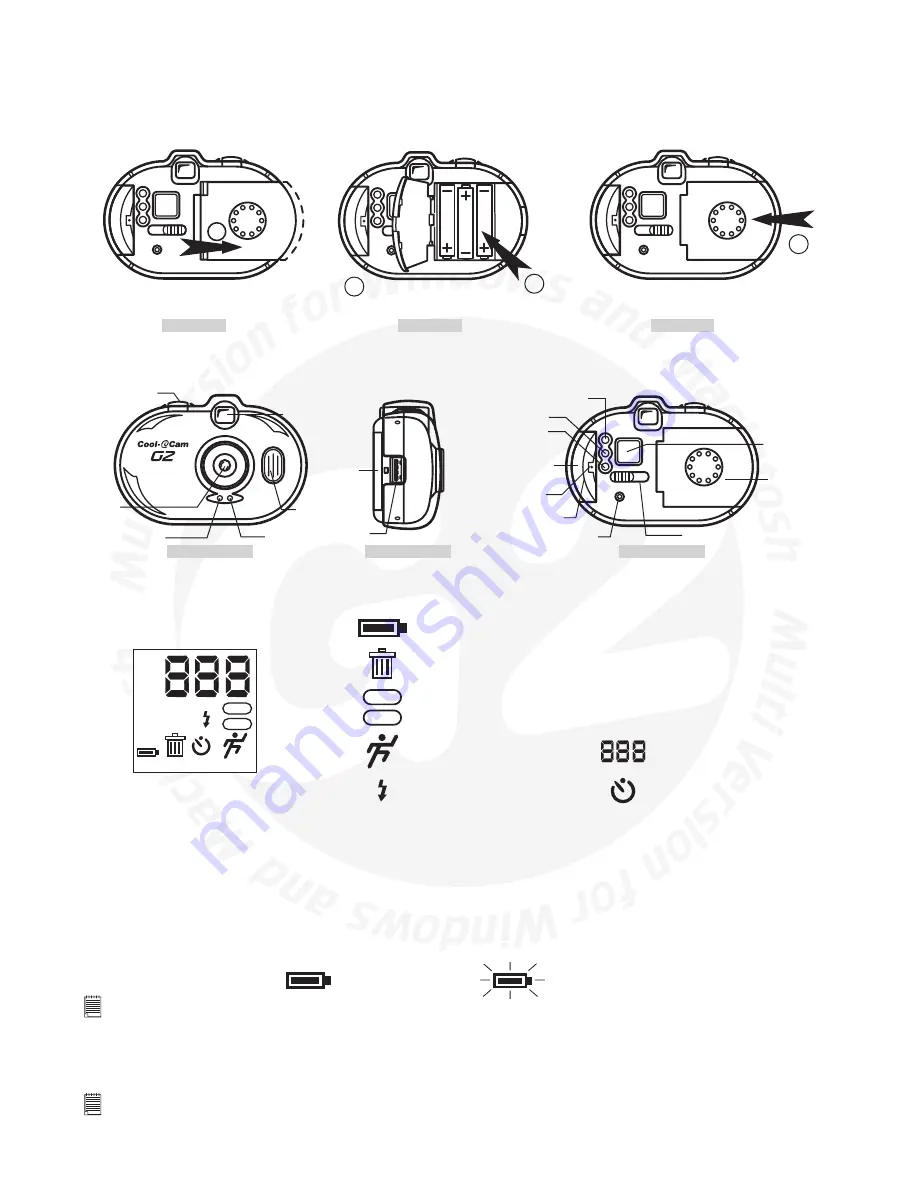
The battery compartment is located on the reverse side of the
G2
.
G2
requires 3 x AAA alkaline batteries (supplied).
To install the batteries:
1. Slide the battery cover outward and lift it upwards as shown on Diagram A and B.
2. Insert the 3 x AAA batteries. When inserting, make sure that you follow the polarity directions (+) (-) which are indicated
on the inside the battery cover and Diagram B.
3. Close and slide the battery cover inward to lock the battery door as shown on Diagram C.
1
Diagram A
Diagram B
Diagram C
slide the battery cover outward
lift battery cover up
insert batteries
1
2
close and slide the
cover inward
3
7. Getting to Know Your
G2
Refer to the picture below for a quick overview for your
G2
.
Side View
Hole for
Wrist Strap
USB Cable
Port
Back View
Feature Button
Timer ON/OFF or
Feature Changing Button
Power ON/OFF
Smart Media Card Slot
Smart Media Card
Isolation Button
SmartMedia Card
Slot Cover
Video Out Port
LCD Display
Battery Cover
Smart Media Card Eject Button
Front View
Shutter Button
Viewfinder
Lens
Flash LED
(Green)
Flash
Power LED
(Red)
7.1 LCD Display
By default, the 3 digit LCD screen displays the number of images taken. It is also used in conjunction with the Feature Button
and Feature Changing Button to access and display the
G2
settings.
2X
HIGH NORMAL LOW
PAL
NTSC
PAL
NTSC
HIGH
NORMAL
LOW
2X
Battery Indicator
Delete All
TV Mode
Movie
Auto Flash On
Self-Timer
No. of images remaining /
LCD Messages
(details will be available under
separate sections.)
2X digital
Low Resolution
Normal Resolution
High Resolution
See Section 10.3 for LCD display quick reference guide.
7.2 Power
7.2.1 Stand-by Mode
After a period of 60 seconds inactivity, the
G2
will switch to Stand-by Mode automatically and the LCD will go blank. All
images taken will not be lost as they are stored in the
G2
’s memory.
This is a preferable way of switching your
G2
off.
Waiting for the 60 seconds ensures all image processing has been completed correctly before switching off.
7.2.2 Low Battery
When your
G2
has full power, the Battery indicator on the LCD display will be fully shown. When power is low, the icon will
flash. This indicates that the batteries are weak and need to be replaced.
Full Battery Power
Low Battery Power
Important Notes:
Do not remove battteries from the battery compartment when
G2
is switched on.
7.2.3 SmartMedia™ Card Isolation Button
The SmartMedia™ Card Isolation Button powers down the
G2
when the SmartMedia™ Card cover is opened. This is designed
to protect your
G2
and SmartMedia™ card’s internal memory during insertion of your SmartMedia™ card or you can insert
another SmartMedia™ card for storage images.
Important Notes:
• Do not leave the SmartMedia™ card cover open and make sure it is closed properly otherwise
G2
cannot be switched on.
• Your
G2
will go to Standby Mode during insertion of your SmartMedia™ card and images taken will not be lost.


