background image


38

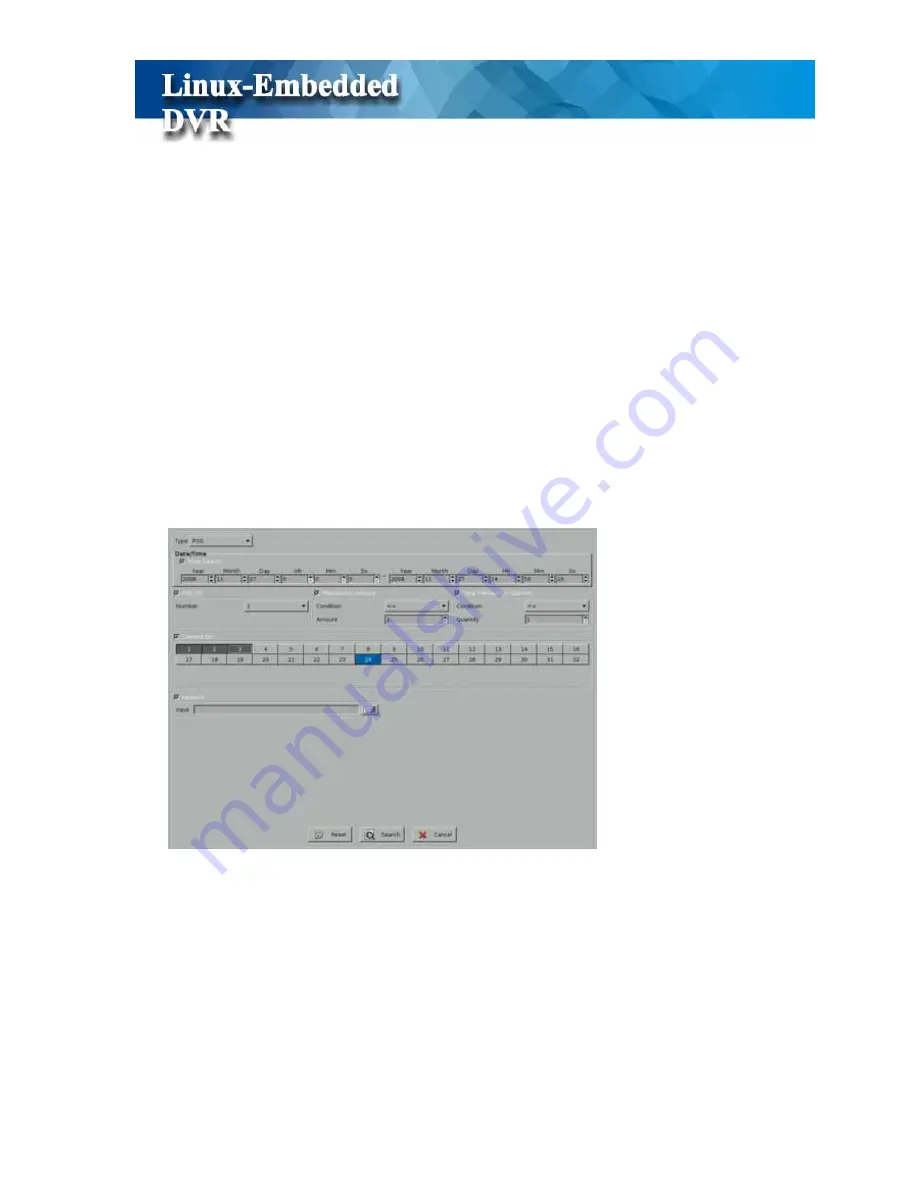
4-2-4 Event Search by POS


Because this DVR supports POS application, you can search the POS events when you enable 

POS integration function. Please refer to Chapter 5-7 POS Setting. When you do the POS event 

search, you can also add the “

Time Search

” condition to narrow the search range. By marking 

the various 

POS conditions, 

you can


decide the search range. 

        DVR provides the following search conditions     

z


POS No: Search the video by POS No.     

z


Transaction Amount: Search the recorded data by setting the transaction amount.   

z


Total Transactions Quantity: Search the recorded data by setting the transaction 

quantity. 

z


Camera No: Search the recorded data by the camera no. 

z


Keyword: Search the recorded data with the keyword in POS transaction content.


Refer to the 

Step 4 to Step 6 of Time Mode Search

 to search the recorded data.   


Besides the detail POS transaction data is listed in 

Control Window

, you can also enable POS 

Playback OSD function to let POS transaction data overlaid in the screen. Please refer to 

Chapter 4-6-4 Playback Setting.    


Summary of Contents for M1600

Page 1: ......

Page 2: ...DIO VOLUME ADJUSTMENT 20 3 5 CAMERA STATUS 20 3 6 ALARM INPUT STATUS 21 3 7 ALARM OUTPUT STATUS 22 3 8 HDD STATUS 22 4 PLAYBACK 24 4 1 SEARCH RECORDED DATA BY TIME 27 4 2 SEARCH RECORDED DATA BY EVENT 31 4 2 1 Event Search by Time 32 4 2 2 Event Search by System 35 4 2 3 Event Search by Device 37 4 2 4 Event Search by POS 38 4 3 PLAYBACK SCREEN STYLES 40 4 4 PLAYBACK COLOR SETTING 43 4 5 PLAYBACK ...

Page 3: ...tional 74 5 3 USER ACCOUNT MANAGEMENT 76 5 4 ALARM 79 5 4 1 Add Modify Delete Alarm Rule 79 5 4 2 Alarm Device Configuration 90 5 5 NETWORK 94 5 5 1 General 94 5 5 2 DDNS 97 5 5 3 Remote Control 98 5 5 4 Network Share 99 5 6 STORAGE 101 5 6 1 Disk 101 5 6 2 Disk Recycle 102 5 6 3 RAID Box 102 5 7 POS 104 5 7 1 POS Setting 105 5 8 SYSTEM 111 5 8 1 Time Setting 111 5 8 2 Security 114 5 8 3 COM 114 5...

Page 4: ...LANGUAGE 127 6 5 DVR PLAYER 128 6 6 DVR REMOTE BACKUP 131 6 7 REMOTE REBOOT DVR 132 6 8 REMOTE UPGRADE DVR FIRMWARE 133 6 9 REMOTE MONITOR VIA 3G GPRS WI FI MOBILE HANDSETS 135 6 9 1 Window Smartphone and Handsets 135 6 9 2 Java Smartphone and Handsets 140 7 APPENDIX 150 A HARDWARE COMPATIBLE LIST FEHLER TEXTMARKE NICHT DEFINIERT B FAQ 151 C INTERNET CONNECTION 154 D MAINTENANCE 155 E CUSTOMER SER...

Page 5: ...tection function will enable the recording only when there is motion of the objective and makes the system and data retrieval more efficient High Reliability Normal PC digital surveillance system adopts the MS Windows OS Operating Systems Such kind of system is so often to crash It usually makes a negative impression which digital surveillance system is unreliable This DVR system adopts Embedded L...

Page 6: ...nce of IP surveillance compared to CCTV High Resolution Display and Wide Screen Support To provide better screen quality DVR supports 1024 768 and above high resolution and supports 16 9 wide screen display without picture distortion User can select best DVR display resolution according to the monitor he uses 64 High Channel DVR Solution From V6 00 DVR supports max 64 channel camera connections wi...

Page 7: ...tment Brightness Contrast Hue Saturation for each camera Compression MPEG 4 like Compression Resolution NTSC 720 480 320 240 PAL 720 576 320 240 Frame rate per channel NTSC 15fps 720 480 30fps 320 240 PAL 12 5fps 720 576 25fps 320 240 Pre Schedule Recording By 7days x 24hours set each hour as recording by events continuously recording non recording Motion detection area Define any 8x8 cell for mot...

Page 8: ... clients access simultaneously Max 16 ch sync playback Remote playback Web Viewer Remote backup Max 64 DVR connections with 1024 Ch Remote monitoring Remote playback Remote backup One time backup or periodical backup Central Management System E MAP Max 200 DVR connections Remote DVR Health Check Control Center Remote Time Sync Remote Functions Remote Backup by Windows Network Neighborhood Inputs 4...

Page 9: ...word protection Password expiry management PTZ camera support Yes Power Down Management Yes Auto recovery when power back Watchdog Yes Hardware Watchdog Time Zone Daylight Saving Yes AVI Format Export Yes Time Sync Support Time Server FM and RTC Time Sync POS Support POS integration Other UI Language 9 languages in single software English French German Japanese Portuguese Spanish Dutch Traditional...

Page 10: ...ck mode 3 Disk Tool Tools for HDD storage device including Scan Disk S M A R T Diagnostic Disk manager to assign camera to HDD and RAID configuration 4 System Tool Reset Configuration 5 Select Language Select preferred language Traditional Chinese English Japanese French German Portuguese Dutch and Spanish 6 Camera Signal Switch DVR to NTSC or PAL mode according to camera signal type 7 Display Res...

Page 11: ...hat incorrect camera signal will cause abnormal image format z Select Display Resolution To provide better display screen quality this DVR system supports multiple display resolutions DVR will automatically detect the resolutions that monitor supports and list them in the menu We suggest to select the highest resolution listed in the menu z Disk Tool Format HDD If DVR is not equipped with an insta...

Page 12: ... and the system will restart automatically z Disk Tool RAID Box Configuration If DVR is equipped with ARECA RAID Box you should have RAID configuration before you start to assign camera to disk in DISK Manger of Main Menu 1 Step 1 Go to Main Menu Disk Tool RAID Box Configure ...

Page 13: ...nterface to sent RAID alarm message to DVR 3 Step 3 Authentication The default password is 0000 4 Step 4 Select RAID JBOD mode Because ARECA 5030 RAID Box is SATA interface with host please select RAID mode JBOD is for IDE interface 5 Step 5 Select RAID mode Please assign each disk Channel as Hot Spare or RAID disk ...

Page 14: ...e data can be reconstructed from the remaining data and parity drives Please have the proper configuration according to your requirement RAID Level Description Min Drives Max Drives Data Reliability 0 z Also known as stripping z Data distributed across multiple drives in the array z There is no data protection 1 5 No data protection 1 z Also known as mirroring z All data replicated on N separated ...

Page 15: ... dedicated parity disk 3 5 Lower than RAID 1 Higher than a signal drive 7 Step 7 Select capacity and stripe size Available Capacity means the max capacity that can be used in the RAID disk You can select how much disk space that you want to use The RAID box provides the options of Strip size that you use 8 Step 8 Initialization The final step is initializing the RAID Box There are two modes for se...

Page 16: ...12 3 Main Screen ...

Page 17: ...l List PTZ Control Menu 3 Color Adjustment List four color parameters including Contrast Brightness Chroma and Saturation 4 Audio Volume Setting Adjust live audio volume 5 Control Window Control Window for Display Screen Style PTZ Control Color Adjustment Audio Volume function 6 Camera List List all of DVR channels and each camera status 7 Alarm Input List all of alarm input devices and status of ...

Page 18: ...tyle you want 3 1 1 Split Styles This DVR system supports two types of split styles according to the monitor you install For the 4 3 monitor it will support 4 6 8 9 10 13 16 25 36 49 and 64 split styles For the 16 9 wide screen it will support 4 6 8 9 14 17 24 33 36 48 and 65 split styles The split styles that DVR supports will be listed in the Control Window You just need to click on any split st...

Page 19: ... Alarm event If you want to enable this function firstly you should go to Setup Alarm menu to set up Motion to Zoom or Alarm DI to Zoom Rule Please refer to Chapter 5 4 Alarm Click Event to Zoom icon in the Control Window to switch to Event to Zoom display style 3 1 3 1 Rule of Event Zooming 1 When the DVR detects motion or alarm on the channel set with Motion to Zoom or Event to Zoom it will imme...

Page 20: ...e zoomed in and the red frame marked in this channel will disappear z If DVR doesn t detect the current zooming channel with motion or alarm again the first priority of the zooming in channel in waiting list is the one of which channel number is the smallest For example if DVR detects concurrent motions or alarms on channel 3 and channel 4 the channel 3 will be zoomed in to the Zoom in Window firs...

Page 21: ...17 3 1 4 Full Screen When you click Full Screen function in Control Window DVR will maximize the display screen to full screen without user interface ...

Page 22: ...Function 1 PTZ Channel 2 OSD Menu 3 Auto Focus 4 Focus Far 5 Focus Near 6 Start Auto pan 7 Stop Auto pan 8 Zoom Out 9 Zoom In 10 PTZ Speed 11 Speed Up PTZ 12 Slow Down PTZ 13 Preset Point 14 Quick Select 15 Preview Window ...

Page 23: ...g any channel that with PTZ function Please refer to Chapter 5 1 6 PTZ Camera Setting PTZ Control menu will show in the Control Window You can see each button definition in above PTZ control table 3 3 Color Adjustment When you click Color Adjustment Tab it will show Color Adjustment Parameters in Function 1 Camera Channel 2 Contrast 3 Brightness 4 Chroma 5 Saturation ...

Page 24: ...itor mode you can disable this function in the System Setting menu Please refer to Chapter 5 8 2 Security Setting 3 4 Live Audio Volume Adjustment When you click Audio Volume adjustment Tab it will show the tool bar for the adjustment of Live Audio Volume The source of Live Audio comes from the microphone connected to the DVR Mic in connector 3 5 Camera Status The Status Window shows total camera ...

Page 25: ... Motion not detected Red Motion sensor Motion detected recording Gray No recording 3 6 Alarm Input Status When you click Alarm Input Status Tab the Status Window will show the total Alarm Input devices that this DVR can be connected and the status of each device as below Color Status Gray Alarm Input device is disabled Green Alarm Input device is enabled but alarm device is not activated Red Alarm...

Page 26: ...th column shows the rest of HDD space When you start using a new hard disk for example a hard disk with capacity 80GB the percentage of free space will be very close to 100 e g 99 and the color will be BLUE However as recording continues the available space will diminish When the remaining available space is less than 4GB the display color will change to ORANGE This serves as a warning message tha...

Page 27: ...23 will turn RED Note z This DVR system supports maximum six HDDs without RAID function z This DVR system supports maximum six HDDs volumes with RAID function ...

Page 28: ... bottom right of main screen it will pop up the Access Menu as below Click Playback tab and it will prompt you to enter username and password to login to the Playback Menu as below Click on the keyboard icon to enter the user name and password of Administrator ...

Page 29: ...s below z Preset user name admin z Preset password 1111 2 If Playback Password Protection function is enabled you need to enter administrator user name and password for Login authorization Please refer to Chapter 5 8 2 System Security for the authorization of playback ...

Page 30: ...ata by event conditions 4 Playback Color Setting Set the playback 5 Playback Audio Setting Set playback audio volume 6 Playback Control Window Control Window for Time Search Split Type Event Search Color Setting Audio Volume setting 7 Playback Control Panel Set playback functions including Play Pause adjust Playback Speed Rewind Next Frame 8 Access Menu List Playback Access functions including Mon...

Page 31: ... Event When you click the tab of Time Search it will show three kinds of time parameters for selecting and jump to the recorded data by time directly including Calendar Hour and Minute 1 Step 1 Select Calendar Click on the Calendar tab and it will pop up a calendar If there is recorded data the date will show red color for selection Calendar Hour Minute ...

Page 32: ...show the pull down menu providing 0 23 hours for selection If there is recorded data in the hour it will show red color for selection otherwise it will show black color If it is daylight saving time with extra one hour the color in that hour will show yellow color 3 Step 3 Select Minute Click Min tab and it will show the pull down menu providing 0 59 minutes for selection If there is recorded data...

Page 33: ... recorded data in the playback window Note 1 If the time bar in Timemap shows green color it means the recorded data with video and audio 2 If the time bar in Timemap shows red color it means the recorded data with video only ...

Page 34: ... from 1 8 1 7 1 6 1 5 1 4 1 3 1 2 to 2 3 Next Frame button allows you to play picture by picture 5 Step 5 Change playback split style The default split style when entering Playback mode is 4 split This DVR totally supports 4 8 9 10 and 16 split styles in 4 3 monitor and 4 8 9 14 and 17 split styles in 16 9 monitor If you want to see more playback channels at the same time you can click Split Tab t...

Page 35: ... within the time range you set up System Search all of the System events within time range which you set up by ticking the Time Search at the same time or Search all of the System events without time boundary by disabling the Time Search Device Search all of the Device events within time range which you set up by marking the Time Search at the same time or Search all of the Device events without t...

Page 36: ...tep 2 Set up the time range of starting point and end point including Year Month Day Hour Minute and Second 3 Step 3 Click Search tab to start the Event Search Click Reset tab to go back to Default time range Click Cancel tab to stop the event search 4 Step 4 Then it will show the Search Report as below ...

Page 37: ... System event Each page in the search report includes 24 event logs and you can click one of the Jump button to go to the event page you want to see Jump to the first page of event search report Jump to the preview page of event search report Jump to the next page of event search report Jump to the last page of event search report You can click Print tab to print the logs of search report 5 Step 5...

Page 38: ...window lists the detail description of selected event log that you select in the up window Click any log in the up window and the detail information of this log will be shown in the down window Click Goto tab to jump to the start point of the event and click Play button to start to play the event video Search Logs Detail Description of Selected Event Log ...

Page 39: ...tem You can search the event by System mode and you can also add the Time Search condition to narrow the search range By marking the various System conditions you can decide the search range The following table lists all of the System Events Event Group Rule Recording Start Recording Stop Recording running Record Recording exception Capture setup error Capture Capture sync error ...

Page 40: ...ayback mode DVR online Current Timezone Detect camera count error Monitor System Shutdown Disk error detected System Setup change Setup Max user count limit is 128 Enter monitor Playback Enter backup No disk found Disk error Storage Recycle disk FTP alarm E mail alarm SMS alarm Alarm Voice Dialer Setup change by remote user Remote Setup Fail Remote Remote Setup get Fail Refer to the Step 1 to Step...

Page 41: ... of the Device Type Device Event Event Type Log Message Camera Motion Camera Motion 1 2 3 Camera Video Loss Video Loss 1 2 3 Camera Enable Camera Enable 1 2 3 Camera Mask Camera Mask 1 2 Remote Alarm Record Remote Alarm Record 1 2 3 Camera Camera Disable Camera Disable 1 2 3 DI DI is triggered or not DI is triggered 1 2 3 DO DO is triggered or not DO is triggered 1 2 3 Refer to the Step 1 to Step ...

Page 42: ...h the video by POS No z Transaction Amount Search the recorded data by setting the transaction amount z Total Transactions Quantity Search the recorded data by setting the transaction quantity z Camera No Search the recorded data by the camera no z Keyword Search the recorded data with the keyword in POS transaction content Refer to the Step 4 to Step 6 of Time Mode Search to search the recorded d...

Page 43: ...39 ...

Page 44: ... Window DVR will maximize the playback screen to full screen without user interface z Split Styles Like Screen Style in Monitor Mode to maximize the screen display this DVR system also supports two types of split styles in Playback mode according to the monitor you install However the maximum concurrent playback channels are 16 channels For the 4 3 monitor it will support 4 Split 8 Split 9 Split 1...

Page 45: ... style that you want to set Group in Screen Style Mode For example 4 Split Style 2 Step 2 Go to Time Search Mode The default playback channels for 4 split style are 1 2 3 and 4 channel Click Channel 5 data bar in Timemap and Drag and Drop it to the screen location of channel 1 Then the screen picture of channel 1 will be replaced by channel 5 Repeat this step to replace channel 2 with channel 6 ch...

Page 46: ...provided by DVR to ensure system reliability DVR will automatically detect DRAM capacity If DVR is installed 1G DRAM it will provide max 16 channels playback function If DVR just installs 512MB DRAM or less only four channels or eight channel playback function will be provided Please refer to the following table for the playback channels that are provided by DVR system according to the DRAM and DV...

Page 47: ...annel to enlarge it to single screen and the color setting will be shown on the Control Window for your setting 4 5 Playback Audio Setting Click Audio tab in the Control Window and it will show the audio volume control bar for your setting However this function only works in signal screen mode you should click on any channel to enlarge it to single screen and the audio volume control will be shown...

Page 48: ...playback window and Playback Access menu will be shown as below If you want to back to monitor screen just click Monitor Exit tab 4 6 1 Snapshot Click Snapshot tab to catch the images and you can print or save them to USB storage device this selection shown after plugging in USB storage device ...

Page 49: ...int button and then select the Printer model you connect Note 1 This DVR only supports USB printer If DVR don t connect a USB printer the print button will be disabled 2 The default paper size is A4 3 If there is any unfinished printing file before printing they will be automatically deleted 4 This DVR only supports one USB printer 4 6 2 Export Log You can backup the log file to external storage d...

Page 50: ...46 ...

Page 51: ...Video Files You can back up the video files from hard disk to burning device such as CD R W or DVD R W or USB external storage media such as USB pen drive or USB Hard Disk Click Export Video tab to see the following screen ...

Page 52: ...that the back up program has detected the IDE USB burning devices or USB storages If not please check if the device is installed properly and click to rescan the device After that the device still can t be detected please verify if the device is ok 2 When you put the disc to burning device or plug the USB storage device to the DVR click the Backup Device or Rescan Device to get the device informat...

Page 53: ... icon and the system will start to convert the selected files into standard ISO 9660 format files Make ISO and burn the files to the disc 8 If the backup device is USB storage and the device space is enough to back up the selected files the Export Files icon will lighten when you add the Selected files to the right column of the screen for backup Click this icon and the system will start to copy t...

Page 54: ...if the files are successfully burned to the disc 1 Automatic verification after files burning z Step 1 Click Configure icon and it will pop up the menu as below z Step 2 Click Verify files in disc after burning and enter OK button to save the burning configuration z Step 3 Start to proceed with file burning Please refer Chapter 4 6 3 1 Backing Up Procedures z Step 4 Verification Report After files...

Page 55: ...s that are failed to burn to the disc or failed to add digital signature Unverifiable Files The numbers of unverifiable files If you don t enable Digital Signature when recording the recording files can t be verified 2 Manual verification after files burning z Step 1 Select device as CD ROM DVD ROM Verification Progress Verification Summary Current Status List of Unverifiable Files Failed to verif...

Page 56: ... after files burning DVR will prompt a message of the files failed to burn to the disc Note You should enable Digital Signature in system configuration when recording If you don t enable Digital Signature the recording files can t be verified and will be marked as Unverifiable Files ...

Page 57: ...select Even only or Weave Each one has different enhancement on playback video quality You can select the one you prefer to fit your quality requirement 2 Playback OSD The configuration of OSD is to decide what information will be shown on the playback video and where it will be shown This DVR provides the function of overlaying the audio icon and POS message on the screen If you want to overlay t...

Page 58: ...ss Menu as below Click Setup tab and it will prompt you to enter username and password to login to the Setup Menu as below Click on the keyboard icon to enter the user name and password of Administrator Note The preset user name and password of Administrator are as below z Preset user name admin z Preset password 1111 ...

Page 59: ...in to the Setup menu following Setup Main Menu will pop up and you can start to go to each setup submenu to have DVR configurations To exit the Settings click Close tab on the bottom of Setup Main Menu to back to the Access Menu ...

Page 60: ...Use the keyboard legend on the right of Camera Name field to enter camera alias name 3 Camera Status Disable Enable Hide If the channel is not connected to a camera set Disable If it is connected set Enable If you don t want the camera image to be showed on the main screen set Hide You can click Copy to button on the right of Camera Status to copy the camera status to other camera channels Camera ...

Page 61: ...her quality setting will consume more hard disk space 6 Digital Signature Enable Disable The setting allows you to encrypt digital signature watermark to the video content 7 Audio Enable Disable Beside the video this DVR system also supports audio input on video channel The number of audio channel supported by your DVR system depends on the model you install from one channel to maximum 16 channels...

Page 62: ...n Area z Sensitivity 10 20 30 40 50 60 70 80 90 100 You can set the sensitivity of motion detection during recording It is recommended to adjust the setting to 100 in order to prevent any data loss However in some special conditions the system continues to record even when no motion has occurred This will result in a considerable amount of useless data being recorded In such a case it is recommend...

Page 63: ...2 Under Non Motion Detection Area Select Set option in selection bar Use mouse to drag an area that you want to have motion detection You can set multiple areas by dragging mouse again Method 3 One Time Setting You can also have one time setting by clicking under Full Motion Detection Area or clicking under Non Motion Detection Area ...

Page 64: ...SD OSD On Screen Display Position you can select where the time and camera name will be displayed in the image in live view There are four positions to choose from Top Left Top Right Bottom Left and Bottom Right ...

Page 65: ...e you can adjust Contrast Brightness Hue Saturation Color Adjustment function is also provided in the monitor mode except that the Security of Monitor Color Setting is enabled Please refer to the Chapter 5 8 2 Security setting ...

Page 66: ...ou can define individual camera recording rule and arrange recording schedule z Add Add a new recording rule schedule z Modify Modify existing recording rule schedule z Delete Delete recording rule schedule When you click Add Modify the dialog box below will appear to provide with Recording Schedule setting ...

Page 67: ...ck Next 1 Schedule Type Week Cycle Type If you select the Schedule Type as Week DVR will repeat the recording type weekly Select a day from Monday to Sunday and set recording Start Time and End Time and click Next If you select Event Recording in Recording Mode at previous step it will pop up the Event Recording setting menu as below ...

Page 68: ...ord setting 0 600 seconds is to record a certain seconds after an alarm happens If you select Full Recording in Recording Mode at previous step it will pop up the Full Recording setting menu as below You can set the recording frame rate of fully recording from 1 2 3 4 5 6 7 8 10 12 15 20 25 to max The higher the number is the higher frame rate it will be recorded However with higher frame rate the...

Page 69: ...Recording or Event Recording described in Week schedule type to finish the recording schedule setting 3 Schedule Type Range If you select Range as recording type DVR will repeat the same recording type during the period you set z Step 1 Set the period you want to repeat the same recording type Select the Start Date and End Date z Step 2 Set the Start Time of Start Date and End Time of End Date z S...

Page 70: ...ng types by setting fully recording from 6 00 to 18 00 2007 07 01 to 2007 07 05 z Week Type Setting Full recording from 6 00 to 18 00 Monday to Sunday Sun Mon Tue Wed Thu Fri Sat z Routine Type Setting Full recording from 6 00 to 18 00 2007 07 01 to 2007 07 05 07 01 07 02 07 03 07 04 07 05 Setting Full recording from 18 00 to 6 00 2007 07 01 to 2007 07 05 07 01 07 02 07 03 07 04 07 05 12 6 18 24 0...

Page 71: ...ype That means if there is time overlapping between Week type and Routine type or Week type and Range type the Rule of Routine type and Range type will overwrite the Rule of Week type in the overlapped time frame However Routine and Range type are with the same priority and can t overwrite each other That means the new rule of Routine or Range type can t be successfully built up if the time frame ...

Page 72: ...232 converter to USB port of DVR Step 2 Connect RS232 to RS485 converter to the connector of USB to RS232 converter Step 3 Connect the cable of PTZ to the RS485 converter 2 Software Installation According to PTZ Hardware device and connection type please follow up the steps as below z Step 1 Select Enable in PTZ Status option z Step 2 If your DVR only supports analog PTZ cameras please skip this s...

Page 73: ...ation and it will pop up the PTZ Control panel as below 3 PTZ Control Functions There are two parts of PTZ Control functions On is Standard function applied to all PTZ models and the other one is Advance function that will be different between PTZ models z Standard PTZ Functions Focus near Focus far Auto focus Zoom in Zoom out PTZ moving direction z PTZ Advanced functions ...

Page 74: ...control panels move the PTZ camera to the position that you want for Preset point 1 D Click Save tab to save the Position of Preset Point 1 E You can click Reset tab to reset the Preset point that you set F Totally DVR supports 128 preset points Auto Pan function A Tick the Group options of Autopan Group 1 Preset Point 1 to 4 Group 2 Preset Point 5 to 8 Group 3 Preset Point 9 to 12 Group 4 Preset ...

Page 75: ...ach Quick ID Note 1 Preset and Auto pan function is different from protocol to protocol 2 The above example is given using Lilin protocol for example 3 If user selects Eyeview PTZ model please set Baud Rate as 2400 in DVR and physically set the PTZ protocol as Pelco D in Eyeview PTZ according to the Eyeview s user manual If it still can t work please contact your PTZ supplier to check the firmware...

Page 76: ...VR supports 1 channel 4 channel and 16 sequencer styles For the 1 channel sequencer style you can set up the desired sequencer order and duration up to 300 seconds For the 4 channel and 16 channel sequencer styles the display formats are 4 spilt and 16 split separately You can set up the sequencer duration up to 100 seconds ...

Page 77: ...sets for monitor with 16 9 proportion 4 6 8 9 14 17 24 36 48 and 65 split style To show the best display performance DVR will automatically detect the monitor connected to DVR 4 3 monitor or 16 9 monitor and provide one of the split sets Step 1 Click any tab of split mode Step 2 Click the small block on the split screen and then you can modify the camera shown on each split screen An example for t...

Page 78: ... Main Monitor You can set split style for Main monitor and assign the channel to each split screen Main Monitor supports 1 4 6 8 9 10 13 and 16 split style for selection z Quad Monitor There are 1 4 split display and 4 split sequencer for each Quad monitor and you can assign the channels to display in each Quad monitor The max number of Quad monitors supported by each Quad card is 4 monitors If yo...

Page 79: ...75 Note z Only analog camera can be displayed in these monitors ...

Page 80: ...n click on the User tab on Setup Main Menu This DVR provides two system preset accounts The user names and passwords for these two accounts are as below z User name admin Password 1111 is for the system management account This account cannot be deleted z User name net Password 1111 is for the normal user account This account can be deleted 1 Add User Account Click Add icon to add new user accounts...

Page 81: ... disable the user to dial into the DVR i e to access the system through modem z Export Log Enable Disable The permission for exporting SYSTEM Log z Password Expiration This is the notification of password expiration The time setup range can be 1 365 days When the password expires the following dialogue will appear z Remote DO Control This function enables remote application ex CMS to toggle DVR DO...

Page 82: ...You can define different levels of user permission on Monitor and Playback authority Please refer to Chapter 5 8 2 Security to enable Playback and Monitor authorization in advance z The preset user of admin can t be deleted 2 Modify User Account Click Modify tab to modify the existing user account The operation is similar to that of the Add User Account above 3 Delete User Account Click Delete ico...

Page 83: ...of Alarm configuration 5 4 1 Add Modify Delete Alarm Rule Click Add tab to start to build up Rule of Alarm Trigger and all of the Rules will be listed in the Rule Window Select any Rule in Rule window and Click Modify tab to modify Rule or click Delete tab delete Alarm rule ...

Page 84: ...ith alarm message and three continuous event pictures to three E Mail addresses that you set up The DVR events include System Error System Warning Camera Motion Camera Video Loss and DI Alarm Input Please refer to Chapter 4 Playback to see the definition of Events z Step 1 Select Event Type to trigger DVR sending E Mail For the events of System Error and System Warning you just need to Enable or D...

Page 85: ...rm After setting you can click Test tab and it will pop up the window of E Mail testing result as below z Step 3 Click OK tab when you have done the setting z Step 4 Besides the setting in this menu you should have further configurations of E Mail server to let this function work Please refer to Chapter 5 4 2 about setting E Mail of server ...

Page 86: ...Please refer to the description of All Events E Mail settings z Step 2 Enter the IP address of FTP site z Step 3 Click OK tab when you have done the setting z Step 4 Besides the setting in this menu you should have further configurations of FTP server to let this function work Please refer to Chapter 5 4 2 about setting of FTP server 4 3 All Events SMS When DVR detects events it will send SMS alar...

Page 87: ...receive SMS message z Step 3 Enter the Subject of the alarm message for example DVR Alarm z Step 4 Click OK tab when you have done the setting z Step 5 Besides the setting in this menu you should have further configurations of GSM Modem to let this function work Please refer to Chapter 5 4 2 about setting of GSM Modem 4 4 Camera Motion Camera Zoom in When DVR detects motion of selected cameras it ...

Page 88: ...that motion picture stays in the Main monitor or Quad monitors z Step 2 Click any Monitor tab Main Monitor or 1th 4th Quad Monitors z Step 3 Select the camera that will trigger call monitor function in Main monitor and Quad monitors You can tick the square icon in front of each camera or click Set All tab or Clear All tab z Step 4 Click OK tab when you have done the setting 4 6 DI Alarm Input DO A...

Page 89: ...one the setting z Step 3 Besides the setting in this menu you should have further configurations of DI Alarm Input device to let this function work Please refer to Chapter 5 4 2 about setting of DI Alarm Input device 4 7 DI Camera Recording When DI is triggered DVR can start to record the video of selected cameras You can select the cameras to be recorded when DI is triggered Each DI signal can tr...

Page 90: ...I Alarm Input device that will trigger camera for zooming Each row in the DI Camera Zoom in menu represents one DI Alarm Input device and each column shows one camera Click any row in the menu to select DI Alarm Input device and tick the square icons in each column to select the cameras to be zoomed in z Step 2 Click OK tab when you have done the setting z Step 3 Besides the setting in this menu y...

Page 91: ... setting in this menu you should have further configurations of DI Alarm Input device to let this function work Please refer to Chapter 5 4 2 about setting of DI Alarm Input device Note 1 When many events occur at the same time the Main Quad monitors will pop up a camera s image in full screen The popping camera is chosen by the number of the camera for example camera 1 be selected firstly then ca...

Page 92: ...p 2 Click OK tab when you have done the setting z Step 3 Besides the setting in this menu you should have further configurations of DO Alarm Output device to let this function work Please refer to Chapter 5 4 2 about setting of DO Alarm Input device 4 11 Cam V Loss DO When selected cameras lose the video signal selected DO can be triggered and start to send control signal to the external device e ...

Page 93: ...ou should have further configurations of DO Alarm Output device to let this function work Please refer to Chapter 5 4 2 about setting of DO Alarm Input device 4 12 System Event DO Alarm Output There are two types of system events to trigger DO device including System Warning and System Error Please refer to Chapter 4 Playback to see the definition of System Events When system event occurs selected...

Page 94: ...to Chapter 5 4 2 about setting of DO Alarm Input device 5 Interval Set alarm notice interval and click Next tab to have detail configurations The interval can be set from 1 second to 86400 seconds 1 day 5 4 2 Alarm Device Configuration Besides the setting in Chapter 5 4 1 for each Alarm Rule you should have further configurations for the alarm devices including DI Alarm Input DO Alarm Output E Mai...

Page 95: ...p on triggering in that time interval z NO normal open The signal loop is open under normal conditions When the loop becomes closed DI will be triggered until the loop becomes open again In other words if the loop keeps on closed for a period of time DI will keep on triggering in that time interval 2 Configuration of DO Alarm Input device Click the tab of DO and it will show the menu of DI configu...

Page 96: ...menu of E Mail server configuration z Enter the IP address or the hostname of the E Mail server z Enter sender s full email address It must be a valid email address z If the mail server requires user name and password to send emails please Enable the option of SMTP Authorization z Enter Username and Password for the SMTP authorization Note If you don t know the IP address of your mail server you c...

Page 97: ...tion of GSM Modem for Sending SMS Message Because SMS message is sent via GSM Modem you should shave the setting of GSM modem Click the tab of SMS and it will show the menu of GSM modem for yours configuration z Set the Baud Rate to be 9600 baud per second Note If you fail to send SMS successfully you may reduce the baud rate to 4800 or 2400 bps and try again z Set the DVR COM Port interface accor...

Page 98: ...neral DVR Network Address This DVR supports Static IP and Dynamic IP address If you select Static IP please enter IP NetMask and Gateway in the fields If you select Dynamic IP and click Apply tab DVR will be assigned a set of IP configurations automatically You can click Reconnect tab when DVR is disconnected ...

Page 99: ...reconnect to ISP if it detects connection over time However this behavior will not be recorded as a log z It will be recorded as a DVR log when DVR dials out successfully failed or reconnects z If it is in connection status DVR will disconnect the network connection and then reconnect again when you click Reconnect button z FTP sending Alarm under PPPoE connection When you enable PPPoE connection ...

Page 100: ... Status as Setting Auto DHCP or Auto PPPoE according to this table Network Setup Static IP Dynamic IP Disable Setting Set DNS IP manually Setting Set DNS IP manually Auto DHCP Automatically assign DNS IP by DHCP PPPoE Setup Enable Setting Set DNS IP manually Auto PPPoE Automatically assign DNS IP under PPPoE connection Setting Set DNS IP manually Auto DHCP Automatically assign DNS IP by DHCP Auto ...

Page 101: ...ustomer pay account To use this service for free account you must apply an account from several free Web servers such as http DynDNS org 1 Step 1 Enable DDNS 2 Step 2 Select DDNS Provider and Service supported by this DVR Enter DVR Host Name and select Domain in the list 3 Step 3 Enter User account and Password to login to DDNS server to get DDNS service You can click Apply to let DVR connect to D...

Page 102: ... detecting Firewall NAT IP address will be affected by the ISP s transparent proxy so that DDNS provider detects the wrong IP Please ask your local ISP to solve this issue 5 5 3 Remote Control This DVR system provides powerful remote control functions including Remote Monitor Remote Setup Remote Playback and Remote Backup In the DVR site you need to define the remote authority and set up the remot...

Page 103: ...ures per system per second for remote access The remote PC needs to install MPEG4 player which can be download from the DVR z Frame Rate This function defines that the DVR can send how many number of frames per second to remote side for monitoring There are five levels of remote frame rate including Lowest 30fps Low 60fps Medium 120fps High 240fps and Highest 480fps If Remote Monitor is disabled o...

Page 104: ...VR for identification in the network 3 Enter the Workgroup 4 Give a password for remote access of the files 5 Click on the camera numbers to be shared in the network Please refer to Chapter 6 for remote operation Note Network Share only can be used in LAN environment ...

Page 105: ... tab on the Setup Main menu to enter the window of Storage configuration 5 6 1 Disk This function let you check HDD status by clicking S M A R T tab You can see the HDDs in the Disk Window and all of the cameras recorded in the HDD ...

Page 106: ...ration of the video file and it doesn t recycle log file z Even if the video files are recycled DVR will keep the log file for the last two weeks 5 6 3 RAID Box This DVR integrates with ARECA RAID Box and supports RAID configuration and RAID alarm notification These two functions are done via DVR COM Port Please refer to the physical installation of ARECA RAID Box If your DVR equipped with RAID Bo...

Page 107: ...ight window Information Description RAID Box information 1 Vendor name 2 Serial number 3 Firmware version 4 Boot ROM version 5 MBR version 6 Model name ex Areca 5030 7 Com Port RAID Setting information 1 RAID Alias name 2 Capacity 3 Number of member disks in this RAID set 4 RAID State 5 Number of volumes created in this RAID set Volume setting information 1 Volume Name 2 RAID Level 3 Capacity 4 St...

Page 108: ...ering It can largely be applied to convenience store grocery gas station and etc For POS application this DVR integrates with EPSON printer protocol and 3688 printer protocol in it Generally if your POS system supports EPSON printer or 3688 printer protocol DVR can work with it Through RS232 RS485 and Ethernet connection interface DVR can receive the transaction data from POS You need the extra co...

Page 109: ...ick Add to start to add POS device When you click Add it will show the POS Setup menu as below 2 Enter the POS Name and Enable the POS device Currently DVR just supports English POS name If you don t enter any character or enter ...

Page 110: ...S and KANGS POS products Please select the correct POS system If your POS system is not in the list you can select Others option but POS transaction data will only show in the Display mode z Font Size Please select the font size of POS message you want to display in camera channel The range of font size is from 12 to 20 z Idles Time The time at which POS message will stay in the channel if no furt...

Page 111: ... that POS message will be shown on z Display Enable the POS message showing on the camera in Display mode z OSD Position Click Setup tab to open OSD setup menu as below picture You can drag mouse to define location and range of POS message that is printed on screen ...

Page 112: ... DVR Please set up the Baud according to your POS device Start Bit Please set up the Start Bit according to the COM port transmission spec of your POS device Data Bit Set up the data bit according to the COM port transmission spec of your POS device Parity Set up the Parity according to the COM port transmission spec of your POS device Stop Bit Set up the Stop bit according to the COM port transmi...

Page 113: ...ollow below setting 1 Please select Maitre D in Printer protocol and POS product 2 Because Maitre D POS system only supports Ethernet connection please select Ethernet in connection type 3 The default port number used to connect to Maitre D POS is 5111 ...

Page 114: ...d DVR is within 1 8m RS232 to RS485 COM Port POS DVR One POS connection The distance between POS and DVR is over 1 8m Ethernet Multiple POS Connections The distance between POS and DVR is Unlimited RS232 to Ethernet Y Cable Y Cable LAN POS DVR RS232 RS232 RS232 Ethernet 16 POS Y Cable RS232 RS232 to RS485 RS485 ...

Page 115: ...our kinds of methods to synchronize DVR s time Type Description 1 Manual Set up time manually 2 Time Server Synchronize DVR time with Time Server 3 RF Clock Synchronize DVR time with RF Clock 4 RTC Synchronize DVR time with Real Time Clock RTC z Time Sync Manually Directly select the date in the calendar and set Hour Minute and Second in the time fields ...

Page 116: ...the IP address or hostname of the Time Server You can test the Time Server function by clicking Time Server test z Time Sync with RF Clock When you use RF Clock to synchronize DVR time you should select DVR interface for connection of RF Clock device Usually the interface is COM Port ...

Page 117: ...should be connected z Time Sync with RTC Select RTC option and click Apply tab Note z Configuring Time Synchronization will reboot DVR 2 Timezone Setting When using DVR first time you should set up the correct Timezone according to the DVR location Incorrect Timezone setting will result in incorrect time synchronization via NTP and incorrect Daylight Saving time ...

Page 118: ...lease refer to Chapter 6 7 Remote Reboot DVR z Local Monitor If enabling this setting you can set user Monitor permission in User configuration menu Please refer to Chapter 5 3 User Account Management z Local Playback Export If enabling this setting you can set User permission of Playback and export video or log files in User configuration menu Please refer to Chapter 5 3 User Account Management 5...

Page 119: ...d a reset signal to the motherboard to reboot the system To enable Watchdog function please select available durations 15 20 25 or 60 seconds It requires the first capture card to have a physical connection to the reset pin of the motherboard 5 8 5 About This About Menu provides the information of DVR firmware version and product code ...

Page 120: ...Items Function Description 1 Connect to DVR Connect to DVR and start to connect DVR from remote site 2 Log Remote Log Query 3 Language Support four language operation including English Traditional Chinese French and Japanese 4 Download dvrsetup Download dvrsetup when first time connecting DVR from remote site or upgrade dvrsetup when DVR with new version upgraded Enter DVR IP Address 1 2 3 4 ...

Page 121: ...Client dvrsetup program If DVR with new version upgraded you should also upgrade dvrsetup 6 2 Remote Operation After you finish the installation of DVR client you can start to connect DVR from remote IE Click the icon of Connect DVR and the dialog box below will prompt to remind you to enter the user name and password Please refer to Chapter 5 3 User Account Management to set the user authority fo...

Page 122: ...e network transmission preference and remote DVR setup 4 Snapshot Catch display image and save to the storage device 5 Full screen Display in full screen 6 Playback Remote playback 7 Display Mode Select display division 8 Log DVR Log List 6 2 1 Remote Display Mode Click on the corresponding icons on the bottom of the screen to view difference display mode There are 4 6 8 9 10 13 and 16 split modes...

Page 123: ...d Dial up service please adjust the setup based on real ISP speed You also can adjust the image quality just select low Medium High modes for adjustment on the ComboBox We suggest you choose High for higher image Quality However higher quality will occupy more system resources network bandwidth and it will result in low display speed Low 3 Kbytes FPS Medium 6 Kbytes FPS High 12 Kbytes FPS z Remote...

Page 124: ... users Record shown in Event Search Besides once any remote setup change is done it will immediately send a message to DVR z Configuration of Remote Audio Alarm When remote IE client disconnects with DVR you can set the times of auto connection to DVR You also can set the remote alarm audio when DVR occurs Motion detect No signal Capture Fail or DVR disconnect ...

Page 125: ...t as JPEG files by clicking the Save button or print these pictures by clicking Printing button 6 2 4 Full Screen You can click the icon Full Screen to enlarge the monitoring screen display If you click any channel it will enlarge that channel If you want to return to main monitor just click the ...

Page 126: ...function click on the channel with PTZ camera directly The screen will enlarge and a PTZ control panel will appear on the right as below Items Description 1 Zoom Out 2 Zoom In 3 Focus Far 4 Focus Near 5 Auto Focus 6 Adjust PTZ Speed 7 PTZ Preset Point 1 2 3 4 5 6 7 ...

Page 127: ... recorded data file 3 Select Playback Channel Select playback channels 4 Zoom the Playback Channel Select different zooming screen 5 Full Screen Playback in full screen 6 Snapshot Catch playback image and save to the disk 7 Save Files Download and backup the recorded files 8 Change Split Mode Change playback division 9 Time Map Select playback in minute ...

Page 128: ...hannels select the time slot you want to play in the Time Tree window In the Time Tree Window it will list all of the time slots with recorded video files Click to save the configuration and start to playback according to the new configuration Download Files Click button to download files and the following Download Window will appear It will show all of the video files played in playback main wind...

Page 129: ...channel again to Show the screen Click button to print the snapshot pictures per channel per sheet by 320 240 resolution or click button to save the snapshot pictures as JPEG files Speed To reduce the playback speed Speed To increase the playback speed Playback Previous 1 min To rewind 1 minute Next 1 min To forward 1 minute Pause Stop Download file window SNAPSHOT WINDOW ...

Page 130: ...Log in the front page and it will show the menu below Step 1 Select Log Type There are four types to select All System Device and POS Step 2 Select the time for Log Query You can query the logs by day Step 3 Click OK Click OK button to start log query and the result will show in the right window ...

Page 131: ...cluding English Traditional Chinese Japanese and French The default setting of operation language will be according to the language of Windows Operation System in your PC If you want to change the operation language click the button of Language in the front page and select the language you prefer ...

Page 132: ...nd the DVR Player application in the program files z Click on the icon on bottom right to select a video clip You can check the digital signature in File Check Signature z AVI Format Export This function provides you to transform the download files from CX3 format to AVI format a Open a download file b In the Tools bar select Convert to AVI and then select the path you want to save the AVI file an...

Page 133: ...129 c Select the transforming format Here we choose Microsoft MPEG 4 Video Codec d Select transforming parameters and it will influence the file s quality and size ...

Page 134: ...workable but it will prompt a warming message if it is not workable z Below four codecs are not supported by this systems Intel 4 2 0 Video V2 50 Microsoft RLS Microsoft H 263 Video Codec Microsoft H 261 Video Codec z The time of transforming format will depend on the file size and the codec you choose ...

Page 135: ... the same network 1 Search computer in the network by the DVR name or IP address 2 Enter the username and password you set in Chapter 5 3 User Account Management If user wants to have the right of Remote Backup he should enable Remote Playback Remote Setup and Dial in Access 3 Copy the files to hard disk or storage for backup ...

Page 136: ...System Setup menu of DVR Please refer to Chapter 5 8 2 Step 2 Open IE Browser and enter Remote Reboot command Remote Reboot command http DVR ip rmapi system control remote reboot Step 3 Enter User Account and Password Only Administrator account has the authority to reboot DVR from remote side If user account passes the authentication DVR will start to reboot If not or DVR reboot failed it will ret...

Page 137: ...mote upgrade form html Step 2 Select the file for upgrade and click Go button If file is successfully uploaded to the remote DVR it will show the following message Step 3 DVR Reboot When proceeding DVR remote upgrade there should be someone at the DVR side to monitor DVR remote upgrade process When file is successfully uploaded to the DVR at remote site DVR will immediately pop up a message to sho...

Page 138: ...tart to upgrade the new firmware and show the following message After SYSTEM DVR is successfully upgraded to the new firmware version it will reboot again and SYSTEM DVR will operate in a new firmware version If upgrade failed you should use DVR Tool to do local SYSTEM DVR upgrade ...

Page 139: ...Support QQVGTA and QVGA display resolution z Support channel switch z Support snapshot and save function z Support directional control to browser camera view z Support camera PTZ control 6 9 1 Window Smartphone and Handsets Once your Smartphone or handset runs on Window Mobile 6 0 and above versions you can use Window Mobile Viewer to connect to DVRs to monitor DVR live images 6 9 1 1 Installing W...

Page 140: ...pop up an error message when you executing Mobile Viewer 1 0 in your Smartphone Please go to Microsoft website to download free version of Microsoft NET Framework 3 5 and install it to your PC After installing this tool in your PC please find NETCFv35 wm armv4i cab in the program folder copy and install it in your Smartphone Furthermore if your Smartphone runs in the language of Traditional Chines...

Page 141: ...umber Login username and password to connect to DVR Hybrid DVR or NVR If your Smartphone successfully connects to DVR Hybrid DVR or NVR it will immediately show the live image as below z Channel Switch Each time you can see one channel live image in the screen You can switch the channel view by selecting the channel number in the field of channel option ...

Page 142: ...below Zoom out Zoom in Left Right Up Down z Setup Mobile View 1 0 supports two setup functions by clicking Setup icon Image Quality Low Middle and High Image Resolution 160 120 and 320 240 z Snapshot and Save function You can catch and save live image to your Smartphone by clicking Snapshot icon ...

Page 143: ...screen In the bottom left of full screen you can see a Hide icon Click it to show the control buttons and click it again to hide the control buttons Hide Control Back to original view Snapshot Save Zoom out Zoom in Left Right Up Down Set Picture Name Select Folder Select Location ...

Page 144: ... Yes Yes Quality selection Yes Yes DDNS Yes Yes Snapshot No Yes Channel Switch No Yes Remote PTZ Control No Yes 2 5G Transmit Speed 1 3 fps 3 4fps 3G Transmit Speed 1 2 fps 3 10fps 6 9 2 1 Download Java Mobile Browser Before you start to use Java Mobile Browser at first time you should download it from WAP Gateway to install it in your mobile phone Because the application of Java Mobile Browser re...

Page 145: ...r mobile phone 9 Please use your mobile handset to connect to the WAP Gateway wap mo soft com wap 9 Select Language 9 Click Download z Step 2 Select system version 9 Select Mobile Surveillance system 9 Select Vender ...

Page 146: ...u want to download Commercial version please just select Free Version 9 Select Java MIDP Version of your Mobile Phone supported If you select Full version it will ask you to select the Java MIDP Mobile Information Device Protocol version your mobile phone support If you select Free version it won t pop up the selection Most of 3G mobile phones support MIDP 2 0 while 2G mobile phones only support M...

Page 147: ...use Java Mobile Browser z Begin Mobile Browser After you install Java Mobile Browser application the icon of this application will exist in your mobile phone Click the icon to start the Java Mobile Browser When you start Java Mobile Browser it will ask you if you agree to convey or receive information Please click Yes to enter the system ...

Page 148: ...DVR connection information including DVR Alias Name IP Address Port Username and Password In Camera Type column please tick DVR and then click Add to finish the configuration Then this DVR will be shown in the Camera List Camera List List the DVRs you can access 9 System Language We provide English and Traditional Chinese version Quit Choose Quit to finish the system you are using ...

Page 149: ...ve You can move the DVR which you already chosen and move it to a certain place 9 Main Menu Back to the Main Menu z Operation of Live Monitor Live Vision When you click Live Vision it will start the remote monitor screen as below picture 9 Operation menu PTZ You can control the PTZ via your mobile handset This Mobile Browser provides you with several control function including Moving up Down Left ...

Page 150: ...apture a single image Move If the image you are monitoring is larger than the screen of your mobile phone you can use this function to move the picture Full Screen You can use Full screen to adjust the image to fit the size of your phone Split This function provides you to monitor the previous images in the same screen The picture on the left or upper left is the latest one There are two splits If...

Page 151: ...op of which web address is www mo soft com before you start to download the Web Browser to your mobile phone Click the button of Shop If you just want to use Commercial version please skip this Section and jump to the Section of Download Mobile Browser z Link to the purchase Page Then it will list below table for your selection Please select MobileBrowser and click Buy z Enter the DVR Mac Address ...

Page 152: ...can use this Serial number to download the Java Mobile Browser on your mobile phone Note If you can t access the live image via your mobile phone please check the items as below z You should set Fixed IP instead of Dynamic IP in DVR network setting z Please check if your mobile phone can connect to network z Please check if DVR remote monitor is enabled z Please check if the version of your DVR is...

Page 153: ...149 ...

Page 154: ...ca ARC 5010 Hardware RAID Level 0 1 3 5 IDE HDD to IDE or SATA Areca ARC 5030 Hardware RAID Level 0 1 3 5 SATA HDD to IDE or SATA Mobile Surveillance Handsets Window Mobile Support Smartphones PDAs running on Window Mobile 6 0 and above versions Mobile Surveillance Handsets Symbian Java MIDP 1 0 2 0 Vender Handset Models Motorola E770 E1070 E1000 V975 A760 A768 A780 E680 E680i V3 V3x T720 A388c No...

Page 155: ...lor Elmo Eye View Messoa Elbex DongHwa A FAQ 1 Q I have set the recording mode as motion sensor recording But why the DVR still records a lot of video that has no motion at all A 1 The digital recording system is very sensitive It can detect the tiniest motion that human eyes cannot perceive You can lower the sensitivity setting in camera setup menu ...

Page 156: ...be lost It is recommended connecting the system to an Uninterruptible Power Supply UPS This will help to avoid shortening the system life span and partial data loss caused by the instability of power supply When the power returns the system will automatically re boot restore data and go back to the normal operation in approx 1 minute 3 Q Why the remote monitor not working A 1 Using the windows com...

Page 157: ...153 A It can be done from remote PC using IE browser Suppose the DVR IP address is 192 168 123 12 type http 192 168 123 12 rmapi misc screen snapshot on a remote PC to see the picture ...

Page 158: ... following figure ADSL Modem DVR Ethernet RJ45 In this case just follow the instructions in section 3 6 7 and section 4 2 to make the DVR on Internet User from Internet can use http 211 23 87 163 to connect to the DVR D 2 IP address is shared by more than one device Assume the static IP address you get from ISP is 211 23 87 163 When 1 The IP address is shared by more than one devices or 2 ISP requ...

Page 159: ...he user name and password on this router in order to successfully connect to ISP Follow the instructions in section 3 6 7 to set the IP address of DVR1 as 192 168 123 51 Users from Internet can now use http 211 23 87 163 8001 to connect to DVR1 and use http 211 23 87 163 8002 to connect to DVR2 C Maintenance Avoid placing the system in a high temperature or a high humidity environment and also kee...

Reviews: