


74
Using this method, security settings are configured with a personal identification
number (PIN). The PIN can be found on the device itself or within the software.
The PIN may be generated randomly in the latter case. To obtain a PIN number for
your client, check the device documentation for specific instructions.
The WPS PIN configuration is described in the procedure below. It is assumed that
the Wireless function is Enabled and that the router is configured as the Wireless
Access Point (AP) of your wireless LAN. In addition, the wireless client must also be
configured correctly and turned on, with WPS function enabled.
NOTE:
Unlike the push-button method, the pin method has no set time limit.
This means that the router will continue searching until it finds a client.
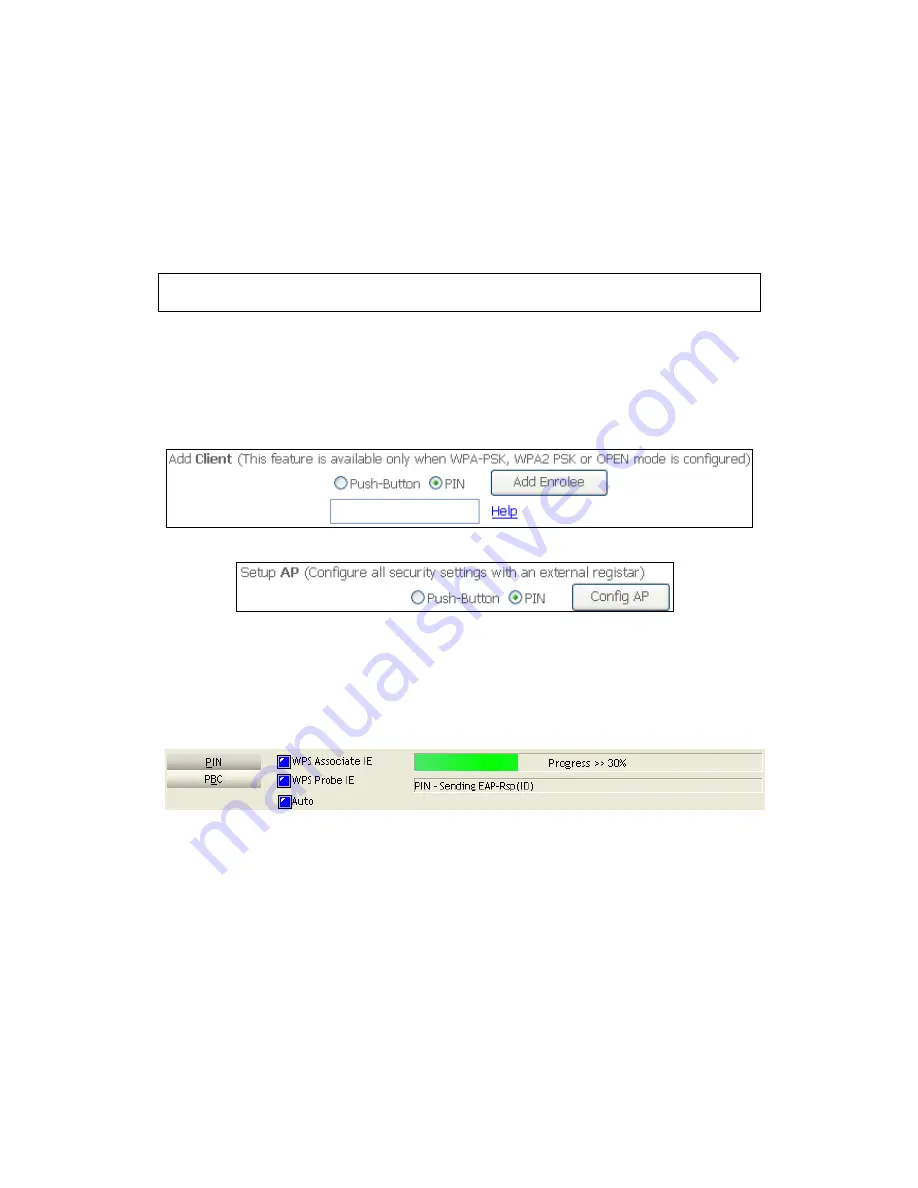
Step 6:
Select the PIN radio button in the WSC Setup section of the Wireless
Security screen, as shown in
A
or
B
below, and then click the appropriate
button based on the WSC AP mode selected in step 2.
A -
For
Configured
mode, enter the client PIN in the box provided and
then click the
Add Enrollee
button (see below).
B
- For
Unconfigured
mode, click the
Config AP
button.
Step 7:
Activate the PIN function on the wireless client. For
Configured
mode,
the client must be configured as an Enrollee. For
Unconfigured
mode,
the client must be configured as the Registrar. This is different from the
External Registrar function provided in Windows Vista.
The figure below provides an example of a WPS client PIN function in-progress.
Now go to Step 8 (part IV. Check Connection) to check the WPS connection.
Summary of Contents for AR-5382u
Page 1: ...AR 5382u ADSL2 WLAN Router User Manual Version A1 0 June 11 2010 261056 049...
Page 7: ...6 1 2 Application The following diagrams depict typical applications of the AR 5382u...
Page 8: ...7 Chapter 2 Installation 2 1 Hardware Setup BASE STAND ATTACHMENT...
Page 17: ...16 STEP 3 After successfully logging in for the first time you will reach this screen...
Page 56: ...55 5 11 UPnP Select the checkbox provided and click Apply Save to enable UPnP protocol...
Page 57: ...56 5 12 DNS Proxy...
Page 106: ...105 STEP 9 Choose Yes or No for default printer setting and click Next STEP 10 Click Finish...


