Appendix - Qualifier System
3-7
Appendix E: Battery Replacement
Eventually, repeated depletion and recharging of the battery will decrease the battery’s
efficiency and require its replacement. Care must be taken when replacing the battery so as
to maintain the Qualifier meter’s waterproof seal. The following instructions have been
provided to make this possible.
1.
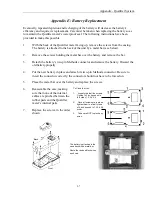
With the back of the Qualifier meter facing up, remove the screws from the casing.
The battery is attached to the back of the unit by a metal bar (see below).
2.
Remove the screws holding the metal bar over the battery and remove the bar.
3.
Detach the battery’s two-pin Methode connector and remove the battery. Discard the
old battery properly.
4.
Put the new battery in place and attach its two-pin Methode connector. Be sure to
insert the connector correctly; the connector should not have to be forced on.
5.
Place the metal bar over the battery and replace the screws.
6.
Reassemble the case, making
sure that none of the internal
cables are pinched between the
rubber pads and the Qualifier
meter’s internal parts.
7.
Replace the screws, in the order
shown.
Back
Front
To Close the Unit:
1.
Loosely reinstall the screws.
Tighten to 2 inch pounds in
this order; 1,2,3,4,5,6.
2. Once all screws are in place,
tighten them to a final torque
of 4 inch pounds in 1,2,3,4,5,6
order.
3. Take care NOT to pinch any
wires.
The battery is attached to the
case back with a metal bar.
Route the red and black wires
as shown.
Summary of Contents for CyberTek QUALIFIER
Page 2: ......
Page 8: ...Qualifier System iv This page intentionally left blank...
Page 47: ......
Page 48: ......


